

A decade ago, I was captivated by the article The Secrets of the Houston Warehouse, one of the most popular and most quoted pieces ever printed during Precision Shooting Magazine’s 56 years of publication. That landmark article, originally published in 1993, shared the findings of a group of Benchrest shooters who turned a vast Houston warehouse into a precision rifle laboratory.
The Houston warehouse had a 325-yard straight-away through the heart of it, which provided an ideal shooting environment – where the wind never blew, the rain never fell, the mirage never shimmered, and the sun never set. So began some of the most insightful and revealing experimentation into practical rifle accuracy ever conducted. Over six years, the levels of accuracy achieved in the Houston Warehouse went beyond what many precision shooters thought possible for rifles aimed shot-to-shot by the human eye.
The warehouse experiments reshuffled the list of what did and didn’t matter in precision shooting. They blew away many myths that had been long held by the shooting community (some still stubbornly held 30+ years later) and elevated other elements previously thought to be of no consequence. Their findings rocked the shooting community and continue to enlighten to this day.

Dr. Harold Vaughn also used a shooting tunnel to conduct his precision rifle experiments published in Rifle Accuracy Facts. Dr. Vaughn was a leading scientist at Sandia Labs and arguably contributed as much to our understanding of modern weapons and ballistics as any other figure in history.
“I have found the Tunnel Range to be essential in doing rifle accuracy diagnostic work because it eliminates the worst variable: wind effects.” – Dr. Harold Vaughn in Rifle Accuracy Facts
The Houston Warehouse and Dr. Vaughn sparked a dream that has been bouncing around my head ever since: that one day I might have access to a fully-controlled environment that I could use as a precision rifle lab to do my own experiments. I honestly doubted I’d ever get that opportunity, but I’m very excited to share that my dream is about to be realized.
The article below represents my plans as of December 2021, and I largely stuck to these plans. However, I asked for my readers’ input and suggestions in this article – and I got a lot of great ideas and was able to integrate many of them into the project. So, in February 2024, I published an update that did a walk-through of the finished project and explained all the changes I made. I consider this Part 1 and the subsequent article Part 2. I’d still suggest you start by reading this article but don’t forget to go check out that one next afterward: Finish Out of PRB’s 100 Yard Underground Range.
PRB’s 100-Yard Underground Range
Last year, I bought 10-acres just a couple of miles outside of town, where I’ve been building a home, a shop, and a fully-enclosed 100-yard underground range. That project has taken most of my free time – which is why I haven’t been publishing as many articles this year. It’s a huge investment, but I’m excited about what I’ll be able to do with a lab similar to the Houston Warehouse right at my house.

Doing experiments like my recent 6.5 Creedmoor match ammo test, my muzzle brake field test, or my massive barrel test that was published in Bryan Litz’s last book requires a lot of time at the range. I’m fortunate to have access to a private range that is just 25 minutes away from my home, but if you add up the round-trip drive time and typical setup/teardown, those things account for almost 2 extra hours each day that I did experiments. If I was out at the range and the wind ever got over 5 mph I’d pack up for the day to prevent the wind from skewing my results. In west Texas, the wind is always blowing! So I’m thrilled about what I could do with this underground shooting tunnel – especially one that is right at my house! I already have a long list of ideas for things I could test, and of course, I’d share the results with you guys.
I reached out to several experts in the industry who helped me with the initial range design, including guys at Applied Ballistics, Accuracy International, and other companies. Aaron Davidson from Gunwerks has built 3 shooting tunnels over the years to test their rifles, and when I asked him for advice for this project, he invited me to fly up to see all of them and experience shooting in them first-hand – and I took him up on it! Aaron graciously shared mistakes he’d learned the hard way, as well as construction drawings, equipment specs, etc. Thank you to all those guys who helped me out!
Now I need your help! I want to share what I’ve done so far and what I have in mind because I’m sure some of you may have experience in an area that could help. I’d love to hear what ideas or products I could use to make it better as I finish it out.
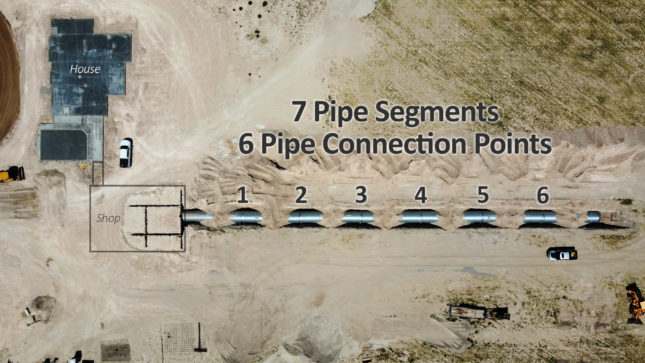
My underground range is basically two concrete rooms connected by an 8-foot diameter corrugated steel pipe. I’ll first show you the plans, and then I’ll share some design choices I’m sure some of you guys may have questions about.


There is exactly 290 feet of corrugated steel pipe connecting the rooms, and the rifle and target are each offset 5 feet into their respective room, providing a total distance of 300 feet – precisely 100 yards. If I decide to move the rifle forward/backward for any reason, I could adjust the target’s location by at least +/- 3 feet without a problem, which is what the red “Target Area” is showing above. There is actually a debate about whether the distance should be measured from the rifle’s muzzle or scope (read more here), but I gave myself enough margin to do either. I didn’t want to make the concrete rooms bigger than needed, but I also tried not to hem myself in either.

I hired a structural engineer to design how the pipe connects to each room, and you can look at the plans he drew up here. In short, we placed the pipe and formed up an 18” wall with rebar in it and poured highly fluid concrete around it.
A friend that has been in the industry a long time and has seen a lot of firearm R&D labs made a suggestion for the shooter’s room that he referred to as a “gas expansion chamber.” The basic idea was to stick the rifle’s muzzle through a porthole into a small room just in front of the tunnel that is isolated from the shooter, and that would be the place that absorbs the brunt of the concussion of each shot. In my case, I plan to have plexiglass doors that I could close, and there would be portholes in the doors to stick the rifle’s muzzle through. Below is a diagram of the shooter’s room shown from above. (Note: I’m thinking the “expansion chamber” would extend into the area under the stairs.)

I plan to hang heavy acoustic blankets in that expansion chamber, and I also plan to add acoustic panels on most of the walls in the expansion chamber and the shooter’s room to absorb/dampen as much of the energy as possible. I’ve shot a magnum rifle with a very loud muzzle brake in an enclosed tunnel before, and it actually wasn’t as painful as I thought it might be. You might need to double-up on ear protection, but it didn’t give me a headache. My hope is the “expansion chamber” idea, along with the acoustic blankets and panels, will help make it more comfortable.
On the target end of the tunnel, I plan for my primary target area to be 3’x3’, as shown below. That would mean the bullet shouldn’t ever be closer than 2 feet from the tunnel walls, which seems like a reasonable margin of error. I can’t remember ever shooting at a paper target at 100 yards and missing the mark by 2 feet. You could fit quite a few bullseyes in a 3’x3’ area and not have to change out paper targets all the time.

Note: If you’re like me, you might be wondering how much of an arc a bullet has and if it’d ever get close to hitting the top of the tunnel. The peak of a bullet’s trajectory is referred to as its “Max Ordinate.” Even on something slow like a rimfire 22 LR at 100 yards, the max ordinate is less than 4”. So it doesn’t seem like that should be a problem.
Instrumenting The Range for Data Collection
My goal is to be able to digitally capture as many stats as possible on shots fired in this tunnel, including velocity data and group size data. Because this is an indoor range, and I can do a permanent install (i.e., don’t have to set up/teardown each trip to the range), it seems like there are likely a few new options for how to collect live-fire data.
Electronic Target System
First, I plan to invest in an electronic target system that could automatically provide advanced stats on groups (like mean radius, CEP, etc.) and save those digitally, without having to scan or snap photos of paper targets. Ideally, I would have a large screen in the shooter’s room connected to the electronic target to show the location of each shot and the overall stats. I believe some of these systems can also measure velocity, although I’m not sure how their accuracy compares to a Doppler radar. I know Mark Gordon from SAC uses a Silver Mountain G2 Electronic Target System, but I’d love to hear other suggestions for the best electronic target systems you guys are aware of that could do that. Please leave those in the comments.
Recording Velocities
I hope to continue to record muzzle velocities using my LabRadar. One of the reasons I went with a large diameter tunnel was to increase the odds it would work accurately. Fortunately, a friend connected me with the inventor of the LabRadar, Guy Desbiens, before I started this project. While Guy couldn’t say for sure if the LabRadar would be able to capture accurate readings through an 8-foot corrugated steel pipe (kind of a niche scenario, I guess), he did graciously pass on a few tips for how to give it the best shot. Guy is the President of Infinition, and they don’t just make the LabRadar, but also very high-end Doppler radars used in government research. He told me the Infinition BR-3503 would provide very high-resolution readings and would for sure work because it is optimized to work over very short ranges, so it only needs a few meters to get a reading. In fact, it can even provide bullet measurements as it travels inside the barrel! But, that system costs around $50K – so I figured I should wait and try out my LabRadar first. 😉 I did go out and measure a few shots over my LabRadar once the pipe was in the ground, and it seemed to provide solid readings. Still, more testing would be necessary to ensure the signal-to-noise ratio is high enough to have confidence in the output.
If you know of good options for instrumenting this range, please let me know in the comments!
Why 8-Foot Diameter Corrugated Steel Pipe?
I connected the two rooms with 16-gauge galvanized steel 3×1 corrugated culvert pipe, which had a 50-year coating on it to prevent the metal from rotting (and even longer in the semi-arid climate where I live). This thickness and 3×1 corrugation is very strong and is the same specs as what they use for drainage pipe under state highways where I live. I believe it’s stronger pipe than is necessary for this, but when the pipe manufacturer heard what we planned to use it for, they said if there would ever be a person in the tunnel, we’d have to use this 16-gauge steel with 3×1 corrugation. That higher rate of corrugation gives the pipe significantly more strength, and I’m sure they saw that as reducing their liability. Now that the pipe is in the ground and covered, I’ve driven over it many times with vehicles and a 5,000+ lb. tractor with no issues.

The most common question you guys might be thinking is, “Why did I choose that over other materials or designs?” I considered a wide variety of options before settling on the corrugated steel pipe, including shipping containers, 3-4’ diameter concrete pipe, concrete box culvert, CMU block, and other options.

Most shooting tunnels I’ve heard about that are longer than 25 yards use either 3’ or 4’ diameter pipe made of concrete or HDPE (high-density polyethylene) culverts. That size and material might be the most economical way to go about it, but here are a few factors I considered that caused me to personally go with the larger diameter pipe:
- Safety: While there aren’t many of these tunnels in the world, as I talked to a few people in the industry about this project, I heard stories of at least two professional indoor ranges on different continents that burst into flames and had multiple casualties. The fires were so fast and hot that those inside weren’t able to escape. Did you know that some unburnt powder may come out of your barrel on every shot? When firing outside, the unburnt powder gets dispersed, blown away or buried over time, or otherwise contaminated where it doesn’t readily burn – but in an indoor range, it can accumulate over years. The theory is years of unburnt powder from hundreds of thousands of rounds fueled those fires. While I may never get to the round count that would cause enough build-up to be a fire hazard, cleaning and inspecting an 8-foot diameter tunnel seems way easier than a 3 or 4-foot diameter tunnel. I love to tinker and experiment, but clearly, none of this is worth dying over.
- Mirage: In Rifle Accuracy Facts, researcher Dr. Harold Vaughn provided an appendix on constructing a tunnel range. How helpful! Dr. Vaughn said, “Before building the tunnel range I had talked to several people with some experience with them, but no one seemed to say much about mirage problems, which proved to be nearly as bad as the wind. … When we watched through the scope we could see the reticle move up or down over a total distance of as much as 0.6 inches.” Dr. Vaughn went on to explain the lengths he had to go to in order to mitigate mirage, which was primarily due to temperature differences between the tunnel walls and free air inside the tunnel. To avoid those issues, I doubled the diameter of the tunnel AND buried the tunnel deep, with at least 3 foot of grade above the top of the tunnel. Dr. Vaughn’s tunnel was 4-foot diameter concrete pipe that they laid on the ground and then piled dirt on top of it (see photo below). That is likely why he said, “the top and bottom wall temperatures usually differ by 3°F to 4°F.” My pipe being 3-11 feet underground should result in much more consistent wall temperatures, and a larger diameter pipe should also reduce the odds that I’d be shooting through an area near the sidewalls with a significant temperature gradient, too. However, I am installing a large commercial-grade exhaust fan to move air, as Dr. Vaughn suggested, but that is primarily to prevent lead poisoning – not mitigate mirage.

- Reflection Off Tunnel Walls: Could the tunnel walls somehow affect the bullet’s flight? Could there be some reflection or pressure nuances that might cause the bullet to fly differently than it would in the open air? I was worried about that, so I asked a couple of ballisticians. While it might be plausible if the tunnel was very narrow (e.g., 2-foot diameter) and the bullet traveled very close to the walls, the consensus was it was unlikely that reflection off the walls could impact flight in a 3-4’ diameter tunnel for bullets traveling at the muzzle velocities typical of centerfire rifles (2,500+ fps). Dr. Vaughn wrote about this, too: “The Tunnel Range may not work for transonic velocity (1000 to 1500 fps) projectiles because the normal shock waves will be reflected back from the tunnel walls to the bullet. This can cause instability of the bullet with large dispersion. We know that it doesn’t work for low or medium large-caliber bullets such as muzzleloader or pistol bullets because we have seen oblong bullet holes in the target.” Very interesting! To stay away from any possibility of the walls affecting the bullet flight, I went with an 8-foot diameter pipe. I may never test rimfire or subsonic rifles/ammo, but I didn’t want to write that off as a possibility.
- Flexible Shooting Distances: Because the tunnel is large enough to walk down, it would allow me to fire guns at shorter distances – not just 100 yards. If I want to shoot a rimfire or sight-in an AR-15 at 50 yards or get a newly mounted scope on paper at 25 yards – I could simply walk down and do that. I expect to shoot at 100 yards 99% of the time, but having the flexibility for other distances seemed useful.
- Target Access: The ability to walk straight downrange to change targets or double-check equipment will also be convenient. Most other tunnels I’ve heard about require you to go outside and walk around to access the target area through a hatch. I could even install a target retrieval system in the tunnel if I ever wanted to, but I think an electronic target system may make that a non-issue.
What Else Did I Consider?
Why not concrete walls? While a 4-foot diameter concrete tube might be less expensive than the 8-foot corrugated steel, a concrete pipe that is 8-foot diameter is pretty rare and ridiculously expensive. Frankly, I don’t plan to shoot the tunnel walls. I was concerned about that at first, but thinking back, I couldn’t remember a single time I ever missed a paper target at 100 yards by 2 feet or more. When I’m mounting a new scope, I usually make sure I’m on paper at 25 yards before I move out to 100. I can do that above ground on my new property or go set up in the tunnel at 25 yards before moving back to 100. I also don’t plan to allow kids or novice shooters to shoot in my tunnel. I plan to have a setup above ground to check zero or fire at some steel targets out to 200 yards, and the tunnel is reserved for experiments and advanced shooters.
I initially considered building the tunnel using shipping containers (a.k.a. CONEX boxes) that would be welded together end-to-end. I liked the idea of a flat floor and oversized tunnel. However, burying a shipping container is more complex than it seems. While they’re designed to take a lot of weight in a stacked position, they aren’t built to take the pressure from the sides. When you bury them, there is significant pressure from the earth on the sides and top, so it’s wise to reinforce them structurally to prevent a cave-in. When you consider the cost of the shipping containers plus the expense to reinforce them structurally, it turns out the corrugated steel pipe was much less expensive. Unlike shipping containers, the steel pipe is meant to be buried and has a 50-year coating that will keep it from rotting.
Building the whole thing out of CMU block (a.k.a. cinder block) or concrete would have been fantastic but significantly more expensive. Depending on what material you used, you might also have to take extra measures to seal out moisture, where the steel pipe is well sealed against moisture.
How’d I Connect The Pipe & Make It Water Tight?
End-to-end the pipe measures exactly 290 feet, which combined with the 5 feet into the rooms on each side gives exactly 100 yards. There is a limit to the length of pipe an 18-wheeler can transport, so I had to buy the pipe in 7 sections, 2 that were 40-foot long and 5 that were 42-foot long for a total of 290-foot of pipe.
I obviously don’t want water to leak into the tunnel, especially since I’ll also have electricity running down it from the basement to the target room. The thickness of the steel and coatings on the pipe shouldn’t allow moisture in, but the connection points between sections of pipe is a weak spot when it comes to water penetration, so I had to be a bit creative to come up with a solution at those connections.
Along with the 7 sections of pipe I purchased steel connective bands that were designed to connect the 8-foot pipe end-to-end. However, this type of pipe is typically used for drainage culverts, so the connective bands aren’t made to try to make the connections watertight. After input from a utility contractor and someone who does coatings in the oil-field, we came up with a solution where we used the steel connective bands to connect the sections of pipe structurally, then we completely covered those with a 2 to 3-inch thick layer of closed-cell ground foam. Finally, we coated the foam with a polyurea liner.
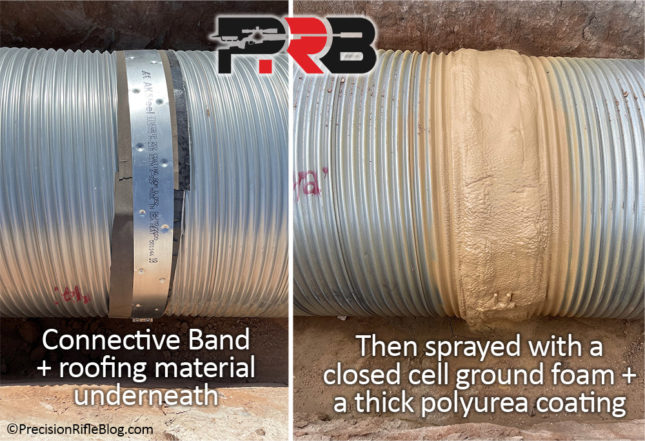
The connected pipe was already laid in an 11-foot deep hole when we applied the foam and polyurea, so we weren’t able to get the very bottom of the pipe, so we plan to apply the same treatment all around the inside of the pipe at each connection point (both the closed-cell foam and the polyurea). That is likely overkill since we get less than 20 inches of rain annually in my area, but I just don’t want to walk in one day to water in the tunnel. Before we got the rooms built on both ends, we got rainwater and runoff in the tunnel, and it was NOT fun to clean out. 😉
Ventilation
Lead poisoning is a very serious concern for indoor ranges, which I didn’t realize until this project. Honestly, I’m not an expert in this area, so this is another area that I figured a couple of my readers might be experts in and could confirm whether I’m headed in the right direction or help me improve my plan.
Indoor ranges must mitigate the risk of lead poisoning with ventilation that moves air away from the shooting line at a recommended rate of 75 feet per minute (the equivalent of 0.85 mph), as well as regularly wiping down surfaces with special lead wipes and other things. The government has ventilation criteria for indoor ranges (read summary), and I figured it is wise to follow those recommendations.
Update on 3/23/2022: After this article was published I got a lot of great feedback in the comments related to ventilation. After some conversations with a few veteran experts in specialized HVAC like this, I decided to hire Carey’s Small Arms Range Ventilation to fully engineer/design a range ventilation solution for this setup. I got the finalized plans yesterday, and I think it was a great idea to hire a pro to help with this portion of the project. Below is what I originally published in the article, but I’ll have an update come out when the range is complete to explain what I ended up going with in more detail. It varies pretty considerably from what I was originally thinking below. I would say if you are planning an enclosed range, I would highly recommend hiring an expert to help with the ventilation design. There are several out there, and I talked to a few of them at SHOT Show 2022, but I’m happy with the work Carey’s did.
A couple of industry pros told me with an indoor range it’s best to pull/draw the air with an exhaust fan near the target rather than pushing air from the shooter’s location. Trying to push air from the shooter’s location can cause air turbulence near the shooter’s position and possibly even cause a backflow of contaminated air.

I did some calculations (see below) as to what it’d take to move 1 mph of air down an 8-foot diameter tunnel (i.e., 4-foot radius circular duct), and it looks like that volume flow is around 4,423 CFM. If you do the same calculation at NIOSH’s recommended airflow velocity of 75 feet per minute, you get 3,770 CFM.
Based on the recommendations I’ve got so far, I plan to buy a RuppAir DU240HRA commercial-grade exhaust fan, which is adjustable from 4,000 to 7,000 CFM. I thought it’d be better to have a margin of error on the upper end of the range in case I need more than I think – rather than get to the end of the project, and it isn’t moving enough air to keep me safe.

I plan to mount the upblast exhaust fan on the roof of the target room and have it perfectly centered with the tunnel behind the target to minimize turbulence near the target. I plan to have a wall switch in the shooter’s room to turn the exhaust system on or off.
On the other end of the tunnel where the shooter is, I have a 48” x 48” hole in the slab where I plan to run a fresh air duct that will draw air down into the basement from the northern-facing wall of my shop. My HVAC contractor initially calculated how large the fresh air duct needed to be, and he thought a 28” x 36” duct would be adequate. But, after he discussed it with an engineer, he recommended we upsize it to 48” x 48”. I guess like the exhaust fan, having more airflow if necessary is better than not having enough. If you are going to “fall off the log” one way or the other, it’s probably better to have more air than not enough.
I am thinking within the shooter’s room, I would split the fresh air duct into 4 registers (marked in the diagram below by the 4 yellow boxes, with the red line being the fresh air duct). The registers would be centered on the tunnel to try to prevent air turbulence near the shooting line. One downside of needing to bring in fresh air is that when it’s blazing hot outside or freezing cold, I’ll be drawing that air into the range. I plan to install a radiant heater above the shooter’s location to help make it more comfortable during the winter months and will use a fan in the summer months. I also thought this 4 register setup might allow me to shut the vents farthest from the tunnel if the air was too uncomfortable, and most of the air drawn downrange would be from the 2 registers in the expansion chamber area. Having 4 registers that could be adjusted independently might also help me fine-tune where the air comes from to minimize air turbulence. I figured I could use an HVAC smoke test to visualize how the air moves and make adjustments.

I do plan to have the switch to turn the exhaust fan on/off in the shooter’s room, so if it does cause air turbulence that I feel could potentially impact bullet flight, then I could switch it off to fire a shot and then flip it back on to clear between shots. However, I doubt that is necessary since we are only talking about 1 mph of airflow straight down the tunnel from the shooter to the target.
Ultimately, this is a sensitive part of the project because while I’m very excited about all of this, it isn’t worth risking my health over. If anyone is an engineer or HVAC professional that specializes in this area, please let me know in the comments if I’m headed in the right direction or what you’d do differently.
Bullet Trap
I originally designed the target room to use a traditional bullet trap, as you see at a commercial indoor range, which is a berm of small, chopped pieces of rubber. However, as I learned more about those, I realized that as part of the long-term maintenance to keep the berm functional, you have to rake and maintain rubber levels and occasionally clean it by mining/separating the fired bullets from the rubber (maybe every 80,000 rounds). The process of separating the lead from the rubber can be a very specialized and time-consuming task. Often when a bullet goes into this kind of trap, it tumbles as it slows down and the lead core separates from the jacket, which means there is extensive lead exposure inherent any time you touch the rubber. In fact, cleaning the berm is so dangerous that everyone involved should be outfitted with a complete hazmat suit and certified respirators. That’s why it’s common for indoor ranges to contract this cleaning process to a third party that specializes in the process. This type of rubber berm also requires about 15-foot of space, which means the target room would need to be much larger – and since it’s a concrete basement, that means much more expensive.
The truth is I won’t be firing as many rounds at my private range as a bullet trap at a commercial range would need to support, so I started looking at other options like a total containment trap using steel deflection plates and other solutions. Those only need about 8 feet of space, which is much less than a traditional rubber berm, but it’s still quite a bit more than another solution I found.
After a lot of research, today, I am leaning toward simple ballistic rubber blocks. I’d seen those before at SHOT Show but really didn’t understand the benefit of them. The way I understand it, unlike most other bullet traps, ballistic rubber virtually eliminates ricochet and splatter and reduces airborne lead by 99%. That’s because when a bullet hits this bullet trap, it gets fully encapsulated, and the lead core never has a chance to be exposed.

These ballistic rubber blocks come in various dimensions, but I’m leaning towards something like Range Systems Dura-Bloc, which is 24” wide x 12” deep x 9” tall. Each block weighs around 75 lbs., and you just stack them on top of each other to build a wall. One manufacturer told me a ballistic rubber bullet trap for the average home range is 10 blocks high x 10 blocks wide, and each block can take about 5,000 rounds. After you get around 5,000 rounds on the same block, you simply swap the blocks around.
I’m planning for my bullet trap to be around 10 feet wide and 9’ 9” tall, which would require 65 blocks. If I got 5,000 rounds out of each block by swapping them around, this solution should last over 300,000 rounds. I usually fire less than 5,000 rounds per year total (most at long-range, not at 100 yards), but even if I doubled that with this new range being right at my house and fired 10,000 rounds per year at 100 yards – this bullet trap could last up to 30 years!
Here is a demo video of a ballistic rubber bullet trap: https://youtu.be/koAN0lTDASg.
I got a quote for 65 Dura-Bloc delivered to my location for $6,206. So, it’s not cheap, but it is less than a lot of the other options and seems like the least hazardous to my health. Once I decided to go with rubber blocks for the bullet trap, it allowed me to shrink the size of the target room because these only need roughly 1 foot of depth – compared to 8 feet for a steel trap or 15 feet for a rubber berm. That cost savings resulting from the reduced room size is significant since this is entire range is underground.
In addition to the rubber blocks, I also plan to mount a 1/2 inch thick AR-500 steel plate to the wall behind the blocks. That would be my fail-safe, in case I ever shot more in one spot on a rubber block than I should have, and a bullet penetrates all the way through. I’m not sure if that should be a genuine concern or not, but I figured it would be better than having damage to the concrete wall. I plan to drop an 8’ wide by 9’ tall piece of steel in the room using heavy equipment before the framers start building the roof of the target room.
If you guys have any tips related to bullet traps or recommendations for the brand of ballistic rubber blocks, please leave them in the comments.
Electrical & Lighting
I’ll briefly touch on what I plan to do for electrical and lighting down the tunnel and in the target room. I plan to run power in conduit from the basement through the tunnel to the target room. I plan to weld L-brackets to the side of the pipe to support the conduit, and might place those support brackets every 10-15 feet. I figured running the electrical on the side would reduce the odds that I’d accidentally hit it with a bullet one day.
I plan to do LED lighting in 10-yard increments through the tunnel. I plan to weld a bracket to mount a light to at the top of the pipe. I’m not sure what kind of lights I’ll use, although I’d like them to be low profile to reduce the risk of a bullet impact. This lighting is simply to keep me from tripping in the dark when I walk down the tunnel, and I’d keep them off while shooting. I initially thought I might do a wood platform/walkway in the bottom of the tunnel, but honestly, it is easy to walk in with how much corrugation this pipe has.
I want bright, even light on the target, so I plan to mount a few LED strip lights in the target room on the same wall as the tunnel to point directly at the target. I haven’t researched what lights those should be. I thought if I had outlets in the target room that flip on/off with a switch in the shooter’s room, that would give me the most flexibility to add/change lights in the future without having to hardwire them and still be able to control all of them from the shooter’s position.

If you guys have any suggestions for electrical or lighting, please share them in the comments!
How You Can Help
At this point, the pipe is in the ground, and the concrete rooms on each end are poured. So, the room dimensions can’t change, but I haven’t framed the shooting or target room or purchased any of the items I plan to outfit the rooms with (i.e., bullet trap, exhaust fan, etc.). So if you guys have recommendations for how to improve things at this point, I’d love to hear about them in the comments!
Thank You!!!
This project is largely happening because of how my readership and the influence of PrecisionRifleBlog.com have grown since I launched it almost 10 years ago. Thank you guys for your vote of confidence and for helping me get to this point! I have many ideas for things I could test with this new fully controlled range, and I can’t wait to see what we all learn!
Part 2: See The Finished Tunnel & Learn About The Changes I Made
The article below represents my plans as of December 2021, and I largely stuck to these plans. However, I asked for my readers’ input and suggestions in this article – and I got a lot of great ideas and was able to integrate many of them into the project. So, in February 2024, I published an update that did a walk-through of the finished project and explained all the changes I made. I consider this Part 1 and the subsequent article Part 2. I’d still suggest you start by reading this article but don’t forget to go check out that one next afterward: Finish Out of PRB’s 100 Yard Underground Range.


Cal I Love it!…. I have been planning something similar for a long time. Id love to connect off line wand pick your brain. But is there any risk of the 16 ga pipe collapsing under the weight of the soil over the top ?
Hey, Michael. There isn’t any risk of the pipe collapsing. It’s the same specs as what they use under state highways here, and I think it’s the same as what they use for drainage under railroads, too. So it can support an 18 wheeler if it’s installed properly. I’m told the pipe is actually not as strong if it isn’t covered by at least 18″ of soil, which is why I buried it at 2-3′ (to ensure I was easily deeper than 18″). That makes sense to me because it seems like that would actually help distribute the weight over a larger area (rather than a point load), and the surrounding dirt around the pipe also helps it keep its form – which is part of how it gets its strength.
I paid a professional utility contractor to lay the pipe and backfill. I also had help from a friend that had installed 12-foot drainage pipe before for the Texas Department of Transportation under highways. There were a few keys like what material you backfill with, and how the pipe connected to the rooms. So if you’re going to do something similar, I hope this helps – but I’d suggest getting a professional to help. I had a dirt work contractor, utility contractor, structural engineer, and the best basement guy in our area – and it was still pretty complicated! But I’m very happy with how it turned out, and I’d definitely choose to do it this way again.
Thanks,
Cal
As usual a lot of hard work thanks for doing it
You bet, Kent. I’m pretty passionate about this stuff, so it doesn’t feel like hard work to me!
Wow, an extraordinary project. Glad you are being extremely aware of ventilation as re possible lead exposure. A friend of mine was training instructor at a large newly built range for one of the contractors providing diplomatic in Kabul – supposedly well designed by experts. There was full auto fire and a lot of use. He came away with very high levels of lead in less than a few months and the range had to be shut down and redesigned.
Yes sir. I didn’t realize how big of an issue it is in enclosed ranges. I guess shooting outside allows us to be blissfully ignorant to that fact. At least one of the professionals I talked to that operates a range like this has his guys that use it all the time get their blood tested once a month to check for elevated lead. They have a lot of protocol on cleaning surfaces, and touching things down range.
I actually plan to get my blood drawn to check for lead over the first 6-12 months once I start using this … just to make sure everything is working as it should. Lead poisoning sounds a little difficult to diagnose, but it’s pretty simple to see it in a blood test before it becomes an issue. I doubt I test my blood forever, but plan to early on.
Thanks,
Cal
Very well thought out plan. The only suggestion I have is make sure a Left Handed person can use the bench in the Shooter room.
Ha! You crazy lefties! Honestly, I’m not sure how many other people I’d let shoot in this tunnel, and I’m a righty … so I guess the lefties will just have to keep shooting outside! 😉 Honestly, I’d bet I fire most rounds from a prone position, and that would work for lefties, too. Thanks for the tip!
Thanks,
Cal
Cal,
This is shaping up nicely.
I don’t like radiant heat above my body, as you have described your intent in the shooters room. It makes my ears and head hot, which I find really annoying after just a short while. I suggest you find a way to blow warm air across the floor instead. Even space heaters work better. The rising air will keep you warm across your body.
Thanks for the tip, Larry. Your suggestion for blowing warm air across the floor gave me an idea. Heating a space with radiant floors is actually a very efficient method to heat a room. But, with the airflow, I think if you tried to heat the air you’d lose most of it downrange, which is why I was leaning toward radiant heat. However, what if I could heat the bench/table somehow that I was lying prone on or where I was sitting? A really simple method would be to have a heating pad under a shooting mat, and as I’m laid out prone it would probably be really effective at keeping me warm, if I’m shooting in there on extremely cold days. It’s an interesting thought.
Thanks for sharing!
Cal
Stay out of the firing room during thunderstorms. Possibility of high voltage differences between tunnel and wiring during possible very close discharges.
What a neat dream setup!
Very interesting. That isn’t something I wouldn’t have thought about. Luckily I live in the desert and there aren’t many thunderstorms, but good to know.
Funny enough this basement/tunnel is going to double as a tornado shelter – I guess for me and my 500 closest friends. While we don’t get a lot of storms, we do occasionally get tornadoes. We had one touch down just a couple of miles from where I’m building this earlier this year. I was in one a couple of years ago not far away – and that near-death experience made me want a tornado shelter.
Thanks,
Cal
Cal Zant
Congratulations on your wonderful project, we readers will definitely enjoy your efforts.
Greetings from Brazil
Thanks, Humberto! It’s been fun to dream about what I could test inside this underground range. My reloading setup will be right there, so it seems like it’ll open up a whole new area that I could explore. Honestly, if I’m able to test for 30 minutes or an hour a couple of nights during the week, and maybe a few hours on the weekend – and not have to travel and setup/teardown between outings – it seems like I could collect a lot more data. Can’t wait to get started!
Thanks,
Cal
Just an idea. Save yourself the lighting. A headlamp is sufficient for a few passages. With best regards from Germany Frank Pitschke
This sounds like a great project and am really looking forward to reading about all of the projects that you do after you get the range done. I really enjoy all of your blog posts, especially the last series about 6.5 ammo. I can see that you are having a lot of fun with this build.
I just saw this tonight and did a quick read through. One thing that jumped out at me is that you plan to weld brackets to the top of the pipe. I’m thinking that might not be a good idea as you are working with galvanized material and welding it would compromise that coating, not to mention other issues with welding galvanized steel. Maybe some light steel framing would be better. You could even have electrical conduit shaped in a roll bender that would follow the contour of the corrugations in the buried pipe and would be essentially self supporting. I am an amateur and I know you asked for expert advice, so take it for what its worth!
Very interesting, Richard. I hadn’t thought about how welding might impact the coating on the metal. I honestly don’t need the coating on the inside of the pipe, since the outside is what will be in contact with the soil and moisture. Most of the time this is used for drainage pipe under highways, so it’d have moisture inside and outside – which is why it’s coated inside and out.
Honestly, I thought being able to weld on the inside of the tunnel was an advantage over other materials. I do know that you need to wear a respirator and have ventilation when you’re welding on galvanized metal.
Do you think welding on the inside would harm the coating on the outside? I guess the heat might break it down or something. I’m not sure, but it’s something to consider.
I’d also thought about just leaving the conduit in the bottom of the pipe and building a flat, wooden walkway over it (like a bridge), but if water ever gets in there … that seems like a really bad idea.
Using some kind of steel that runs in the grooves of the corrugation is an interesting idea. I sure like the idea of welding something like that out of the tunnel and then installing it, instead of spending a couple of days welding inside that pipe!
I appreciate the comment. That is certainly something I hadn’t thought about.
Thanks,
Cal
Cal, have you seen the series of videos that Colin Furze has published on YouTube regarding the tunnel he is building under his yard? I was thinking it could provide inspiration.
Have you considered building the flat walkway out of steel? That would provide the “utility space” underneath for conduit and anything else you need to send downrange (compressed air, data cabling for the electronic targets, etc.). And it would provide a flat surface to walk on. The frame for the steel walkway could be welded into 5-10′ sections to allow for maintenance and the weight of each segment should not require it to be welded to the pipe.
Like Richard, I am not an expert, so I hesitated to give you feedback, but I am thrilled with your project and very happy for you! All happy thoughts and best wishes.
Thanks, Jason. I haven’t seen that video series but may try to find it.
The walkway out of steel is an interesting idea. Someone else had suggested encasing the electrical line in concrete at the bottom of the pipe, but steel sheets might make a lot more sense and still protect the conduit in the same way – but also be removable if I ever needed to run other wiring down the tunnel. That’s a really interesting idea. I had thought about a wood walkway, and obviously the concrete the other reader mentioned, but the steel makes a lot of sense and honestly it might be pretty ideal. The only thing that makes me hesitant is electrical being in the bottom of the tunnel, in case water ever gets in there. But, honestly I feel like I’ve done a good job mitigating that risk, and it’s likely a relatively low risk with how dry it is where I live anyway.
Hey, Jason. That is a great tip, and one I honestly had not thought of. Thanks for taking the time to share it.
Thanks,
Cal
Richard is correct in that welding would remove the coating, as a mater of fact it is extremely toxic to weld and you would need a specialty respirator.
You could utilize an epoxy bond here as well over welding. There is heavy duty construction adhesive or JB Weld as an example of a 2 part compound. This way you could stay fairly low tech but complete it quickly and not worry about other adverse effects. Some epoxies could react with the coating but as long as you are getting something for metal this should be completely mitigated. The epoxy does put off fumes but using your ventilation system or a decent 3m respirator would solve that quickly.
Also, consider making sound absorbing devices you can hang or otherwise place before, after and inside the tunnel to help reduce sound waves. To include inside of the shooters room.
Thanks, Joe. I think I’m convinced that welding is a terrible option. I was definitely headed in that direction and had even talked to a couple people about how to go about it. I did know you need a special respirator, but wasn’t thinking about how it might damage the coating. I plan to try magnets first, but if that doesn’t work a two-part epoxy would be the next best option.
I hadn’t thought about hanging acoustic panels or any type of sound-absorbing devices in the tunnel. I was going to put them in the shooter’s room, but it’s an interesting idea to place them in the tunnel, too. They might be difficult to clean and could easily get contaminated, so I’m not sure if I’ll start off with them in there, but I might experiment with some and see what kind of impact it has. My main plan is to double-up on ear protection, with both in-ear and over-ear protection. So all of the other mitigation with acoustic panels or blankets is more about absorbing the energy of the concussion to make shooting in the roof more comfortable.
Thanks for sharing your thoughts!
Cal
…it’s all about lead in the air,lead in your trap and filters…..I’d think about filtering the exhaust and intake….you seem to have the rest covered…..led lighting strips with adjustable lighting temp?….needless I wish I had your setup…..maybe refrigeration to test cold weather performance!….take care and happy new year..
Thanks, Pierre. I definitely plan to filter the air coming in the fresh air intake (because it’s so dusty where I live), but why would I want to filter the exhaust? It’s 100 yards from my house, so I guess I just don’t understand why I wouldn’t want to blow any contaminated air straight out.
The adjustable lighting temp is an interesting idea. I’ve noticed a lot of LED lighting strips actually come with that now, so it might be an easy thing to include. I’ve done some scope optical performance testing in the past, and I’d assume that if I ever did something like that again I’d use this 100-yard range to do it.
Funny enough, one of the experiments I hope to run in here is testing ammo of different sizes at a bunch of different temperatures. So it’s funny you mentioned using refrigeration to test cold-weather performance.
I honestly thought about integrating an ERV air exchanger that would mix the incoming fresh air with conditioned air, so that you aren’t blasted by cold or hot air from outside. Honestly, the way I’ve positioned the fresh air duct, it will be running within a foot of the air handler for my shop, so I could always add that later if it really is uncomfortable. I bet it’ll be alright though. It won’t be any worse than the cold temps I’ve done experiments in before outside.
Thanks for sharing your thoughts!
Thanks,
Cal
For the exhaust filter I’d like to see how much actually gets to the exhaust point…..another data point I guess…but now that I think about it you have blocks to catch the bullets so the lead/copper dust should be minimal….I suppose the gasses from firing might be some thing to watch…the chemistry of that might be something ….but I await for your updates with great interest…..
Pierre, a guy named Brad left some comments related to that point. He sounded like he was well-educated in this area (you can read a few of the comments he left and see that). Here is what he said on that topic:
So, yeah. I’d expect virtually all of the particles coming from the rifle to settle somewhere in the tunnel before they made it to the exhaust fan. And, like you said, because the blocks fully encapsulate a bullet and don’t make it tumble and come apart – there is minimal lead exposure at the bullet trap. Range System specifically claims that “Our ballistic rubber virtually eliminates ricochet and splatter while also reducing airborne lead by 99%.” Reducing it by 99%! As I’ve been learning how dangerous lead exposure is and how insanely careful you need to be with an enclosed range, that was a big selling point.
I feel like I’ve already learned a lot, but I can’t wait to get in there. I know there will be more to learn as I go.
Thanks,
Cal
Great project. I suggest you consider the ShotMarker electronic target for your range.
Looking forward to the completed project.
Thanks, Henry. I had heard of the ShotMaker and seen it used at a couple of the big, long-range matches. I just Googled it and found an article that made it seem like Adam MacDonald from AutoTrickler.com might be the inventor. I actually referenced a ton of stuff that Adam wrote when I published my Statistics for Shooters series about a year ago. If Adam is behind it, I bet it provides the kind of advanced group statistics I was hoping to find in a system like this.
Thanks for the tip! I’ll try to see if they’re around at SHOT Show, and maybe I can play around with the system there.
Thanks,
Cal
I am going to say upfront I am no expert at this but I am usually pretty good at spotting problems. So a couple of points to consider.
1) Ventilation because of lead contamination is important, but that flow rate is really for an open shooting space like in an indoor gun range. You basically have a pipe with a rifle in it and a much lower flow rate with guarantee negative pressure in the shooting room would be enough to make sure all gun smoke moves down the pipe.
2) Why worry about the speed of ventilation? Because here you are trying to determine extreme accuracy and the air flow could affect your results. There was none of this at the Houston warehouse so you are adding a variable in.
3) The fact that you are using a corrugated pipe potentially may affect your results because this type of pipe does not have a smooth side and that means you can potentially have turbulent air flow which could affect ballistics. Notice the other enclosed rifles ranges have smooth sides. How much I don’t know but I would suggest caution until you know.
So the point is with the potential for turbulent air flow, the rate of air flow may be an important criteria to look carefully into.
Thanks, Joseph. I can tell you’re a sharp guy. I think you are right on #1, but I figure that NIOSH has those recommendations for a reason. Their recommendations were specifically for an air flow velocity. It is relatively minor (less than 1 mph), so it isn’t like I’m blasting air down range. I guess the risk of lead poisoning has me hedging a bit when it comes to air flow.
I agree on #2 also. That is why I’m adding a switch to turn the exhaust fan on/off in the shooter’s room. I plan to test all kinds of things in this new controlled environment, but the first thing I will thoroughly test is if the fan being on has any impact on how the bullet flies. If it does, any time I’m doing serious precision testing I will make sure the fan is off for every round.
#3 is an interesting point. I think the pipe is so large that it would be in the noise. That is one of the reasons I went so big. I didn’t want any nuances about the sidewalls possibly be able to impact how a bullet flies. I do think doing an HVAC smoke test with the exhaust fan on would tell you a lot about whether there is turbulent air or not.
Perhaps instead of going with an exhaust fan that ranges from 4,000 to 7,000 CFM, I need to go with one that has a margin of error on both sides (like 2,500 to 5,500 CFM).
Anyone else have input on this?
Thanks,
Cal
Higher airflow will be always better for removing contaminants. Us heating and AC guys use the term air changes per hour (ach). If your room is approximately 22x17x13 (approx 5,000 cu ft) then 85 cfm would give you approx 1 air change per hour in your shooting room. I would stay at or above the 4,500 cfm which is about 53 air changes per hour which meets the OSHA removal requirements. You want the air to wash over what you are trying to protect which is your body/nose so I would suggest a minimum of 25% of the air behind you, 25% near your breathing area and the rest can go near the muzzle to wash away contaminants. In an hospital operating room we would blow the air directly over the patient to blow contaminants down and away.
As far as heat goes, radiant heat will heat any exposed skin faster than the rest of you but it can be very effective. You could even go with a portable propane “Mr Heater – buddy heater” to try out the radiant heat option before spending too much money. As noted in an above comment, radiant heat pads underneath you will probably be more effective at keeping you warmer. Get something that goes under a rug (amazon has many options) and you are set.
Also, when sizing the ductwork and grills for your intake system, make sure you are not too small/restrictive (this creates pressure drop). It will make the shooting room a negative pressure. Too much negative pressure and you will not be able to open the door to get out while the exhaust fan is running. No big deal until you have an emergency. Once you get things built, you will want to check. If you need any help in sizing anything, hit me up.
Brad, that is VERY helpful. Thank you for the thoughtful comments. Honestly, it sounds like I was getting a little too aggressive on my exhaust fan. Based on what you and a few others commented, it seems like instead of getting an exhaust fan that is adjustable from 4000-7000 CFM, I should be looking more in that 2500-5500 CFM range. The NIOSH minimum is 50 feet per minute, which equates to 2513 CFM inside the pipe – but as you mentioned the airflow in the pipe is not exactly the same as air exchanges in the shooter’s room per hour. So how you explained it makes sense to me, too. That just tells me 7000 CFM is way overkill and I’ll probably land closer to around the 4,500 you suggested – but some margin of error on either side to test/adjust when it’s actually completed and running is wise.
I haven’t ever even heard of a warmer under a rug, but I’ll check it out.
I definitely think the 48×48 fresh air intake duct will be adequate, but I’ll be careful to not pinch it down if I run it to separate registers.
Thanks for taking the time to share the thoughtful comments. It’s VERY helpful, and I’ll make adjustments based on what you suggested.
Thanks,
Cal
Hey, Brad. I have a question about your comments. I like how you went to air changes per hour of the shooting room. I’d only thought about air flow through the tunnel before that and I always felt like that was only part of the issue. But you said “4,500 cfm which is about 53 air changes per hour which meets the OSHA removal requirements.” What is that OSHA requirement you’re referencing? The only OSHA standards I can find don’t have anything to do with “30 micrograms of lead per cubic meter of air (30 µg/M3) as an eight-hour time-weighted average” as the action level, or “50 micrograms of lead per cubic meter of air (50 µg/M3) as an eight-hour time-weighted average” as the permissible exposure limit. That actually isn’t very helpful for me, because it’s more defining the result and not the method to prevent it. Things like airflow velocity in linear feet per minute or air changes per hour are more actionable recommendations, but I couldn’t find anywhere that OSHA references how many air changes per hour you should have in an indoor shooting range or equivalent environment. I searched for probably 30 minutes and just thought I’d come back and ask if you could point me in the right direction.
Thanks,
Cal
Another item to consider is the push fan or the pull fan. It really doesn’t matter which way you go. Air is air and if you pull it through, you create a negative pressure system as I noted above and will pull dust and particulate through all of the cracks on the intake side/shooting room. If you push the air through you create a positive pressure system and will push any contaminants out any cracks you have. The other issue is noise. A fan of 4,500 cfm will be fairly loud though probably not an issue with ear protection. If it was me, I would supply the air to the space. That way you pressurize the entire system. I don’t like the idea of creating a negative pressure and not being able to open the escape hatch. With a negative pressure of just 0.1″ you might be stuck.
If you go with a perforated supply grill, for reference look up http://www.hartandcooley.com PDR grill (it is a return but you are not trying to control the air just diffuse it). A 24×24 will flow 1,500 cfm without creating a lot of pressure loss. You could locate 2 at the muzzle then use 2 more grilles at 750 cfm each at the back with an 18″ neck.
Very helpful! Thanks, Brad
I did a bit of back of the napkin calculations to see if the airflow was high or low compared to what lead might be present.
I assumed you would be shooting a cartridge with a 60 grain load of powder (0.1% of the powder converted to equivalent micrograms in lead – (60*.001)*.0648 grams/grain*1000000 microgram/gram = 3,890 micrograms per shot). Then 3890/35.32 cuft/m3 = 110 micrograms per cuft. The allowable limit from OSHA is 1.4 micrograms per cuft (50/35.3 cuft/m3). If you remove 4,500 cfm then you will disperse the lead into that volume (110/4500) = .024 micrograms of lead (per shot).
If you exposure limit per OSHA is 1.4 micrograms per cuft over 8 hours then you would have to shoot 57 times per minute for the total duration of 8 hours to reach the exposure limit.
As noted above, this is a very loose equivalence to help me get to the idea that 4,500 cfm seemed to be a good upper number. My biggest assumption is the amount of lead dispersed by the primer/powder in each shot. I couldn’t find any real data on the true amount of lead in the primer makeup so just took a shot at something I could calculate. It is probably a great deal less than I assumed.
There one item I didn’t calculate is capture velocity of lead vapor in the air but the tunnel is so large that you could never achieve anything near what would be necessary. The primer creates a lead vapor that is heavier than air. I couldn’t find any data on the volumetric weight to calculate an air velocity that would keep it entrained. Based on what I know of fume hoods, you would probably need 1,000 FPM or faster to keep it entrained for the full length of the tunnel so it didn’t fall out to the floor. Your 8 foot tunnel is around 90 FPM. You will likely get lead dust buildup in the floor of the tunnel over time but as long as the air is moving away from you and you don’t go stirring that up, it should not increase your exposure limit. If you walk down that tunnel, I would recommend a proper fitting OSHA approved face mask with HEPA cartridges. Plus a good HEPA vac would allow you to clean it up.
A bit long winded but I hope that helps.
VERY helpful, Brad! I had no idea it was that complicated to get to that number, but it makes sense. Thanks for helping me figure it out!
Thanks,
Cal
Hi Cal
What a great project. I hope everything works out for you.
Paul
Thanks, Paul!
Awesome project. I am not expert in any of it, but having dealt with confined spaces and confined space entry at work you might want an additional fan control up in the workshop, and do an air exchange before you enter the below grade structure.
Any low oxygen air or contaminates from your shop can pool and reduce air quality.
Good thought, Danno. I do plan to have an air filtration system for the workshop above. Honestly, the room the stairs are in will be a relatively clean “gun shop” where all my reloading equipment is and I clean/work on guns, and I’ll also have a dedicated photography setup with backdrop and lighting for the blog. I put up a wall to divide that room from my general workshop area when I’d have woodworking and metalworking tools and do things like paint. So just describing it as a workshop above might not tell the whole truth, since it’ll be more of a clean environment.
Thanks,
Cal
This looks awesome.
Did you consider a sump pit in the rooms in case you do get water?
Did you test for radon?
Thanks, Ben. I didn’t do a sump pit … but kind of did. I dropped the floor of the target room 6″ below the floor of the tunnel, and the shooter’s room is 6″ higher than the floor of the tunnel. So if water ever does get in the tunnel I could drop a hose for a pump through the egress hatch on top of the target room and pump the water out. I will say that one problem with the corrugated pipe is you can’t get water out of the bottom of it very easily. (Ask me how I know!) It doesn’t flow like it would in a smooth-wall pipe.
Having said all that, I live in an area that is really dry. It’s technically a semi-arid climate because we only get around 20″ of rain annually. So the odds of getting water in the tunnel are probably pretty low. I did also put the range on the higher side of my property, just to be extra sure. Honestly, with how we built the basements and how we sealed the pipe connections … I can’t imagine how water would get in.
I didn’t test for radon. I’m in an area of Texas that has a relatively low risk of high levels of radon … but now you got me thinking about it.
Thanks,
Cal
Your ventilation system should take care of any radon you might have in the range. I used to live in Indiana South, just about a mile south of Lubbock. When we purchased that house a fan was running in the basement to vent the radon gas. It lowered the level enough to be acceptable at the time. Stagnant air allows it to accumulate to just above unacceptable levels.
Have you thought about an epoxy coating for the floor? It could flow into the corrugated area and make a flat walking surface while helping with the water issue.
Hey, Trent. Very helpful. I hadn’t thought about an epoxy-coated floor, but that’s an interesting idea. It would actually be watertight and if there was ever water in the tunnel it could actually help it flow to the target room where I’d drop the sump pump. I’m not sure what something like that would cost, because it seems like it’d be a lot of material (100 yards long, at probably a couple of inches deep). I have a friend who owns a company that specializes in those kinds of floors, so I might reach out to him and ask. Thanks for the input!
Thanks,
Cal
First thing, nice project but 100 yards seems too short to get drop measurements that can be extrapolated out to long range with sufficient accuracy, 300 yards would seem like a more reasonable length except for the budget.
Second, noise is a big issue indoors so I would bury the tunnel but make the shooting bench open air and probably incorporate a pretty long used tire sound control line to shoot through. I would have a roof over the shooting bench and tire line but would want a full 360° that the pressure wave can escape. A mild side wind for a few feet before a bullet enters the tunnel is probably not enough to cause meaningful windage errors.
Third, I would have done the exterior seal over the full 360° of culvert and made the culvert shape a parabola for drainage out of the ends so it does not want to collect water in the center.
I would get a long plastic sheet to run inside the length of the culvert and cover that with some gravel to create a walkable bottom in the tunnel, bury conduit and maybe put in a target stand railway.
Having a way to limit airflow inside the tunnel during a shot is good for ballistics but creating a natural draft will be the best way to make sure the GSR and lead don’t hang in the air at the shooting bench.
Hey, Dan. Thanks for sharing your thoughts. Of course it’d be awesome to have a longer tunnel. 1,000 yards would be amazing! But, I’m not sure you can’t learn an awful lot at 100 yards. You know what is funny? In the Houston Warehouse they had a 325-yard straightaway, but they typically only shot at 100 yards. That actually bothered me for a while when I first read the article, but the longer I’ve shot the more I think I might agree with them. I think you can diagnose or fine-tune most precision work at 100 yards. I realize that is a hot topic and a few long-range guys do all their testing at distance. Obviously, I’m not saying you shouldn’t test your loads at long-range. You should! You might have bullet stability issues that doesn’t appear until way out there. I’ve personally had that happen. But, if you are using appropriate twist rates with high-quality bullets and you collect muzzle velocities and group dispersion at 100 yards and use meaningful statistics, you are 90% of the way there. Most of the time when people test loads at 600+ yards they have environmentals adding more noise to the data than they think they do. Then they think they see meaningful patterns in the data, but it’s really just meaningless noise. I’m not saying I wouldn’t like to have a 300-yard or even 1000-yard range, but I honestly don’t think I’d spend much more to have it, because I’m not sure how much more value it’d add. Ultimately, I’ll still take a trip to test things out at long-range, but I think I’ll be able to learn a lot at 100 yards.
I understand what you’re saying on #2 and #3, but that’s not what I’d do (obviously). I think if you have any portion of the range exposed to open air, you’d risk wind gusts affecting the bullet flight. I think the “natural draft” as you called it is what I’m trying to avoid with an enclosed range. We regularly have sustained winds where I live that are over 20 mph, so a fully enclosed range is the only way to mitigate the wind issue around here. I’d imagine the “natural draft” here is simply stronger than what you might have in mind.
I did consider the gravel bottom and was even planning to do that at one point, but when the pipe came in I realized that walking on the corrugation just isn’t a problem. I also considered a wooden walkway and the conduit could be below it, but then again I don’t know that I want the conduit in the bottom of the pipe. While water isn’t a huge concern here in the desert, I still don’t know if having high voltage running at the very bottom of the pipe is wise … especially if it’s covered and you might not notice it’s sitting in water.
Thanks for sharing your thoughts,
Cal
A mini fridge for the sodas.
Ha! Okay, you win the funniest comment yet. Thanks for the suggestion!
Thanks,
Cal
You are a Beast! Thanks for all you do for the shooting community. – Pete –
What about pouring a light concrete “floor” walkway along the bottom of the tunnel. You could run electrical conduit inside (and even install junction/outlet boxes along the way to power lighting and gain access). Given the 8′ diameter, you could probably have a 24″-wide walkway poured without losing but a few inches of depth. You would have none of the “wood flooring” issues you were concerned about, would add safety (flat always creates a better walkway), and would shield the electrical run (without needing to “weld” or snake it over the corrugation ridges.
That’s an interesting idea, Pete. Your right, you wouldn’t lose much depth to get a 2 foot walkway. My only hesitation would be having the electrical in the bottom of the pipe, in case water ever does get in the pipe. I feel like I’ve done more than enough to mitigate that issue, and I do live in an area where we only get 20 inches of rainfall per year. As we were building it, it rained quite a bit before we got the concrete rooms on each end built. In fact, the target room concrete was just poured 5 days ago. But while the pipe was open on both ends, a lot of water got in and sat in there for a few weeks. I guess the image of the water sitting in the bottom of the pipe is still burned into my brain! But, you present an interesting idea. I like the idea of the concrete “protecting” the conduit too, and the floor plugs.
Thanks for sharing!
Cal
Thanks, Pete!
Cal, I’m excited for you! This has been a dream of mine since I bought my first house 30 years ago but is a bit tougher to do living within city limits and our lot sizes! Regardless, I just thought about it again the the other day.
Starting off, good on you for doing your homework.
I’m a mechanical engineer by training (but not a PE) and work in the HVAC world and you’re about to deal with moving a BUNCH of air there!
1) Look at getting an exhaust fan with an ECM motor or VFD (but unsure if you’ll have 3-phase power available) where you can easily adjust the fan speed.
2) I wanted to mention by bringing ventilation air through four registers/diffusers with potentially 1000 cfm each (or 2000 cfm each, if you shut two of them), you might find the airspeed through the tunnel insignificant but a bit annoying at the shooting bench (e.g., keeping papers on the bench). The bigger concern is by bringing in air via two or four registers/diffusers you could be introducing a bunch of air turbulence around the shooter, potentially swirling the harmful contaminants past the shooter’s face. However, you mention poking your barrel through an opening into a second room to contain the muzzle blast… if so, consider balancing your airflows where the vast majority of outside air is introduced into the shooter room behind the shooter, with the remainder of the air far off to the side of the muzzle. This should minimize contaminated air in front of the shooter’s face.
3) However, iIn lieu of four registers/diffusers, maybe consider gleaning something from surgical suite airflow design. In their world they introduce air high, keep it laminar past the surgical crew & patient, while exhausting the air low in the room. Instead of a top to bottom airflow approach, you’d want to introduce outside air behind the shooter and moving the air laminarly from back to front of the shooter. (As an FYI, If I remember right, surgical suites need to have 25 air changes per hour (ACH) but at 4,000 cfm and the whole interior dimensions of 9x17x22 space, you’re north of 70 ACH!)
4) Since it appeared your muzzle would extend into a secondary room for muzzle blast control, would this be a dumb idea? What if you were to installing two outside air ducts into the space? Both will supply outside air to the room where the shooter is located but the larger one’s job will be to move the gasses away from your muzzle downstream and the second, smaller duct will move air past the shooter from behind towards the muzzle.
As far as the design, the larger duct would tie into fabricated ductwork that encircles the shooting port. This “square ring” could have linear slot diffusers installed blowing air straight through the shooting port aiming towards the tunnel. As these slot diffusers blow air through the shooting port, it will suck air through the center of the ring like a venturi. So the smaller duct should introduce air behind the shooter (like on the back wall) allowing air to laminarly flow past the back of your head towards the muzzle, thereby always delivering outside air past you.
Depending on your design, you MAY be able to connect the outside supply air duct right to “ring” but it may be beneficial if this outside air was introduced fan-powered so you can get the slot velocity and overcome the pressure drop going thru the diffuser. The second duct for the shooter’s ventilation air would most likely NOT need fan assistance because the venturi effect should suck in enough air.
With this design, you may feel comfortable downsizing both SF and EF horsepower and cfm and use the NIOSH 50 fpm minimum in lieu of the 75 fpm recommendation.
If you don’t want to deal with two ducts, diffuser balancing, or possibly a supply air fan and want to keep the higher cfm, then I’d introduce the all the air behind the shooter via something equivalent to a perforated plenum that is virtually the size of the back wall so all air is moving the right direction.
SUPER HELPFUL, DOUG! Thanks for sharing your thoughts. I immediately called my HVAC guy and asked him to hold off on ordering anything, because this has given me a lot to think about. Wow that is helpful! I honestly have been so worried about not having enough air that I probably went too far in that other direction.
My only hesitation is related to the fan on the intake, and it’s only because I’ve heard a couple of people say fairly strongly that you don’t want to try to “push” the air from the shooter’s room, but instead only “pull” it from the target side. But, I can see how it’d create an area of low pressure that would “draw” air in the right direction if it was directed down the tube in the expansion chamber area, and then the fresh air in the shooter’s room could be a more passive airflow that would follow that same direction.
I think what I’m learning is HVAC on something like this is complicated!!! I sure appreciate the suggestions and even the tip to think about how a surgical suite does this is helpful. I’m going to digest this and I might have a couple more questions, but thank you so much for your thoughtful response.
Thanks,
Cal
No worries. Reach out anytime.
I’m in total agreement with your other contributors if you were only blowing the air in and forcing it down the tunnel. Kinda the same thing as a teenager fabricating a home-made wind tunnel to test the wind effect over his RC car with the strings taped to the body. Less fan blade effect and more uniform airflow by having the fan draw the air over the car than push the air over the car.
In this case we’re wanting to introduce air into the spaces in the same direction as the bullet path trying to minimize the turbulence of how to get large cfm quantity not only sucked into a “box” but have all of it somehow/someway get sucked from a rectangular box into a round tube.
So we just need a mechanism to get the air to enter the 8′ tunnel nicely and not let the smoke disperse. Kinda like one of those air curtains above businesses’ doors prevent leaves, cold air, etc. from entering the building when the automatic doors open. In this case, we just want the equivalent of a 4-sided air curtain all the way around the shooter’s barrel.
Have you thought about fire suppression on both ends? I know a range burned to the ground when someone accidentally fired a tracer into some durablocks. The expansion chamber could be area for fires as well.
Emergency egress from both ends?
Carbon Monoxide detection? Other gasses/liquids from the workshop?
Hardline communication lines to both ends of the tunnels and above?
Outside occupancy light for when the range is hot or occupied?
Switches outside the range area to control fans, fire suppression, lights?
Neal, that is a great question. I hadn’t thought about fire suppression on both ends, but I am now! I do have emergency egress on both ends. That was important to me. The target side will be a permanent ladder up to a hatch on the roof, and there are stairs out of the shooter’s room.
Carbon monoxide detectors are a great idea, too. I’ll add that to the plan. The shop that is overhead has a few rooms in it. The room that the basement stairs are in will be my gun shop, where all my reloading equipment is and photography stuff for the blog. It will be a clean environment without a lot of gasses/liquids. I plan to have an air filtration system in it that will be able to do 5-10 air exchanges per hour. I will have another room in a different part of that building which is more of a workshop with metalworking and woodworking equipment, and maybe one day a lathe and paint booth. But that will be completely isolated from this area.
I thought I’d run a network cable in a conduit alongside the electrical in the tunnel. It seems like a lot of electronic target systems are WIFI, and I wasn’t sure how well that would travel through a tunnel. I figured it’d be better to have it down there than not.
The occupancy light is an interesting idea, too. The stairs come down behind the shooter, so I wasn’t thinking that’d be necessary – but it might be a cool addition. It could even be something like the “On Air” light shown on the floor above whenever the lights in the basement are on, meaning it is occupied.
Thanks for the tips, Neal!
Cal
WOW. I love this more than I can say. I hope you’ll allow serious shooters to use this incredible facility.
I am 100% positive the 22LR crowd would love it, and probably pay for range time. What better way to do your own Vudoo/Lapua lot testing than a 100 yard tunnel? It will provide the final word on accuracy, just as that 1993 article did.
I’d love to see Josh (Pursuit of Accuracy on YouTube) at your place. If he hasn’t already heard of this he will soon.
Thanks, Tommy. It’s been a dream for a while. I’m so fortunate to be able to do it. However, I don’t plan to rent it out or invite others to come use it. I don’t want to be selfish, but I’m not building it in a way that I’d want to use it commercially. If that was the case, I’d have definitely gone with the smaller concrete pipe. I’m not saying I would be the only one to ever shoot in it, but I don’t plan to invite people to shoot in it.
Funny enough, one of the example tunnels I had photos of in this post was the Lapua tunnel where they will test how different lots of their ammo perform in your Vudoo (or whatever 22 you have). That is actually what the guy is doing in that photo. It’s a service they provide for a reasonable fee. I actually hope to fly out to see their tunnel before I start finishing this out. I was invited, but the timing didn’t work out. Maybe sometime after SHOT Show. I’m sure I’d get some good ideas from their setup. Lapua doesn’t seem to do anything halfway.
Thanks,
Cal
Cal, I am so jealous of this project, this is a great idea and I can’t wait to hear your actual results.
I like your conclusion on Ballistic Rubber Blocks for the impact. My minor suggestion on the Steel Plate behind the blocks would be to not have the plate square to your shooting position but to tip the top slightly. That way any potential ricochet will not travel straight back at you. I realize this is highly unlikely to occur, but stay safe.
Best wishes on this endeavor.
Thanks, Scott. That’s an interesting idea, and would be easy to implement – so I’ll probably do it. The steel wouldn’t need to be at a dramatic angle, but having it slightly facing down seems wise.
Thanks,
Cal
Great work.. ideas. In pipe use magnets to hold light. No welding in zinkpipes.
In shooters room. To slow Down intake of Air, make the ceiling with troldtekt and rockwool, and then pull the Air trough the whole ceiling. No draft then. Troldtekt is good to prevent acustik. You could use a frequency controlled ventilator to optimisme airspeed. Sorry for my bad englishwriting abilities hope you understand what i mean. Good luck with project
WHAT?! Carsten, I hadn’t even thought about magnets. That is ridiculously simple and would probably work great. I’m literally going to take a magnet out there tonight and try it out. Dang, that is so obvious once you said it!
And I appreciate the other tips, too. Another reader had suggested getting an exhaust fan with an ECM motor or VFD where I could easily adjust the fan speed, which I think is similar to what you’re suggesting. The entire ceiling being a fresh air intake is a very interesting idea, but I’m afraid that I’m past that point in construction. But, I’m with you. I can see the merit in that idea.
Thanks for taking the time to share your thoughts, Carsten! I really appreciate it.
Thanks,
Cal
Hi Cal,
Nice ideas – I’ve always toyed with doing exactly what you are doing. A couple of points:
1. The magnets work really well, you can buy consumer magnets that take very high loads and generate considerable force. In fact, so much force that they are dangerous to mishandle. I use them a lot, and one of the appropriate strength would have no problem keeping a lot of weight attached to the steel pipe.
2. Fire is an issue – the 100m tunnel I have access to had a fire a few months ago in the bullet trap. I’ve not heard what the cause was, but buildup of unburnt powder would worry me.
3. I’ve not had a lot of success using the Labradar in a tunnel, although this was using overhead cables to move the targets, so that might have added to the interference. I hope you have better luck.
4. I have used a lot of very high-powered rifles in tunnels, up to 50 BMG. An expansion chamber is a very good idea, having the barrel inside the shooting room will definitely shake your fillings loose!
Good luck with it!
Thanks for the tips! I tried a standard magnet out there and it seems to work well, so I ordered a few of the more powerful neodymium magnets off Amazon to try out.
Earlier in my career, I worked in IT and I bought a really powerful magnet to wipe hard drives before disposing of them – and that thing was dangerous! If you got your finger between it and anything metal, it might break it! It was kind of nuts, and I only used it a couple of times.
That’s crazy that they had a fire in the bullet trap. What kind of bullet trap was it? Honestly, I’d expect the overwhelming majority of the unburnt powder to fall out of the air within the first 20 yards from the muzzle. Someone mentioned in another comment that I’d need to move air around 1,000 feet per minute (11.4 mph) for the powder to stay suspended in the air all the way to the target room. I’ll only be moving air closer to 50-75 feet per minute (less than 1 mph). At your 100 meter tunnel, do they sometimes shoot closer to the bullet trap? Or is it always with a rifle at 100 meters? You’ve got me curious now, since I was thinking powder accumulation would mostly be close to the muzzle and not at the bullet trap.
The LabRadar seemed to work well when I tried it, but I only fired a few shots. It was before the basement was enclosed, and we had dug the hole for the target room but hadn’t poured the walls or enclosed it yet. So there were a few variables that won’t be the same, but it was getting what seemed to be solid readings through the pipe. You can see the video of that here:
And that’s awesome to hear that you think the expansion chamber is a good idea, especially with your experience. That was an idea from a friend in the industry, but I’m not sure if he’s seen it done before – or was just thinking it’d be a good idea. One of the tunnels that Gunwerks built had something similar, but they didn’t really ever put that one in commission, so I didn’t get to fire in it. I guess it might all be theory at this point, but it seems like a sound theory! 😉
Thanks for sharing your thoughts! It seems like there aren’t a lot of people with experience shooting in a tunnel like this. I hadn’t ever shot in one until last year when Aaron invited me up to Gunwerks to shoot in theirs. So thanks for taking the time to leave your comments.
Thanks,
Cal
Yes, I work in IT, and I always have a magnet close to permanently erase (destroy) hard disks. I also use a very powerful magnet in the drain of my plastic sink when I’m “washing” my brass to catch any stainless steel pins that escape and threaten to go down the drain. You have experience with the sort of ones I’m talking about – good, you’re on it.
Yes, they had a fire in the bullet trap, I’ve not talked to them to understand what the exact cause was, I don’t think it’s powder being as the fire was so far away from the firing point. They only ever use this tunnel as a 100m range. I believe the bullet trap was steel/water, but I’d need to check.
The expansion thing is a good idea, chiefly to make the whole experience much more pleasant for the shooter. I also have quite a bit of experience in firing in caves/mine shafts – the blast is horrendous. One range here in Switzerland has a 300 tunnel (more like a cavern than a tunnel) and they have small doors in a wall which you put the barrel through. Being a cavern, there is considerable volume to absorb the gas pressure. It makes the whole firing point much quieter and calmer (cannot post a picture).
Very interesting. Thanks for the follow-up.
Thanks,
Cal
While on the ventilation subject don’t forget about carbon monoxide. When I tested small arms at Aberdeen Proving Ground, MD there were CO monitors in the concrete environmental test buildings, which were tight, except for the firing port. While your firing rates and volume will not approach that of machineguns, there will be a buildup over time. Your venting method will probably clear any dangerous CO level. Blood tests were also done.. Just thought you should be aware of a potential health problem.
Yes, sir! That’s a great tip, Franklin. I hadn’t thought about CO monitors before this post, but another reader suggested that, too – and it seems obvious once you say it! Those are so cheap, why wouldn’t I add a smoke detector and CO detector down there.
Thanks for the tip!
Cal
Chiming in from France. Absolutely a great project. Especially because you will share your insights.
1. In Germany and Swiss there are several underground ranges up to 500 meters.
Heating: have a look into infrared panels!
3. Why not incorporating equipment that pushes air mass in volume and directions in order to asses bullet behaviour.
Same in changing air temperature.
Thanks Cal!
Yann, France
Hey, Yann. It’s crazy to think about a 500-meter underground range. I’d love to see something like that one day.
And thanks for the tips. In the article, I think I said radiant heat, but infrared panels are what I actually had in mind and that is probably a more precise way to describe it. And I hadn’t thought about trying to not only eliminate wind or control the temperature for comfort but actually try to control them for testing. That is a very interesting idea, but I’m not sure how I’d accomplish controlling a crosswind (or any direction of wind other than headwind or tailwind) inside the tunnel. You definitely got me thinking though!
Thanks,
Cal
Hi Cal, yet again you choose to do something that I am interested in doing myself. I’m looking at buying a piece of land right now and part of the remit is that I can put a 100yd underground shooting range on/in it! I started out with the container idea then have looked into concrete piping but your way seems a much better way to go. Many of the things you have considered are all news to me and welcome pieces of knowledge, thank you. I will be watching with great interest as yours takes shape and am sure to steal many of your ideas!😉
Ha! That’s crazy, Stephen. Sounds like we think a lot alike! I’m glad this was helpful for you. I thought one of the byproducts of posting about all of this might be helping someone else who might be considering something so crazy in the future. 😉 I certainly wasn’t expecting someone to be in the same position right now. And all the comments people are sharing are just making this article an even bigger wealth of knowledge. Honestly, I’m humbled by how many really intelligent people are chiming in and sharing things I’d never thought of. I was hoping that might happen, and I strongly believe the more collaboration you have the better the outcome will be – but honestly, this has been more helpful than I had even hoped it could be. Honestly, there just isn’t a lot written about shooting tunnels, I guess because it is such a niche thing. I’d bet there might be less than a thousand 100-yard tunnels in the world, so everyone who has done it has just had to figure it out on their own. I hope you get the benefit from all of this as well.
Thanks,
Cal
Very interesting project indeed. I reside in the wind-plagued White Mountains in eastern Arizona and shoot at a range built in the bottom of an abandoned cinder pit. I wish I could get our benchrest group to look into building an operation like this. It appears to me you have the bases covered.
Thanks, Joe. It sounds like the wind plagues your area like it does mine. The private range I’m a member of has targets out to a little over a mile, but it’s in a canyon with swirling winds. That makes for good practice for long-range work (and is why I typically place better in competitions when the wind is really blowing), but a bad place to do experiments into precision. I had looked into building a tunnel system out there, because the natural terrain has a few places where it almost begs for a tunnel to be installed … but I’m so thrilled to have this right at my house. That has to be the ultimate solution, and I’m so fortunate to get to do this.
Thanks,
Cal
You may be far enough underground to experience close to a steady temperature. If so, you might get condensation on the metal tunnel walls from that scorching summer heat intake due to temp difference between the surface and air much like fog on your windshield during the summer from a/c
Very interesting, Jon. I hadn’t thought about that, but you might be right. I do think the average temperature in the tunnel should be fairly constant because of the depth. I think the basement guy I used said he would expect it to naturally average between 55-65 degrees year-round. If you pump a lot of 90 degree air through that, and the walls are 60 … you might get condensation. I’d also think it would evaporate pretty readily since our humidity is close to 0 when it’s that hot, but I guess we’ll find out.
Thanks,
Cal
Since you don’t want any air disturbance the entire length of tunnel and taking the shooters health into the equation a high volume, low pressure exhaust system would be the best design for ventilation of the immediate shooting bench area. These systems are very quiet / efficient as well so they would not be distracting. These fans are sound rated in Sones so converting to dB is helpful. For an example a kitchen vent hood runs around 5 to 10 Sones (51.21 to 61.2dB) depending on the CFM setting. For the disgn the hood would be located slightly away from the muzzle and the makeup air vents close to the shooter on both sides.
✦ Five sones: a louder, more active conversation
✦ Six sones: a quieter restaurant setting
✦ Seven sones: light traffic
✦ Eight sones: the average sound of traffic
✦ Nine to ten sones: congested traffic sound
Very interesting, Arnie. I have been operating on what I’ve heard several industry pros say that have done tunnels like this, and that is to draw the contaminated air downrange with an exhaust fan at the target. In fact, the exhaust fan I’m using is very similar to the one I saw at one of Gunwerk’s old tunnels. Dr. Harold Vaughn did something similar in his shooting tunnel. They know have a new headquarters where the whole building is built around a 100-yard above-ground, but fully enclosed rifle range with a few bays and built out of CMU block. It’s probably the ultimate solution, but I’d expect might have cost over $250K to build.
I honestly haven’t asked why everyone does it that way (which is odd for me now that I think about it), but I assume it is for a good reason. Some of that might be that the contaminated air extends well into the tunnel (from all the expanding gases on each shot), and just clearing the shooting area would not get rid of all the contaminated air. From what I understand you want to “clear” the entire range from one end to the other, and not just try to treat the air around the shooter. But, I honestly couldn’t explain why that is, beyond what I’ve tried to muddle through here. What I’m realizing is that I’m well beyond my level of expertise when it comes to ventilating an enclosed range!
Thanks for sharing your thoughts!
Cal
You would want the exhaust fan at the end of the tunnel to pull the contaminated air away from you while pulling the fresh clean air in where the occupants are. Otherwise you would be pulling the fumes back towards you.
As others have mentioned with using the registers, that may lead to turbulence where you don’t want it. One option would be to run a piece of rectangular duct and use perforated metal on the top side of the duct. That would let the fresh air spill out the top of the duct much more softly. We have done this in process plants where they need soft air flow to not disturb their manufacturing process. We usually recommend about 300 CFM of air per 1 square foot of perf. For your fan at 7,000 CFM on the top end you would need about 24 square feet of perf.
As far as the fan size goes, the 4400 CFM would give you about 8.8 air changes per hour in the tunnel. It would replace all the air in the tunnel every 7 minuets or so. 7,000 would be about 14 air changes per hour, or clean air every 4.3 minuets. Other indoor range designs I have seen have surprisingly high air flows. If you have an ECM motor of VFD to control the speed then you could dial it in to what works for you. If noise is an issue, going with a larger diameter fan wheel and run at lower RPM will reduce noise.
Thanks, Adam. I can tell you have experience with this, so your feedback is very helpful. I’ve learned a lot about this over the past week, thanks to people like you lending their advice. Honestly, at this point, I feel like I have a totally different approach for handling HVAC ventilation, and it involves a perforated wall to spread the airflow like you described. I tried to explain what I’m thinking in this comment, and I’m working on drawing it up.
Your number on 300 CFM of air per 1 square foot of perforated supply is interesting. Would you mind sharing what hole size and spacing that is for? I actually have a spreadsheet where I’m trying to do a similar calculation, or at the very least ensure I match the total area of holes with the total area of the fresh air duct (4’x4′). I was thinking I don’t want the perforated registers or walls to choke down the fresh air, or I’d be working against myself.
I was actually thinking I’d use pegboard to diffuse the air (i.e. since it’s already perforated at set increments). I saw that you could actually buy pegboard made from poly material (which would work with hot, cold, or even humid air), and then I could drill the holes to make them slightly larger to achieve whatever airflow was necessary for the area. I was going to have some on the far wall of the shooter’s room (opposite the tunnel), and then some on either side of the doors into the expansion chamber, so that even when the doors are closed between the shooter and the expansion chamber there would be air being drawn downrange – and it would help clear the expansion chamber. I was doing calculations to try to get the area of the holes in on the back wall to be roughly the same size as the ones into the expansion chamber so roughly 50% of the fresh air would be coming from behind the shooter and 50% would be going directly into the expansion chamber. It’s far from an exact science, but I figured that it would give me a good starting point and then I could do smoke tests to adjust accordingly.
And I definitely see the value in the VFD control of the fan. I had them include that in the quote, so that I’d be able to dial this in. There are so many variables here that I feel like having the ability to adjust the exhaust fan is a must.
Thanks,
Cal
A long-time reader who has become a friend sent me a link via email that I wanted to share with the rest of you guys. I’m told it’s a 300-meter underground shooting range in southern Germany. The guy who built it supposedly owns a cosmetic chain in Germany and other European countries, so money was no issue. I’ve never seen anything like it!
https://mszu.de/schiessstaende/300m-schiessstand/
Obviously, that is a bit out of my budget to do something like that, but it is cool to look at.
– Cal
Cal, Welding to the pipe might not be a good idea, the coating on the pipe would,probably, put off toxic fumes. The welding would destroy the coating on the outside of the tube, allowing rust. You might consider using an adhesive to attach the wiring to the walls ( or possibly magnets)….
By the way, Harold Vaughn’s book is one of the most fascinating books I have ever picked up !
Thanks, Eddie. I hadn’t thought about how welding could impact the coating until someone mentioned the same thing in the comments. That totally makes sense. I think the magnet idea is a great one! I hadn’t thought of that before this either. Thanks for passing those along.
And I totally agree about Dr. Vaughn’s book! I find myself referencing it all the time. There is so much good information in there, and it’s crazy how few people know about it. Honestly, the fact that no manufacturer has released a rifle with the “recoil isolator” he talks about in Chapter 4 is just beyond me. I’ve read through the whole thing, but I’ve read a couple of the chapters multiple times. I think it’s one of the great works of our generation – but unfortunately, it’s out of print. I have a friend that talked to his family and tried to let him reprint the book for them – but hasn’t got it done yet. There are PDF versions of it online now, but I wish it was easier to buy the book so that his family could at least earn some profits from his work. Great research!
Thanks,
Cal
Just my 2c here. Welding on the galvanized steel is toxic so I’d go with a different attachment method for lighting. I’d also do your ventilation intake at the mouth of the tunnel at the firing line where it effectively draws air from the firearm but doesnt adversely effect the firing room leaving you free to heat and cool the firing room separately. Climate control in the tunnel isnt as important as the firing room. Walls sweating will be your biggest enemy so the firing room will need constant regulation. Install a humidity switch so that when the tunnel gets humid the vent will kick on, that way you wont get puddles at the bottom of your pipe.
Thanks for taking the time to share your thoughts, JDK. I realized welding on galvanized steel is toxic and planned to ventilate and wear a respirator while I did it, but a couple people have said that would hurt the coating on the outside and cause the pipe to rust – so obviously don’t want to do it. A couple guys have suggested mounting using magnets, which seems like a great solution that I’m going to try out.
I totally see where you are coming from on trying to exhaust from the shooter’s room directly, but I’ve heard a couple of people who have experience with this kind of range say pretty strongly that you want to draw air downrange towards the target. I’ve largely been operating on what I’ve heard them say and how I’ve seen ranges like this be built, and that is how they did it. Dr. Harold Vaughn did something similar in his shooting tunnel. To be honest, I haven’t actually asked WHY everyone does it that way (which is odd for me now that I think about it), but I assume it is for a good reason. Some of that might be that the contaminated air extends well into the tunnel (from all the expanding gases on each shot), and just clearing the shooting area would not get rid of all the contaminated air. From what I understand you want to “clear” the entire range from one end to the other, instead of only treating to clear the air around the shooter. But, I honestly couldn’t explain why that is, beyond what I’ve tried to muddle through here. What I’m realizing is that I’m well beyond my level of expertise when it comes to ventilating an enclosed range!
Luckily humidity is pretty low here in the high desert where I live. I don’t think that will be an issue, but I do know some basements have humidity issues, so I was thinking I could have the exhaust fan on a timer if that becomes an issue to basically flush out the humid air and replace it with fresh/dry air from outside. That’d be better than manually emptying a dehumidifier like some people have to do in basements! But, the idea to possibly have that on a switch with a humidity sensor seems like a great idea, and then it’d only need to run when it needed to. Thanks for passing along that tip!
Thanks,
Cal
We typically use perforated with holes about 1/8″ to 1/4″ diameter. The free area is around 30-40%. Below is a link to some on McMaster that is pretty close.
https://www.mcmaster.com/perforated-metal-sheets/steel-perforated-sheets-7/hole-diameter~1-8/
The only issue I could see with the pegboard would be the free area of the peg board allowing enough air flow through. You would need more square footage of peg board than the perf metal, but like you mentioned you could drill the holes larger, or maybe even use a router and route slots around the edges.
Thanks, Adam. Very helpful. That link to the product is helpful, too. That’s what I was thinking on the pegboard. I think I’d have to enlarge the hole size, but it’s also diffuse the air over a much larger area. Could be getting into the noise on whether it matters or not, but that is at least what I’m thinking at this point. It would also allow me to install it and then “tune it” after doing a smoke test and I figure out how much more air I might need in certain places. I could just open up those holes a bit. Labor intensive, but seems like it’d work well, and the end product might be ideal. Your feedback really helps me!
Thanks,
Cal
There is going to be a lot of powder residue and lead in the tunnel and target room. You might want to paint the tunnel and the target room in order to make them easier to clean – white epoxy or something, maybe use a power-washer to clean up. Fire from unburned powder and lead exposure are a big deal. My serum lead level is marginal, not where it should be.
I think walking on that corrugated floor is going to get old pretty fast and you don’t want to trip. Consider using industrial metal grating raised a little off the tunnel floor. I would avoid a concrete or sand floor, too hard to clean.
Thinking about opportunities, you may want to mount a chronograph in both ends of the tunnel in order to evaluate ballistic coefficient or high speed cameras to photograph bullets in flight. Protect that gear from lead splatter.
I think it is better to figure out how you are going to patch holes in your tunnel before you make one.
If, in your ideal environment, you shoot tiny groups, measurement error becomes more significant. I think that is a problem but I don’t have a solution.
Load development – do you need a space in your shooting room to do some reloading?
Thanks, Richard. Great tips! I hadn’t thought about painting anything to aid in cleanup, but that seems like a great idea. I plan to try to talk to Ken Oehler at SHOT Show coming up, if I can. I’ve had conversations with him before about how he outfitted Sierra’s shooting tunnel. I remember him telling me how he had to crawl down the 3 or 4-foot diameter pipe to run cables. I don’t like tight spaces, so that conversation with him years ago may have been the first time I started thinking of doing larger diameter pipe. Honestly, I didn’t think I’d ever get the chance to actually build something like this at the time, so I hope to have another conversation with him about it. Something like Oehler’s System 88 could work like you’re suggesting (chronograph on both ends of the tunnel to calculate ballistic coefficient), although I’m not sure how accurate the BC would be since it’d just take sample measurements over 100 yards.
I’m not sure I have a high-tech way to patch holes, if/when they happen. One time I joked about using “Flex Seal” like you see on TV infomercials, and the person I was talking to told me that would probably work great. They said it was basically the same compound as polyurea, which is what the oil field uses to seal off pits of chemicals in a way that 0% penetrates into the surrounding soil. It’s like a spray-on rubber/plastic glue. But, I’ll go back to one point: I can’t remember ever missing a paper target at 100 yards by 2 feet or more. So I still feel like the odds are very low that I’ll have a bullet strike in the tunnel wall – but I guess even if that chance is only 0.01%, by the time I fire 10,000 rounds in the tunnel statistics would say I might expect it could have happened by then. So I guess my plan at this point would be to clean up the steel and spray it with something like Flex Seal, or do the closed-cell foam + polyurea lining like I did on all the connection points.
I’ve thought about the measurement error thing, and that is part of why I’m hoping to find a very precise electronic target. I honestly don’t know what the measurement error is on those, but I’ll certainly do a comparison on a few of them before I make an investment in one. You know me! I’m always trying to eliminate things that could potentially skew the data, so that is a big one for me. Fortunately, I’m not a Benchrest guy, so what a “tiny group” is to me is very different than what those guys call “tiny.” Now, that might change when I start firing in a fully-enclosed range. I actually can’t wait to see what kind of performance I get out of my rifles. You know in a lot of the article and the comments we are talking about air turbulence from the exhaust fan affecting the bullet flight, but in reality that air is only going to be running 0.6 to 1.0 mph and most of that will be purely in the direction of bullet travel. When is the last time we were on a firing line outdoors and we were worried about a 0.6 mph tailwind? The truth is we call that “no wind.” I’m not saying it doesn’t somehow affect bullet flight, but we totally ignore it outdoors and are trying to reduce the impact of it indoors even at a drastically reduced scale. I’m actually very interested to see if there is a measurable impact between outdoor and indoor shooting because of things like that. Will my groups for the rifles and loads I have right now actually be measurably smaller? I don’t expect it to be much smaller, if at all, but I can’t wait to see!
I do plan to have space for load development in there. Your comment made me realize I didn’t label that diagram of the room very well. I knew what everything was, because I originally designed that for myself to try to figure out what the dimensions for the room should be, and I didn’t intend to share it with other people – but I figured it was fitting for this article. In the diagram that is showing the top view of the shooter’s room, the two gray boxes that are 5 feet wide and the other one that is 10 feet wide are all countertops, and some of those would have drawer bases underneath for storage. All of my reloading equipment would be within 15 feet of the top of the stairs out of the basement, so it bet I usually load rounds and then run down there and shoot it, but I’d have a spot for a press or other things down there if I want to move it down there one day.
As always, I appreciate the comments, Richard. You always have something to say that makes me think!
Thanks,
Cal
Some ramblings. I also thought of magnets for attachments to steel walls. Also to lock far hatch so kids and vandals don’t hide down in the target room. Perhaps motion detectors and or camera system. Also maybe a few solar lights in case of (extended) power outages or I guess you could use good flashlights. Always great if you can have adjustability of lights and fans like dimmer switches to customize speed ,noise, volume. For emergency tornado room, have water, food, am/fm radio and charged cell phone and flashlights. For cold, a heating blanket should work. Underneath or wrapped up or just a good hat and gloves.
Thanks, DB!
Thanks Cal, very cool.
I’m glad you’re considering the issues of lead contamination.
As far as the electrical work goes- I wonder if it would be possible to do this overground instead? Maybe a few utility poles in between the shooting and target rooms if damage from vehicles is likely, or just run a fenceline down there? You don’t really need a switched circuit between the rooms to turn things on and off, just power in both and a means to remotely switch those at the other end (a LoraWAN switch would do it easy at the very capable-but pricey side). Might minimize some potential troubles.
If you do run things inside the pipe, I see your point on the water ingress concern. I’d be tempted to try to stick some hardware up with 2p epoxy to hang the conduit instead of welding, but I don’t know how you’d calculate the numbers for how much you could support and you’d need to do a little prep before putting anything on anyway, which could compromise things a bit.
Thanks, Hal. I was thinking of running the electrical down the tunnel because I will also need lighting in there anyway. I need it in the tunnel and not just in the target room.
The two-part epoxy like JB Weld or something is a good idea. I think enough people have commented about welding potentially damaging the coating on the metal that I’m not going to do that. My plan is to first try large magnets (maybe ones rated for 100 lbs), although I’m not sure how well those will stick to the corrugated steel. I bought a small magnet last night that I hope to go out and try in it. That would probably tell me a lot about whether that is the correct route to go or to epoxy or use some other type of adhesive.
Thanks!
Cal
http://bulletin.accurateshooter.com/2010/04/skeleton-rifles-220-beggs-and-secrets-of-the-west-texas-tunnel/
Thanks, Oscar. I had heard of Gene Beggs tunnel in Odessa, and one other tunnel in Odessa that I’m told belongs to a world champion Benchrest shooter that lives there part of the year. I live in Lubbock, which is just 2 hours from Odessa. I actually lead a large home building company that builds homes in a few cities in west Texas, and we build around 400 homes/year in Odessa. So, I’m actually down there quite a bit. Someone gave me Gene’s # a few years ago, so I might try to give him a call and see if I can visit his facility. I honestly hadn’t thought about that until you sent that link, so thanks for the reminder!
Thanks,
Cal
Congratulations, Cal, this is a fantastic shooting range for precision rifle shooters and reloaders. And it’s not far from your house, you can even walk into your “dream house” in your pajamas and slippers.
Maybe in 2022, I can read more of your research papers from your underground shooting range . LOL
Thanks, Bryan. That’s true. I would be able to walk from my bedroom all the way to the range in my slippers and shorts, even when there is snow on the ground. I didn’t mention that in the article, but I am excited about that. Honestly, just the convenience to double-check my zero before I leave for a match or a hunt is going to be really nice.
Unfortunately, I bet we don’t move until late summer at the earliest. The build is taking forever, especially with all the shortages and supply chain stuff going on right now. So I’m not sure how much research I’ll have in 2022 – but I’m sure I’ll be publishing data I collect in this tunnel for a long time.
Thanks,
Cal
Hi Cal, nice project indeed. As you already mention HVAC for shooting range is complex.
One thing to keep in mind is that barrel hole and gaps around doors in blast chamber – shooter’s chamber partition did not have enough area for air to flow through at slow speed so, they will have to high pressure drop (flow resistance) to work well.
I would recommend threat your shooter’s room as two “separate” rooms.
For shooter’s chamber I would go for 200 m3/h for up to 2 persons at same time, 3 persons for short period of time (add 50 m3/h for each additional person). Inlet 200 m3/h with max 1 m/s inlet speed at duct element (min flow area 0.0556 m2), outlet 150 m3/h with max 0.5 m/s at duct element (min flow area 0.0833 m2) just over rifle action. That will keep shooter’s chamber in over pressure. Partition with instaled thu-wall valve with sound damper, 1 piece of DN 100 mm will be enough for 50 m3/h overflow.
In blast chamber I would put ait inlet in floor-wall corner on both sides with max 1 m/s inlet speed, 5000 m3/h should get job done (min area 1.3889 m2 of ducts elements together).
In HVAC is rule to remove contaminated air as soon as possible. I would install 3 outlet duct elements in blast chamber – beginning of tunnel on ceiling. 2 at sides approx 1,5 m from centerline for muzzle brake blast gasses and one approx 2,5 m away from muzzle for muzzle blast gasses. Those 3 elements will extract 2000 m3/h + 50 m3/h from shooter’s chamber at max 0.5 m/s at elements. In duct after all 3 branches join to one put non-return valve and extraction fan. Remaining 3000 m3/h will be extracted by fan in target room.
Air in ducts pipes can travel at 3 m/s for shooter’s chamber and 5 – 7 m/s for blast chamber and target room.
For shooter’s chamber and workshop above you can use small residential air handling unit (AHU) with heat recovery. You can instal heater into in, but air can transfer only 1 kW of heat per 300 m3/h. It makes sense for those small AHUs when winter temps goes down below -6°C (room temp 20°C, if room temp is 22°C heat recovery is good enough down to -10°C).
For workshop I would use 60 – 100 m3/h per person depending on solvents and cleaning agents you use. If aceton or similar is used go for 100 m3/h per person. Anyway small 500 m3/h AHU will be plenty.
If AHU is used clean outlet duct and filter protecting AHU against debris and dust in outlet air often.
For tunnel you can use AHU as well, but that one will be F expensive as it needs to be for explosive environment and extraction duct will be as long as tunnel is. I would recommend exhaust fans to be for explosive environment anyway.
Cheers Jan
Wow, Jan. I appreciate your sharing your expertise. I just read over what you said a few times, and I think I am tracking on most of it – but honestly don’t have the expertise to understand all the measurements you referenced. I do understand a few of your suggestions, and what you probably just made me realize is that I should hire a consultant that has expertise with indoor range HVAC to help me with this – or I’ll probably end up wishing that I would have. With the size of the investment here, it’s probably worth the extra cost. And when I find someone, I’ll ask them to read through what you suggested here, because I can tell enough to see the merit in what you’re saying. I appreciate you lending your expertise!
Thanks,
Cal
Hi Cal, sorry for being metric, I was born like that. 😉
1 cubic meter per hour (m3/h) is 0.5886 cfm.
I can make sketches of my idea if you drop me an email.
I would recommend to hire hvac designer, your supplier should have some in house. Also would recommend that supplier is responsible for project, easier warranty claims if you are not happy.
HVAC seems simple, air in and out, but one can have master degree in it.
I was thinking a bit about shooter’s room setup, partition dividing it into shooter’s part and blast/expansion chamber might be good for muffling sound but it ads complexity and cost into ventilation system.
For noise reduction I was thinking about 8 feet dia tunnel extension with sound “catching” inlay like in silencer, but down side of it is that it will catch grains of unburnt powder well. May be sound panels on walls like in acoustic chamber would do job good enough, but it will require cleaning.
As usual in engineering it is game of tradeoffs and finding balance between all needs is not easy.
Without partition you can go with simplier vent system.
When heater/cooler is added into intake duct some axial fan (high volume, but low pressure) should be added to overcome pressure loss at it. Heater/cooler for duct is caled DX kit and it is basically AC unit.
Thanks for sharing your project, I found very interesting links in comments from others so, I can educate myself on this topic as HVAC for indoor shooting ranges are not done that often in my country and they don’t teach them in shools. It is kind of niche part of trade. Thanks
Thanks! I agree that HVAC seems simple, but it can actually get really complex – and this seems to be one of those scenarios. I’ve reached out to some consultants and we’ll see if I can find someone to provide me with some professional guidance on design decisions. I hear you on the complexity the expansion chamber adds, but I think it might be worth it. I have an idea for how I could get ventilation to both spaces without adding a ton more cost or complexity, but then again … I’m a rookie here, so it may not work.
I thought the same thing about the acoustic panels being hard to clean, but I think I’m going to have to invest in an explosion-proof, HEPA vacuum cleaner. So that should help keep floors, corrugated tunnel, and vertical surfaces clean. I’ve read a few whitepapers lately on how fires started in indoor ranges. It seems like fires can start in bullet traps, but rarely result in casualties. It seems common for the ones with casualties to be a fire near the shooting line and the unburnt propelling and acoustic panels or insulating materials are often where those things were trapped and the major source of fuel for the fire. In fact, one scholarly study said it typically comes down to “lack of cleaning (unburnt propellant) and unsuitable wall coverings.” So I want to be careful with both of those. I do know the pyramid foam that is often used in sound studios is a terrible option after reading all that. I’d say that I’ve learned when it comes to an enclosed range there are really two critical elements: ventilation and the ability to clean the surfaces. So like you said, engineering is a game of tradeoffs, but I’m learning those two factors should carry a lot of weight in every decision.
I’m glad you have found this interesting! Thanks for sharing your thoughts.
Thanks,
Cal
Hi Cal,
I’m not an HVAC engineer but I’ve worked in hospitals where air flow is controlled to limit the spread of infection. Some patient isolation rooms are maintained with a slightly lower pressure than the main room to keep certain agents (like Tuberculosis) from leaving the room when the door is opened. The reverse situation can also be employed.
SO, I recommend you consider adding a supply-side fan to pressurize the shooting room slightly above the pressures in the tunnel and target room. Keep that lead dust heading towards the exit. Building engineers use analog or digital pressure gauges, often mounted inside and outside of the door to document the current pressures. Motor controls on the blowers allows adjustment of the relative pressures.
It is true that at a workbench for toxic vaporous materials, the recommended air flow is around 75 ft/minute but if the shooting room is large enough, as I think yours is, the room serves as plenum and the elevated pressure keeps the airflow from reversing towards you.
Ashley, thanks for your thoughtful comments. I think enough people have suggested that at this point, and how you just laid out the case was very clear – you’ve convinced me. I’m now learning it’s more about trying to control high/low pressures in the right places – rather than “pushing” or “pulling” air. Seeing it as a binary either/or option is oversimplifying the problem (i.e. I’m either pulling air from the target or pushing air from the shooter). Obviously, I’m a rookie when it comes to an HVAC system that is this specialized/niche, but you guys are educating me quickly!
Thanks for laying out the case for some supply-side fan so clearly. How you presented it really helped me.
Thanks,
Cal
Dear Cal,
Congratulations on your project. This is indeed a wonderful milestone!
It seems that you don’t have bad knees yet and that we would not be able to persuade you to have some form of walkway. In any case, this is a cost that can be deferred to a later stage.
Personally, I would not be worried about water inside the tunnel (if any) as it might only penetrate through the joints. With the ventilation systems installed, it will mostly evaporate.
Most of my thoughts on your project were covered by other readers. I do however wonder about the noise levels at the target end though and how it will impact your neighbors and other legislative issues. The noise will not penetrate the concrete, but it will go through the extractor fan.
The rubber blocks are a fantastic solution. We used them extensively in our indoor shooting ranges. (Many moons ago, maybe slightly different technology from 30 years ago). My experiences were that they worked as advertised, they catch bullets, but there is a big but.. Too many shots concentrated on a single block or aiming point and the block balloons. I understand that it can catches 5000 bullets, (far fetched?) but it will be looking more like a tire with copper jackets protruding. (You should be careful when changing the blocks around) The added volume expands and it adversely changes dimensions of the blocks. This will cause your carefully placed rubber wall to become wonky and opening up gaps between them.
If I may, I would make the following suggestions concerning the wall. The underlying assumption is that you will use a single target and concentrated fire on a single aiming point and that most bullets will be within a diameter of 2 feet.
• As another reader mentioned, angle the wall slightly upwards. This will stop the wall from tumbling over (up to a point) and onto your target system.
• I would get extra blocks and put them directly behind the target area, it will be easier to turn the blocks around and exchange them.
• If not, I would suggest to box the target area. Meaning that blocks directly behind the target should be encased in a wooden frame. This will be inexpensive and you can then only change a fraction of the wall. This might entail you to cut some of the blocks.
Thank you for all the content and I wish for you and all the other readers a wonderful and prosperous New Year.
Hey, Maré. I may end up adding a walkway, but just probably won’t start that way. The epoxy or metal options that people have suggested definitely got me thinking. Concrete would probably work, too, but I just wonder about cleaning those things. I guess a wet mop is an accepted way to clean a range, but honestly over the past couple of days I think I’ve realized how careful you need to be about cleaning anything that is downrange of the muzzle. It’s going to accumulate lead over time, so you have to clean it … and you can’t just spray it out with an air compressor. In fact, that could really hurt you. I guess I’m realizing how toxic lead really is, and how careful you need to be related to lead when shooting in an enclosed space. So I certainly might add a walkway, in fact … I’d bet I do at some point. I just might not start with one, but I bet you guys are right. 😉
I’m thankful you said that about water inside the tunnel. I didn’t want to be dismissive about it, but I feel like I’ve mitigated that risk pretty well. So you saying that makes me feel less crazy!
As far as noise and neighbors, I actually have neighbors that fire guns right now. The target room will be around 300 yards away from the nearest house, and I also plan to plant shrubs and trees around it to further dampen the sound (and also hide the building). It’s Texas, so nobody gets too upset about people firing guns. Aaron at Gunwerks actually showed me a range they built inside city limits in Cody, Wyoming, and to get the permit from the city they had to build the range in such a way that the sound would meter at under 60 decibels at their property line … which I want to say was probably 30-40 feet from their tunnel, and the tunnel was only buried under a couple of feet of dirt. But they go there. They built a series of baffles around the fresh air intake and exhaust, and it dampened the sound considerably. Now, it also created a new place that you have to clean in a hazmat suit to avoid lead poisoning, which is why I’m not starting there … but I’m sure one day I’ll be annexed into the city and might have to eventually add something like that, but I don’t think it’d be an issue for many years with the area I bought the 10 acres at.
That is very interesting about the rubber blocks, and makes total sense once you explain it. I mean if they fully encapsulate 5,000 rounds, think about how much more mass is inside of them. Of course they’ll balloon and weigh significantly more than what they did originally. That makes sense. Honestly, even if I had to replace the entire bullet trap every 5 years – I still think it’s the right solution to go with, because of how much it mitigates lead exposure and how compact of a solution it is. Adding another 8 or 15 foot of depth to that concrete room is very expensive, so for an underground range (or at least my range) I think it is a great solution. I do appreciate that tip. I hadn’t thought of that, but it now seems obvious after you pointed it out. Thanks!
I love your tip on somehow adding support for the rubber blocks. Honestly, before I’d even got to the end of your comments I was thinking that same thing. That is a good idea. I would be concentrating shots in a relatively small area. Maybe I’ll just go ahead and buy several extra blocks and as one of them bloats and reaches end of life, I could just throw it away and replace it with a new block … instead of trying to swap it to be in some other portion of the wall.
Thanks for the tips! Very practical and helpful stuff.
Thanks,
Cal
I use a rubber block system regularly. A couple things to consider… First, not all blocks are created equally. Some vendors use blocks that are more dry and “crumbly”. Others are more “rubbery”. For my use neither is better than the other but I can imagine that some folks may have a preference. I’ve had vendors send a sample block for evaluation prior to taking an order. I’d suggest you make that inquiry to see if you can get a couple on hand from different vendors prior and choose what you like. Even if there is a nominal cost, I think it’s one that you’d benefit from. Secondly, though these blocks are designed to encapsulate a good number of bullets, you don’t want to hammer on them too hard at the same point of impact over and over again. In other words, you need to be able to nudge your backstop or your target occasionally so that you’re distributing your shots on the block as best you can. And, of course, you’ll need to rotate your blocks occasionally. Using something like the https://www.range-systems.com/product/encapsulator-bloc-trap-2/ works well for this. Is has the steel back plate that you are looking for that you wouldn’t then have to built into your infrastructure. If it’s something you’d care to discuss in more depth, feel free to reach out to the provided email address. I’m not associated with any vendor – just an end user.
Thanks, Chris. I had noticed that a ton of people make those ballistic blocks, and I figured they weren’t all created equal … but I also didn’t really know what the practical differences might be, so that is helpful. I even found some on Alibaba where you can get them directly from overseas manufacturers. I’m sure even the ones from US companies likely are all imported. But that makes sense to get a sample or even just order one from whoever I’m considering before dropping several thousand on them. I’ll be at SHOT Show in a couple of weeks, so I bet I can look at products from the larger brands that have booths there.
I was thinking I would like the entire wall covered, so I looked at the Encapsulator product that you linked to but decided I’d like it so that all you saw on the other end of the tunnel was bullet trap. I guess I could have something like that in front of the wall of blocks. In fact, the wall of blocks could be my inventory of blocks that I’d trade out for the blocks I’m actually shooting all the time in something like the Encapsulator, and those “spare” blocks could also serve as an extra layer of support if a bullet didn’t hit the primary blocks for some reason.
Thanks for the tips, Chris!
Cal
Also… forgot to mention… Another reason you want something like that portable backstop I linked to above is because that last thing you want/need is to be rotating blocks on your back wall. That will get old REAL QUICK. The facility I work in uses the portable backstop 99+% of the time. Except for rare circumstances, we only shoot in that stop. As blocks wear out, we rotate them in that portable stop and dispose of them as they wear out. Taking that approach, we’ve never had to change blocks in our rear wall after 10+ years of use. The portable backstop may even pay for itself if you elect not to put steel plate behind the back wall and, instead, rely on the steel plate of the portable stop. Just a consideration.
Ha! I just replied to your first comment, and basically was thinking the same thing. Maybe that confirms I was on the right track! 😉 Thanks for sharing your thoughts!
Thanks,
Cal
Your “keep it simple” style of writing fits me well. Just a few comments regarding the tunnel. I’ve never had the luxury (or responsibility) of designing a test tunnel, but I’ve walked or crawled a few miles in the tunnels containing our instruments. (As I recall, Sierra’s tunnel is walkable and can tolerate a bicycle, but Ted Almgren and I crawled on floor with steel tape to verify distances.) The people escorting me thru various tunnels often had comments or observations. My comments would be . . .
1. Anything in front of the muzzle will get shot, sooner or later. Sometimes it is the first shot and sometimes it is decades later. If it isn’t absolutely needed in the tunnel, leave it out. Examples; Electrical power at target should come in at that end. Control and instrumentation signals should connect to shooting room with cables pulled thru conduit external to tunnel. Install spare conduit and pull extra signal cables. Are light fixtures really needed? Structures inside tunnel should be repairable with duct tape, baling wire, and 2x4s; fancy welds and hinges don’t tolerate bullet holes. Conduit is not bulletproof.
2. Shock waves (from muzzle blast and Mach cone) will travel through steel at approximately 20K feet/second. Shock can propagate thru steel tunnel walls to disturb target instrumentation before bullet.
3. You should plan for a convenient access to target room via other than tunnel.
4. Instrumentation is another discussion. You could go much worse than emulating SAAMI with optical screens on a 20’ spacing for muzzle velocity. You should use a redundant “proof” screen or otherwise make dual measurements of muzzle velocity. When you look at ammo or BC uniformity, the first question on an abnormal reading is “Was it the ammo or was it the instrumentation?” A good acoustic target can probably give accuracy of 0.02” on a 3’ target, but it won’t give bench-rest match accuracy. Our acoustic target with optical screens at the muzzle can give BC measurements within a few percent over 100 yards. A BC valid for long range must be measured over long range; either Doppler radar or our System 89 will work with similar accuracy.
5. I’ve never seen a tunnel quite as fancy as the 300-meter version from Germany. I have seen the US military shooting through a Quonset structure, 50’x1000’, as a “wind deflection facility”. Colonel TJ Jackson of the “warehouse crew” often expressed the desire to shoot in Carlsbad Caverns.
Ken, I so appreciate you voicing your comments. You are absolutely one of the few people who have experience with so many tunnels, so your expertise are much appreciated.
I definitely see your point on #1. I like that simple rule. Even if there is only a 0.001% of it happening, if you fire enough rounds you eventually get there. Unfortunately, I think might have messed up with what I’ve already built – in a way that would be tough to overcome. The walls of that basement are basically 12-24″ thick concrete (went a little thicker than the structural engineer called for because of erosion before the pour). The short story is it’ll be difficult for me to get electrical and instrumentation cables between the rooms in a conduit outside of the tunnel. I’m fairly certain that the route I’d need to take would exceed the max length for a single run of a network (most recommend 290-330 feet), which I’d assume might be what would be most common for instrumentation. I can probably engineer around those things and come up with a work-around, but it’s certainly going to be more complex at this point. Honestly, someone suggested doing a pathway out of sheets of steel, and then placing electrical and cabling beneath that in the tunnel, so that they’re protected. Really, the goal is to protect them from bullets, so that might be the best path forward based on where I’m at today. I also think if I had a flat walkway (like with those metal sheets that might be welded together for a continuous, even surface), I might not need lights in the tunnel.
Honestly, if I knew so many people were going to be willing to share GREAT tips with me, I would have written an article before I even broke ground on this. I’m kind of kicking myself at this point for not doing that, because I’ve been overwhelmed by how many really sharp people (like you) have been willing to share what they’d do differently or what could make it even better. I honestly wouldn’t have guessed that half this many people would have shared ideas that have totally changed how I was thinking about one aspect or the other. I whole-heartedly believe when more people weigh in on something it will only get better, but I’m honestly surprised and humbled that so many people would take the time to try to help me out.
On #2, I want to make sure that I understand what you’re saying. Do you think the shockwave that will travel down the tunnel will render electronics or instrumentation in the target room useless (or even less reliable)? I certainly hadn’t thought of that. In fact, I’ll be honest … I thought the opposite. I thought the corrugation might actually be BETTER than a smooth-walled tunnel because it might disrupt a wave as it travels down the tunnel. I was basically thinking like the acoustic panels that are in the shape of wedges absorb sound waves, I assumed the corrugation might disrupt waves because of how it would reflect them in various directions – and maybe even cancel some of them, although probably only a small percentage. I guess my fallacy there might be thinking about it as waves impacting the pipe corrugation, and not waves traveling through the steel itself. Honestly, I’m not a mechanical engineer, so I’m probably “way out over my skis” here.
Any guess as to the impact #2 will have on something like an electronic target in my scenario? Any tips to mitigate those effects at this point? I’m thinking I could spray closed-cell foam on the tunnel walls, and maybe it’d just be necessary on the end near the target, and maybe that would dampen/deaden that material enough so that it would absorb some of that wave and not allow it to transfer all the way to the instrumentation in the target room.
Your tip on the accuracy of an acoustic target is very helpful. I haven’t started researching those, so I didn’t have context for that. I was sure hoping to have better precision than 0.02″. Honestly, if it can’t come close to duplicating how accuracy I could measure it with calipers or if I scan the target into software and calculate it all, I will probably just continue to do it that way. I was really hoping to find a way that I didn’t have to do that anymore, because it’s such a manual process. That’s helpful to know what is likely with those systems though. Is there any other high-end system you know of or have seen that could get better precision than that?
And I totally understand your comments about measuring BC. My gut was telling me you couldn’t really measure that with precision at 100 yards, but I wasn’t sure.
What is funny is I took one of my daughters to Carlsbad Caverns a few months ago, and I admit I was thinking the same thing! Honestly, ever since I read The Secrets of the Houston Warehouse, if I walk into a large, enclosed space … I am probably thinking, “Now this would be a cool place to do rifle experiments!” I think that’s when you know you have a sickness!
Again, Ken, thank you for taking to the time to share your expertise. I have a ton of respect for your experience, so it means a lot that you’d take the time to leave those comments.
Thanks,
Cal
Obviously my comments were biased. My invitations to walk the test tunnels are not for cleaned-up show-and-tell visits, but usually have been extended when instrumentation didn’t work. Bullet fragments shorting or breaking conductors in cables cause problems that are hard to isolate. The one common thread among the tunnels is that they can all be described as “spartan”.
I’m serious about access to your target room. It’s not fun to carry a target system through an escape hatch and down a ladder.
My comment regarding shock waves in the metal walls came from the experience of a customer welding brackets to a metal culvert, and then attaching his acoustic target mics to the precisely located brackets. It took a while to find why the mics were triggering before the bullet arrived. Should be no problem with your generous target room where sensors can be isolated from the metal pipe. Just be aware of the potential problems, especially if you want to mount intermediate sensors along the way.
Accuracy of the acoustic target depends on the size of the window. Our large targets at proving grounds demonstrate approximately one inch accuracy on a thirty-foot square. Ammo companies often use an eight-foot square with mics located behind shields at the corners of the tunnel. I guessed that you were visualizing a four-foot square target. If you cut in half, you can double the accuracy and probably get better than 0.01″, but you won’t get 0.001″. Personally, I’d rather see target location plotted right along with velocity and shot order for each shot even though I must sacrifice a little precision on group size.
The nominal 100-meter wiring limitation is typically for ethernet or other computer networks. Going longer usually means that you may slow traffic down a little, but everything still works. You don’t need high data rates for target displays. I’d think seriously about drilling at least one conduit-sized hole in the wall for instrumentation and signal cables.
Don’t be afraid to use wood for frames and supports. It’s very forgiving and easy to repair.
Thanks, Ken. That makes a lot of sense that you were the expert they called to help troubleshoot when they couldn’t figure out issues. That still means you have seen a lot of ways this stuff could go wrong.
I could see how the acoustic target mics could have issues with the shockwave traveling through the steel pipe if they were connected directly to them. That makes me feel a little better knowing that was the scenario you were describing. I did try to give myself a generous area in the target room for whatever instrumentation I might add – this year or 20 years from now. Constructing the room was pretty complex, because of the huge steel pipe on one side, so it wasn’t even like a typical basement – which translated to lots of labor and expense. So I didn’t want to make it way oversized, but I actually stood in the target room this week for the first time because they just poured the walls on Dec 23rd – and it feels MASSIVE!
Thanks for sharing how I could improve the accuracy of the acoustic targets. I actually wasn’t sure how that worked, but it makes sense. And I’m with you. Having all the target plot and velocity data cataloged in digital format automatically would sure be helpful. I guess if I’m doing an experiment on precision where I need 0.001″ precision, I could just break out the calipers and measure those targets manually – but use an acoustic target setup for 99% of the time I’ll be shooting in the tunnel. Honestly, for things like load development 0.01″ precision likely gives you what you need to see patterns. In fact, I’d suspect if you are comparing loads and going to 0.001″ you are likely fooling yourself, because it’d take a sample size of more than 50 shots for each load to be able to know if those minute differences were real or just noise in the data. (If others are reading this and don’t believe me, you should read this article.)
I was actually out at my property today trying to figure out how I could run wiring outside the tunnel. You bringing it up again tells me that I’ll regret it or will end up redoing it at some point if I don’t!
Ken, I sincerely appreciate all the advice and sharing your experience. I’d suspect you might have helped with more high-end enclosed ranges than anyone else in the world, so I’m honored you’d help me out on my little project.
Thanks,
Cal
> I’m fairly certain that the route I’d need to take would exceed the max length for a single run of a network (most recommend 290-330 feet)…
That’s the least of your problems. Yes, there is a limit on “normal” Ethernet copper cables, although there is some difference in quality/design of the cable that could allow longer runs.
But there are optical equivalents that allow you to use fiber-optic cable instead of copper. Getting 1 gigabit connection over 100-200 yards is no trouble. Look for something that supports 1000Base-SX (short range multi-mode fiber) that is probably the most cost effective starting technology.
The easiest solution is probably “extenders” which can convert normal copper (known as 1000Base-T) to connect to OM1 multi-mode fiber – which should be able to run at least 200m (up to 550m for OM-2 fiber).
Any network person should be able to help you here with a cost-effective solution. Two converters might cost you $75-150 and the fiber-optic cable about $1 per meter (or less).
Plug and play.
Very interesting. Thanks for the tip!
Thanks,
Cal
Thinking out of the “tube” (couldn’t resist )….if the muzzle extended into a chamber, maybe 20′ long, with maybe a 6″ hole in the far end, made of a flexible transparent material . Would it contain the contaminated air ??? Maybe an air evacuation system in the chamber ??? Lots of “maybes”.
Hey, Eddie. I think I’m following, and I’d suspect what you described would result in negligible amounts of contaminated air in the room where the shooter is. Honestly, what I have planned is not too different, although I wasn’t thinking the porthole I stick the barrel through would be airtight against the barrel or anything.
If I misunderstood what you were suggested, please let me know.
Thanks,
Cal
Cal, I was suggesting that the chamber might contain the powder and prevent it from going downrange. The fit on the barrel wouldn’t be critical nor would the exit hole if the chamber was exhausted, the exhaust would simply draw air into the chamber through the holes. it would also allow the shooter room could be heated and cooled separate from the tube. The flexible, clear curtain, hopefully, wouldn’t disturb the bullet, it would only contain powder. The 20′ chamber would be a containment space and a separator between the shooter room and the tube. I am watching “Myth Busters” tonight and they are “busting” shooting myths, maybe you should present them with “myth”…
I see. Thanks for the clarification. That’s an interesting thought experiment for sure. Maybe the technology will exist at some point, but I’m not sure what the flexible, clear curtain material could be today that wouldn’t potentially affect the bullet’s flight.
Thanks,
Cal
Unburnt propellant will accumulate downrange, especially from large capacity magnum calibers. The corrugated pipe used will tend to capture and concentrate this potential fire hazard. Depending how close the muzzle is to the tunnel entrance, you might get a nasty surprise from a flash fire.
Hey, Franklin. That’s a good point. In fact, fires like that have killed several people in very bad fires that broke out in enclosed ranges like this. So it’s very serious.
One of the reasons I went with an 8-foot tunnel was so it’d be easy for me to regularly clean it. I hate the idea of having to shimmy down a 3′ or 4′ tunnel to clean it – especially with a tunnel this long. But, when the pipe is as tall as a normal room, it changes things completely. I plan to invest in a HEPA, explosion-proof vacuum cleaner so I can remove any unburnt regularly. I’m hoping to find a cordless version, but haven’t found one yet. They’re pretty expensive (here are some examples).
Thanks,
Cal
This is quite the investment of time and money. The payoff will be the things you can learn and prove. I look forward to reading about them.
In my former life, the “enclosed” range could best be viewed as a 35 yard garage. We shot into a bullet trap for shorter ranges. We opened the door for longer shots. We struggled with ventilation issues. A key reason was the necessity to have equipment downrange as we lacked storage. We had strict rules about who was allowed to shoot inside. We were forced to break them on a couple of occasions and the result was bullets in things that shouldn’t have had bullets in them. I also hurt some feelings when I insisted on seeing a “World Class Shooter” shoot outside before we went inside.
Back to ventilation: When I first started doing a lot of indoor shooting, I was very surprised by how little I understood about airflow. It should have been common sense but still slapped me in the face. Everything downrange will create an eddy in the air flow. Each eddy will retain some of the hazardous fumes/particles that you don’t want. The smoother the tunnel is, the better. Ken’s advice is spot on. Having a “walkway” with the cabling underneath seems like a very good idea. I don’t know if the corrugations in the pipe will create their own eddies. I doubt they would be significant but checking with smoke would answer that.
We had an exhaust vacuum that positioned over the muzzle of the firearm. It caught a significant amount of the gasses that came out and it was excellent at removing the conditioned air of the test lab. Within minutes the lab would be whatever condition existed outside. We didn’t use it very much, preferring fans near the shooter instead.
I think you already have plans to do the best thing you can do, test with smoke. That is the only way to really tell.
You will have a lot of fun with the new capability and your readers will have a lot of fun reading about it (me included). Good luck!
For a bit of trivia, the longest fully-enclosed range I’ve visited was 500 meters, in Thun, Switzerland. If memory serves, it could accommodate a 155mm Howitzer. Talk about going to extremes!
Thanks, Buford. Honestly, since I published this article, I feel like I’ve received an education on airflow in an enclosed range. I see it way differently now, thanks to my readers. I also found a PDF from a “Workshop On Indoor Shooting Ranges” that was held in Italy in 2005 and it has a TON of really good technical information. At this point, I plan to do something similar to what it shows on page 112, which I screenshotted below:
Basically, the whole back wall becomes the fresh air intake, and doing it this way eliminates almost all of the air turbulence. I found a PDF published by NSSF about Lead Management & OSHA Compliance for Indoor Shooting Ranges, and it said something similar:
So at this point, I think I’m doing that along with supplying additional air to the expansion chamber from the sides and I may have that air pushed lightly with a fan.
I say all that, but I also have been thinking I might hire a consultant to help with the HVAC ventilation stuff who has experience with indoor ranges. I sure don’t want to make a mistake here, and spending a couple of thousand dollars on a consultant might save me more than that – if I made a mistake and had to redo things, buy a different fan, etc.
You saying how excellent the exhaust was at removing conditioned air makes me think about another aspect that I’ve been thinking about this week. The rep I’ve been talking to that distributes the RuppAir exhaust fans mentioned that on many of the indoor ranges he has worked on include something called a “direct fired gas heat makeup air unit.” Here is what he said about it:
He gave me estimates for cost and heat only would be around $7,700, and heat + evaporative cooling would be $9,500 (only works in dry climates, but he said would drop temps up to 20 degrees) … or $16,500 for heat + DX cooling (traditional cooling using refrigerant and a compressor). He did say all of those estimates were based on 5,000 CFM, so if I lower the airflow it would probably save me some on those costs. Based on all the feedback and things I’ve learned this week, I actually think I’ll land somewhere closer to 3,500 CFM. I did read in that NSSF article something new that me realize that having too much air CAN be a bad thing: “note that airflows higher than 75 fpm can be counterproductive and increase the potential for airborne lead exposure.”
That sounds like a lot of money, but honestly, all of this is a lot of money! I haven’t decided whether I’m going to try to condition the incoming fresh air or not yet. It might be something I add later, but then again – I know it’s a little cheaper to do it upfront and not have to do rework.
Honestly, I’ll probably go without it. I shoot outside 100% of the time now, so it wouldn’t be much different, right? Then if I regret it later (which I probably will), I could bite the bullet then. Your experience just makes me think that I might regret it. I feel like in my scenario I have to keep the air on to not breathe in lead, so I guess I’ll just be uncomfortable if it’s uncomfortable outside. … or I’ll bite the bullet with the makeup air unit. Still on the fence!
As always, Buford, I appreciate hearing your thoughts!
Thanks,
Cal
My idea in more detail: Build wall #1 where the tube joins the shooters room. Build wall #2 at 20 feet down the tube creating a 20 ft. long chamber. At the center of each wall, put a 12 inch hole or window. According to Autocad,with the muzzle in the center of the window in wall #1, looking through the window in wall #2, you can see the entire perimeter of the 8 ft. tube at 300 feet.
The chamber is intended to capture the majority of the unspent powder. With an exhaust fan in the chamber drawing air through the two windows into the chamber, it should help prevent build-up in the rest of the tube.
The windows could be mounted in removable panels or doors that could be opened for occasional shooting while standing and access for cleaning the chamber or going down the tube.
By not exhausting the entire tunnel, the temperature should remain fairly constant and comfortable. By closing the window in wall #1, the air in the shooting room would be easy to condition.
The earlier suggestion to build the walls from a transparent, flexible material would allow some visibility down the tube and the flexible material would help absorb the percussion from the muzzle blast; might not be necessary . The walls could probably be built with plexiglass panels and work just fine.
It seems to me that air moving fast enough and at a sufficient volume would be difficult and expensive and contribute to spreading the contaminated material the entire length of the tube.
I hope this helps, if nothing else, you have stimulated some brains and found out how many people are interested in the work that you do….Thank You !
Okay, I’m following you now, Eddie. That is an interesting idea.
The windows could be larger than 12″ without sacrificing the exhaust effect.
If you put some sound attenuating stuff in the chamber , you might have a large silencer….
Hello Cal, this is an amazing project and I must say I am astounded at the effort you are willing to put in again and again for proper scientific tests.
On the topic of ballistic data recording; I work for a company based in Germany called EVO Ballistix and we are just now lauching, after over 5 years of R&D, a new radar based ballistic analyzer which might be very interesting for you. Our device records a lot more ballistic data than just velocities like spin, drift and tumble as well as the local environmental factors. What might be especially interesting for you is that we are using a similar personalised drag model, like you explained in your post from 2019, for each bullet type to calculate the exact trajectory outside of our measuring window.
It is funny you mention the MSZU in one of the previous comments as I have just startet talking with them about outfitting some of their lanes with our technology.
The developer of our analyzer and I would very much like to have a chat with you via Skype or Zoom on what you think of this new system.
I hope to hear from you soon.
Best regards
Marc
Hey, Marc. That sounds interesting. I’ll reach out to you via email so I could learn more about your product.
Thanks,
Cal
Cal, I’m sure you’ve heard it before but don’t let it ever get old – you’re living many of our dreams with this range proj. I’ve sketched out many a plan for this kind of thing throughout my life if ever I could manage to find 6 good numbers.
I read a fair number of the comments but not all. So if I repeat any suggestions you’ve already received, my apologies.
My suggestions come from a guy who’s been shooting and reloading and tinkering for over 40 years, Doesn’t make me an expert at anything but hopefully will give you context to my perspective.
You’re not young forever…
Walking down that corrugated pathway will get old fast. Twisted ankles lie in your future. Maybe not right away, but you will want to address the surface from shooting room to target room. Sand, pea gravel. not sure. But something that you can walk on without thinking about.
I own a SEB NEO rest. All 22 or 23 pounds of it. Lugging back and forth to the range is a PITA, but I wouldn’t be without it. I mention this because at some point in time, you may get tire of lugging whatever is necessary up and down those stairs from you shop. Perhaps some kind of dumb-waiter arrangement?
Had to laugh at your response to the question of a lefty shooter being able to use your setup. Having loaded and tested a number of rifles and calibers for left-handed friends, I’m aware of the mild, yet ever present aggravation of dealing with equipment that requires you stand on the wrong side of the ball – as we say in golf. As long as you don’t sire any lefthanded progeny, I wouldn’t give it another thought. And if you do decide to invite any “wrong side of the ball” types to use your facilities, just charge them triple. That’s what I do 😉
Ha! Thanks, Bill. I appreciate your thoughts and your humor. I bet you’re right about walking on that corrugated metal. I still want to be able to clean unburnt powder from the tunnel, so I probably won’t do gravel or sand – but metal sheets that are welded together to give you a nice flat surface or concrete or something similar to epoxy might be the ticket at some point in the future.
I hadn’t seen that rest before, so thanks for sharing. I know you were just giving that as an example, but I Googled it and having something like that would be helpful. It looks like a good product.
Someone else recently told me about the “Ransom Rest,” which I have heard is the gold standard globally for a machine rest. They want $4K for this “mega” version of their rifle rest, but it looks pretty sweet: https://ransomrest.com/the-master-series-mega2-rifle-tester/.
Thanks for passing along your thoughts!
Cal
Cool project, Cal!
If you decide to dig deeper into attenuation of noise, there are other options that aren’t real expensive and mostly need a little elbow grease. Mass-loaded vinyl (MLV) bass traps are one option. Gunfire acoustic energy has a wide range of frequencies, but a large amount of energy is in the initial muzzle blast, which has a huge low frequency component. You could put MLV bass traps in the corners of your shooter’s room and attenuate the initial muzzle blast effectively. You’d lower the stress on your ears, sinuses, etc.
I’ve got quite a bit of MLV left over from a recording studio project and am willing to donate to your cause if you can pay shipping. I can show you design options, etc. You’re looking at a few 2×6’s, screws, a roll of fiberglass insulation and some caulk.
Hey, Jeff. That’s a very interesting idea. One of the things I’ve learned through this to pay attention to is both ventilation and making sure everything is easy to clean. I bet that mass-loaded vinyl is easy to clean, and that seems like an interesting configuration.
(To anyone else learning from this, here is a page that describes what this might look like: http://hyperrealoverkill.com/bass-trap/)
And thanks for the generous offer. I’ll try to figure out where I’d position those, and if I can find a way to integrate it into the design I’ll reach out to you.
Thanks!
Cal