Related Articles


How would you go about testing if a scope really did provide 25x magnification, or finding the exact point where 18x was on a variable powered scope? That turns out to be a much harder problem to solve that it might seem. In an Outdoor Life article, they said “It turns out to be tricky to measure apparent magnification of an optic, for reasons too mathematical and abstract to mention here.” I concur.
In fact, I spent more time talking with optics engineers and industry experts about this question than any other topic. The vision engineers at Edmund Optics offered a lot of great advice, as did a couple of the engineering teams from major scope manufacturers.
Most companies use very expensive, specialized equipment to measure magnification. Since I still haven’t made any money off this website (that’s not why I created it or why I continue to put effort into it), my budget was a little tight. I actually spent hundreds on this field test out of pocket, so I wasn’t excited about dropping a few thousand on a spectrometer. So I was looking for a practical, straight-forward way to measure this as precisely as possible without spending a fortune on more tools and equipment.
I ended up coming up with a few creative approaches to do this, and went with the most straight-forward one. I figured a simpler approach would likely be less error-prone, and it’d be easier for readers to understand and have confidence in.
The basic idea came from a whitepaper published by the U.S. National Bureau of Standards titled The Properties & Testing of Optical Instruments (p33):
The magnifying power of a telescope may be tested roughly by focusing the telescope on an object which contains many equally spaced lines (e.g., a marked scale or a brick wall). Looking through the telescope with one eye and observing the object directly with the other eye it is possible to determine how many divisions as seen by the unaided eye correspond to one division as seen through the telescope. This is the magnification at this observing distance.
So that is a “rough” way of testing magnification, but that was published in 1918, and I refined it dramatically using modern technology to make it more precise.
I started by finding a large, extremely precise mil-based scale. A fellow shooter turned me on to the Horus calibration targets (CATS), which are ideal for this type of testing. I used their 0280F MIL/TMOA Series target, which is enormous 8’x3’. It provides a 25 mil ladder in the vertical direction, and has an 8 mil scale in the horizontal direction. Horus has these targets printed by a drafting company, instead of a normal printing company. Although they’re much more expensive, the drafting company ensures the scales are ridiculously precise. I used these same targets for a few other tests, so I’ll be talking about them a lot more in other posts. 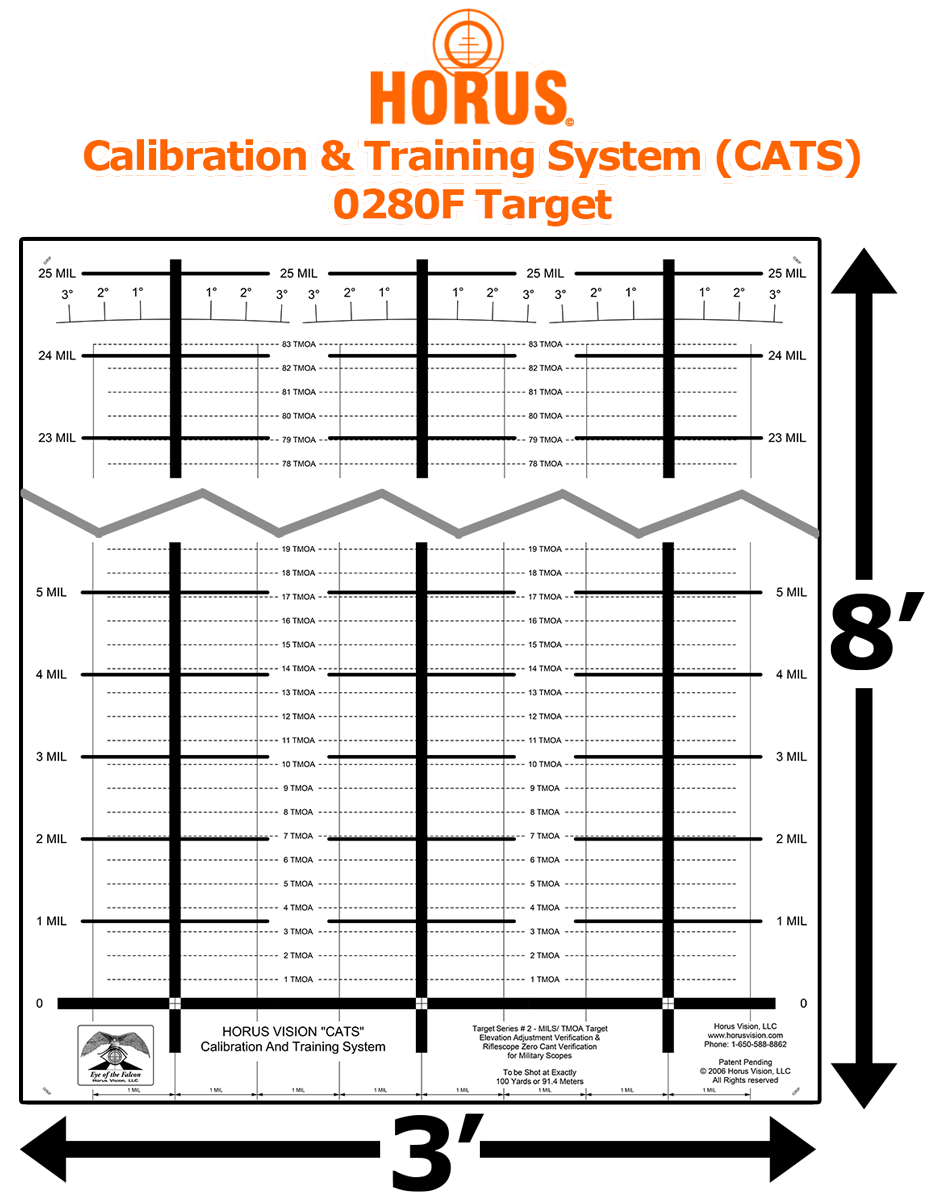 I set the target stands at precisely 100.00 yards, each with a scale attached. It’s critical for the targets to be at the same exact distance, so I used a Leica Disto E7400x Laser Distance Meter to ensure they were both set at exactly 300.00 feet (i.e. 100 yards) from my mark. This unit is far more accurate than a metal tape that can deflect/bend over such a long distance, and orders of magnitude more accurate than a rangefinder. Although its range is limited to just 395 feet, it is tremendously accurate within that range. It can measure to within ± 1/32 of an inch!
 Then I took a high-resolution photo using a DSLR camera. The camera was on a tripod, with the scope in a V block in front of the camera. The scope was aligned towards one of the scales, but the camera could view both scales in the same frame. There is an example of the photo it took below. The target on the left is unmagnified (i.e. unaided), and then you can see the target on the right is the view through the magnified scope. Pretty simple, right?
  Then I opened the photo in PhotoShop, and zoomed way into the photo so that I could precisely measure how many pixels each scale took up. Originally, I used the same scale for magnified and unmagnified, which made it easy to calculate the magnification. But using a huge 20 mil scale for the unmagnified target helps reduce measurement error, since the apparent size in the photo was so much smaller in comparison to the magnified target.
To calculate the apparent magnification, I started by measuring how many pixels were required to cover 20 mils on the unmagnified target. In the example below, that was 151 pixels, which equates to 7.55 pixels for each mil. Next, I measured how many pixels it took to cover 8 mils on the magnified target. In the example, that was 1,511 pixels, which equates to 188.875 pixels for each mil. Then to calculate the magnification, you just divide that ratio of magnified to unmagnified, which is 188.875 pixels/mil divided by 7.55 pixels/mil. So the magnification in our example is 25.02x.  Note: The example shown was the exact calculation for Leupold Mark 8 3.5-25x56mm scope at its max magnification, which is true to Leupold’s claim of 25.0x zoom. That actually reflects a high degree of precision (and integrity) on Leupold’s part.
Although I don’t claim this type of measurement is flawless, it is a good, straight-forward approach to measuring actual magnification for a scope. What I found in testing is that even the most expensive scopes may not provide the magnification you think they do. Some like the Leupold Mark 8 3.5-25x56mm above might be right on the money with what the manufacturer advertises, but they aren’t all that way. So having a way to measure that is very helpful.
How Did I Locate Exactly 18x?
I’ve used 18x magnification as a baseline for direct comparability of variable power scopes. This allows you to compare certain aspects of a 6-24x scope with a 3-18x scope. Once again, this is more tricky than it might sound, because you can’t trust the “18” mark on the magnification ring to be exactly 18x. As the optics testers at FinnAccuracy have said, “marked numbers cannot be trusted.” So I ended up ignoring those marked numbers completely, and acted as if they’d been erased.  To find 18x, I essentially followed a similar process to what was described previously. I’d start by guessing where I thought 18x might be, and I’d take a photo with the two scales in it, open that in PhotoShop, and calculate the apparent magnification for that setting. If it came out to be something like 19.5x, I’d make a minor adjustment to the power ring, then take another photo and repeat the process. I repeated this process 10-20 times for each scope before I zeroed in on the exact point where the apparent magnification was 18x. I wasn’t satisfied until it was at least within 0.5% of 18.0.
Yes … this was very time consuming. It took me almost two weeks to find that 18x point on all of the scopes. There may have been a faster way to go about this, but since I was planning to use this as a baseline for a few of the optics tests, I felt like it was critical that I not rush this part of the process.
Once I located the exact setting for 18x on a particular scope, I marked that spot with a wet erase marker (drawing a fine line from the magnification ring onto the fixed tube). That provided a reliable reference point that could be used for several different tests.


Were the testers able to adjust the diopter when getting behind each scope?
Chris, that is a great question. Most people see that as a diopter adjustment like those found on binoculars, but that actually isn’t what it is. I actually thought that until a couple months ago. Here is an excerpt from Riflescope Fundaments by ILya Koshkin:
Then in the issue of SNIPER magazine that came out last month, Todd Hodnett wrote an article that hit on a couple misconceptions about scope usage, and this is a subject he touched on as well. He said “The ocular adjustment is used to make the reticle crisp. Then we adjust the side parallax, or what I call the target focus.” The ocular adjustment he is referring to is pictured in the article, and I scanned that in and its what is shown below. He is talking about what a lot of us mistakenly think of as diopter adjustment.
I did ensure the ocular adjustment was adjusted for a crisp reticle, but there was no need for the testers to adjust that setting for their eyes. They only needed to adjust what Todd Hodnett called the target focus.
Cal:
In a conversation i had with the Jerry at S&B (regarding the previous exchange you & I had about my S&B 3-27) in a somewhat side comment Jerry made the statement that adjustment of the ocular adjustment to the positive (i.e. increasing) reduces the effective total effective magnification of the scope & likely at full value of ocular adjustment might reduce the effective magnification as much as 10% on a high power scope like the S&B 3-23. Since I have found universal agreement in the fact that ocular adjustment is only to make the reticle crisp, I as a layman have trouble get my head around the idea that it could adversely effect overall magnification of the scope. You thoughts are appreciated.
Thanks
Ranger
That’s a great question, Ranger. Honestly, Jerry seems like a great guy and he is more of an expert on this than I am. I’ve heard the same thing from a couple optics experts. From the practical perspective of the shooter, the ocular adjustment should be used to achieve a crisp reticle. But from a technical perspective, that adjustment is moving lenses in the optical system … so it can have an impact on the apparent magnification. For my measurements, I simply adjusted all of the scopes to get a sharp reticle for my eye, and then did the measurements. That seemed like the best way for an apples-to-apples comparison across the board. Honestly, it’s the only magnification number I really care about. What am I actually going to see through the scope after I finish adjusting everything?
In my tests, I always try to keep a very practical approach that is from the shooter’s perspective. Like on optical clarity, it’d be so easy to get distracted by specific coatings, HD fluoride glass, or a million other features that scope manufacturers market. But at the end of the day, we don’t really care about that stuff … at least not directly. What we care about is the quality of the image that I see through the scope. While I originally started going down a path of itemizing all the coatings and types of glass, that is just noise. It does all play into the quality of the image that we see through the scope, but none of it helps you quantify the whole picture. Actually lining them up and looking through them would be a lot better way to compare them. So that’s what I did. I’m a practical guy, but I do put a ton of effort into removing as many sources of error as practically possible (like doing double-blind tests, controlled lighting, and getting input from optics experts on every single test I plan to run). I try to balance just getting behind something and using it like a shooter would, with controlling outside influences that could potentially skew the results. It’s a tough balance, and I won’t claim I always get it perfect. But I do know I put a ton of effort and thought into it, and invite in a lot of outside sources to critique my approach before I ever get started. At the end of the day, no manufacturer is going to be happy if their product looked poorly in one of my tests. I get that. It’s easy and natural for them to blame the test. But honestly, when the scope was adjusted for my eyes … that is the magnification I measured out of it. It’s hard to argue with that. That is really what I would experience behind the scope, regardless of what the optical system was capable of if the ocular lens was adjusted all the way in or out (which seems highly unlikely that would work for anyone’s eyes).
Sorry to get up on a soap box. This has just been brought up several times, so each time I try to clearly lay out the case as well as I can. Hope this makes sense. It is a great question! Ranger, you always have great questions. You keep me on my toes! 😉
Thanks,
Cal