Related Articles


The previous post contained the details of the mechanical calibration test, which I think was one of the most enlightening tests of this entire field test. This post reviews several other tests I ran related to mechanical performance, including:
- Scope repeatability and whether it could reliably return to zero
- Reticle cant
- Reticle calibration
- Max internal adjustment range (i.e. elevation travel)
- Elevation travel per revolution
- Windage adjustment range
- Magnum recoil box tests
Lots to cover, so lets dive into the results.
Repeatability & Returning To Zero
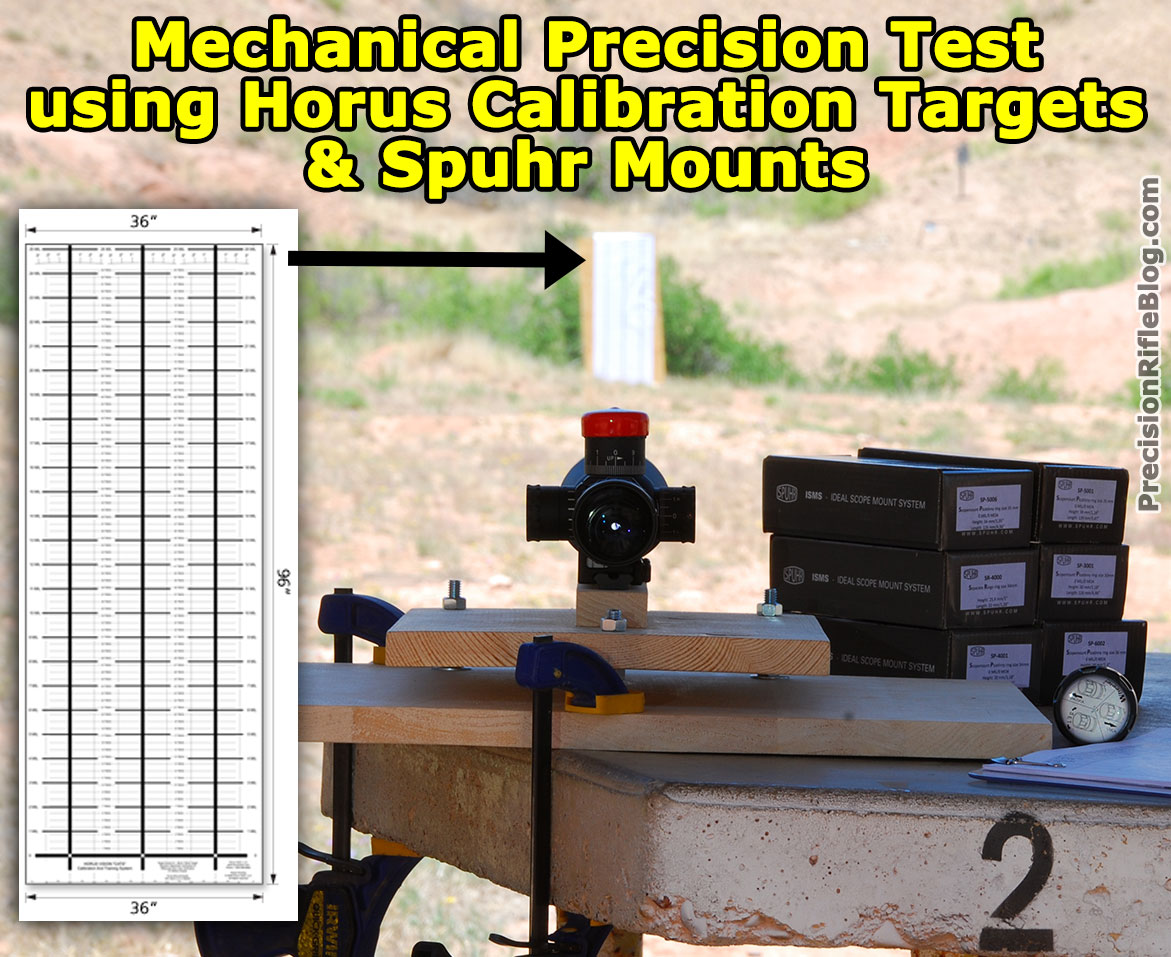
The setup of this test was identical to the click calibration test I covered in Part 1. Instead of mounting the scope on a rifle, I placed it in a Spuhr mount, and attached that to a custom fixed mount. This was essentially like putting it inside a vise, and it allowed me to manipulate the knobs up and down with the scope body held securely in a fixed position. I started with the scope precisely zeroed on the Horus 0280F Calibration Target. With the scope held firmly in place, I’d adjust the elevation of the scope up to 20 mils (or 70 MOA for MOA-based scopes), and then back down to zero. I repeated this 5 times on each scope, and then checked to see if the scope had the exact same Point of Aim (POA) as it did before I started adjusting the elevation.
One thing to remember is that I “broke in” the scope knobs before I started any of these tests, by rotating each knob through its entire range 50 times! This ensures any quirks from new, stiff mechanics should be settled down. I’m not sure there would be any on these high-end scopes, but I definitely didn’t want to take a chance of it skewing the results.
Much to my surprise, all of the scopes performed flawlessly on this test. All 18 scopes were able to repeatably maintain their zero through multiple iterations of this test. As I mentioned in the last post, I had fanatic scrutiny in these tests (probably more than was honestly called for). Because of my approach, I’d have easily detected if any of the scopes were off even by 1/2 click, which is around 0.15” at 100 yards. However, there wasn’t a single one out of the scopes I tested that didn’t return to the exact spot.
The root problem with scopes that aren’t able to maintain their zero could be more related to recoil than imperfections in the mechanics that compound over time. I talk about this a little more when under the magnum recoil tests later in this post.
Reticle Cant
Reticle cant is something that most people don’t think about, and may have never heard of. To understand it, we first need to understand some of the basics of the scope mechanics.
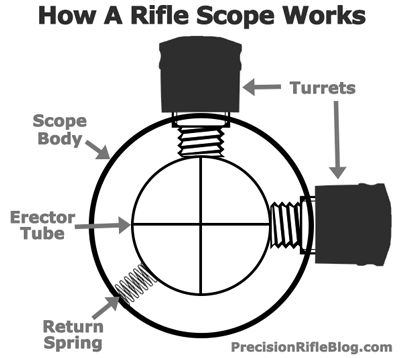
Reticle cant is when the crosshairs don’t perfectly align with the directions of the elevation and windage adjustments. I made a diagram to help illustrate.

It’s not rare to find a scope with some amount of reticle cant, but it typically goes unnoticed. Even if the shooters tests for cant due to mounting issues, they typically just level the crosshairs on a plumb-bob, which unintentionally introduce horizontal error to their elevation adjustment. In Accuracy and Precision for Long-Range Shooting, Bryan Litz explains “When you make an adjustment to the vertical turret of a scope that’s canted, your adjustment is not entirely vertical as it related to gravity. With a canted scope, part of your vertical adjustment ends up in the horizontal direction, and causes an error in the horizontal plane.” The diagram below shows what this would look like.
![]()
It’s difficult to notice a small amount of cant at 100 yards. However, when you apply a lot of elevation adjustment in order to engage long-range targets, even a small amount of cant will cause a group to string horizontally. Cant introduces a small amount of vertical error as well, but it is slight. The horizontal component is more significant. However, even if a shooter noticed a Point of Impact (POI) shift on long-range targets due to cant, most quickly dismiss it as simply a bad wind call. Here is how Bryan Litz summarizes this problem in Applied Ballistics for Long-Range Shooting:
“The benefits of true vertical tracking go beyond the obvious. When your scope truly tracks vertical, your wind zero is assured at long range, and it becomes much easier to learn to read the wind. Long range shooters … never really know if their scope tracks truly vertical, because there’s always wind to blame for horizontal misses. These shooters will always struggle with wind shooting because they can never observe a clear cause and effect relationship between how the wind looks, and where their bullet lands due to the bias caused by random amounts and direction of cant. In other words, if you’re not eliminating cant, then the horizontal impact of your bullet results from a combination of wind and a random component of cant, which makes it impossible to isolate and learn wind effects). But if you eliminate cant, then horizontal deflection is purely due to wind, and the cause and effect of wind reading becomes more clear and manageable.” – Bryan Litz
To get first round hits on long-range targets, it’s critical that your scope tracks straight up.
The Horus 0280F Calibration Target was designed to easily identify and quantify any cant that could be present. It has a cant compass at the top of the target that shows 1, 2, or 3 degrees of cant. If you start with the reticle perfectly aligned with the vertical and horizontal ladder on the chart, and the reticle deviates from the center line as you add elevation, it can only be due to reticle cant.
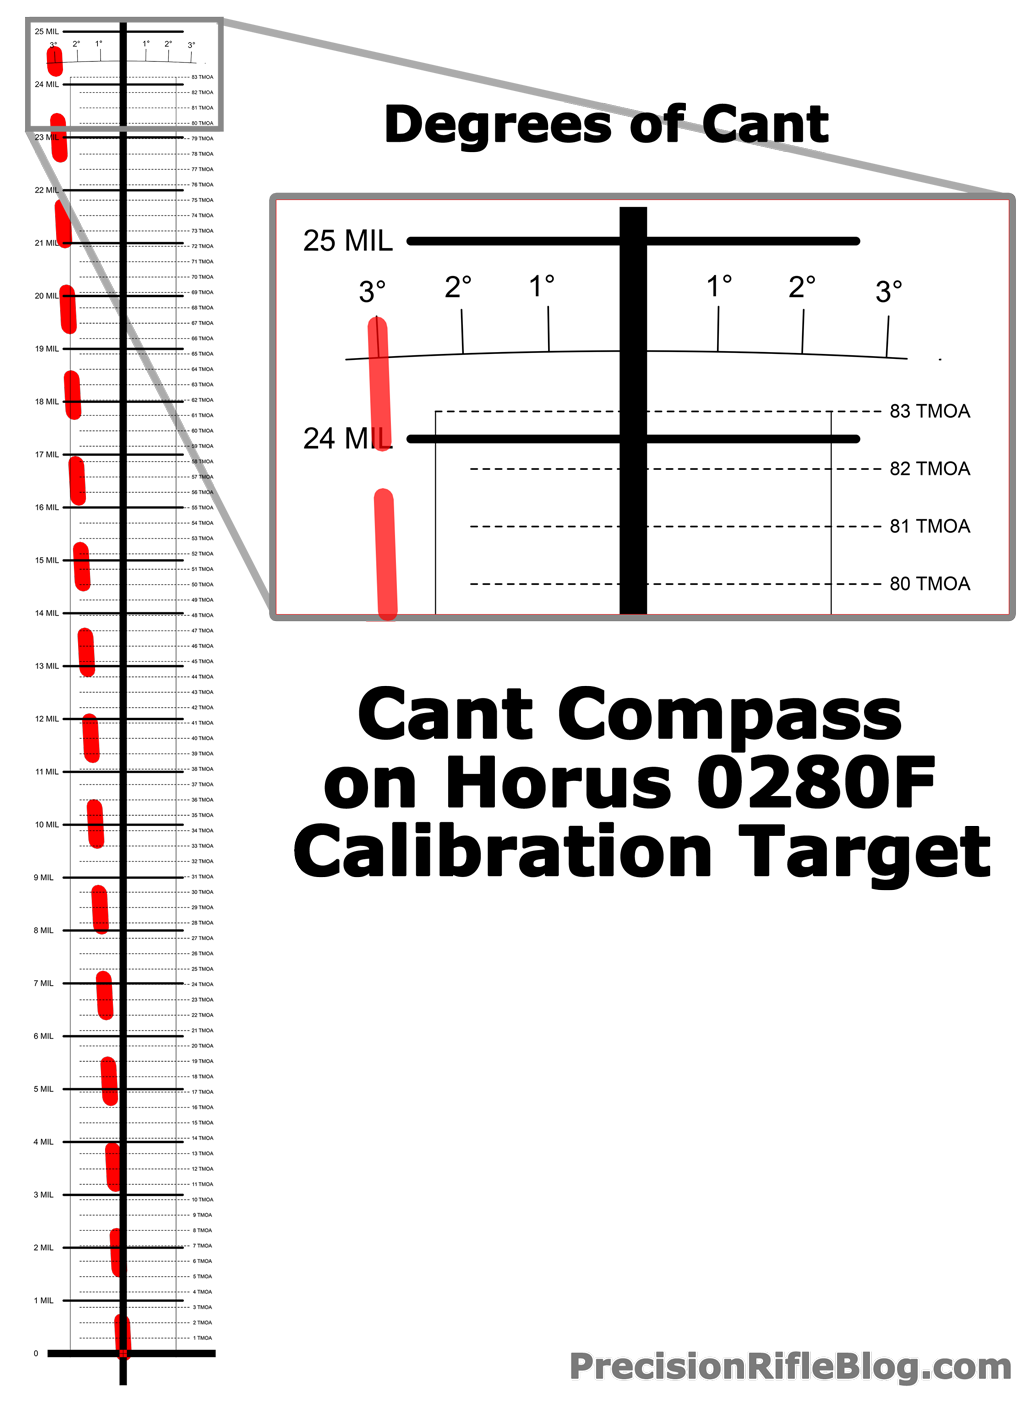
I used the same fixed mount setup in this test, as the click calibration test outlined in the previous post. This ensured none of the cant was due to rifle alignment, and the scope was held securely in place with only the internals allowed to move the POA.
In these tests, 15 of the scopes didn’t have any measureable reticle cant. A few had a measurable amount, but none were significant. Here are the results:
| No Measureable Cant | 0.5° Reticle Cant | 1.0° Reticle Cant |
|---|---|---|
| Kahles K 6-24×56 Leupold Mark 6 3-18×44 Leupold Mark 8 3.5-25×56 March Tactical 3-24×42 FFP Nightforce ATACR 5-25×56 Nightforce BEAST 5-25×56 Nightforce NXS 5.5-22×50 Schmidt and Bender PMII 3-27×56 Schmidt and Bender PMII 5-25×56 Steiner Military 5-25×56 US Optics ER25 5-25×58 Valdada IOR RECON Tactical 4-28×50 Vortex Razor HD 5-20×50 |
Hensoldt ZF 3.5-26×56 | Bushnell Elite Tactical 3.5-21×50 Bushnell Elite Tactical 4.5-30×50 Valdada IOR 3.5-18×50 Zeiss Victory Diavari 6-24×56 |
So back to the question … does it matter? I actually got the idea for the fixed mount I used in the test from Tim K at Sniper’s Hide. He used it to perform similar tests, and in one post he said he’d found 5° of cant in some scopes. If I would’ve found that much, I’d be very concerned. But, even the worse I found (1° cant) would only have 6” of horizontal error at 1,000 yards if it wasn’t accounted for (assuming the ballistics similar to a 308 with 10.0 mils of adjustment at 1,000 yards, it would be off 0.17 mils). Honestly, most people would struggle to “shoot between those numbers” at 1,000 yards (i.e. they aren’t able to consistently shoot 6” groups at 1,000 yards), although you’d have better odds of centering their group on the target without it there.
But, let’s look at it the effect when you stretch into long-range shots at 1 mile. The diagram below illustrates what the horizontal error would be with 5° cant, and what it would be with just 1° cant. This example assumes 20.0 mils of elevation adjustment to reach 1 mile, which would be ballistics similar to a 338 Lapua.
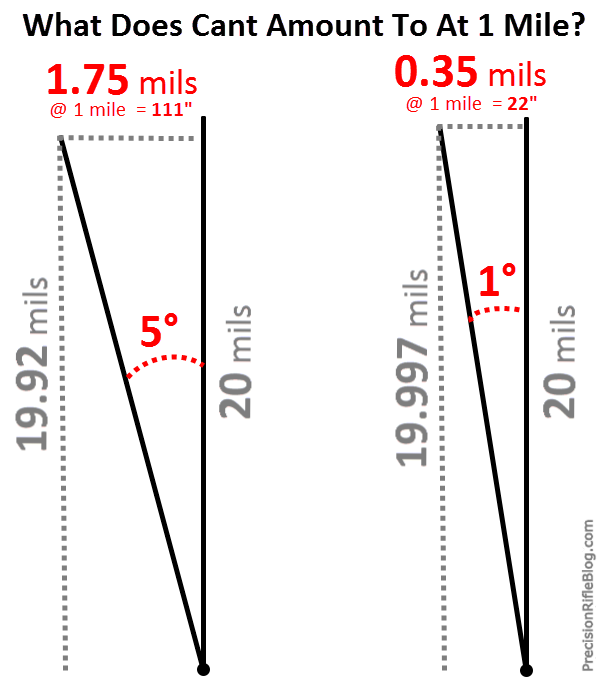
You can see that 5° of cant can equate to 9 feet of horizontal error at 1 mile! That would put you well off target, and honestly might have a hard time spotting misses that far away. 1° of cant can equate to 22” of horizontal error at 1 mile. While 22” may sound like a lot, we should keep it in perspective. If you misread a 10 mph wind by just 1 mph that can throw you off target by over 1 foot at a mile. This helps illustrate the point that it is easy to blame small amounts of reticle cant on poor wind calls.
You should know that it is easy to correct for reticle cant. If it is a significant amount, you can send it back to the manufacturer and they can repair it. You can also just rotate the scope 1° (or whatever the amount is) so the turrets will track straight up, which will eliminate the horizontal error. This does mean the reticle will be slightly rotated (i.e. it won’t be parallel with a plumb-bob), but that isn’t the end of the world. A reticle that is tilted 1° likely wouldn’t be distracting for most shooters. If you dial for elevation, it’s more important that the adjustments track completely vertical and the reticle doesn’t have to be level. If you hold for elevation, it’s the opposite (reticle needs to be completely vertical, and direction of adjustments doesn’t matter). But, if you sometimes dial and sometimes hold (or you’re clinically OCD), you should get counseling or ask the manufacturer to repair it.
Reticle Calibration
Another aspect I checked on all these scopes is how well the reticle hash marks were calibrated. Just like we want 1.0 mils of clicks on the turret to really equate to 1.00 mils of adjustment, we want a 1 mil mark on a reticle to really equate to 1.00 mils at the target.
Once again, I secured each scope in my custom fixed mount and pointed them toward a Horus 0280F Calibration Target. Horus has these targets printed by drafting company so they are made to ridiculously precise tolerances. I went through all of the same detailed measurements and setup as I did on the click calibration test, which I itemized in Part 1 of these mechanical results.
I measured several dimensions of the reticle against the ladder/grid on the calibration target, including hash marks along the vertical and horizontal axes, and if the scope including a Christmas-tree style hold-off grid I also spot-checked a few of dimensions within the hash grid. In full disclosure, I didn’t check every mark on every reticle, because that would have a taken a lifetime on some of these reticles. But I did measure at least 5 to 10 dimensions on each reticle (depending on its design), and if any of them had significant error present, I’d have found it.
I was somewhat surprised to see that none of the scopes showed any measurable amount of error in their reticles. You might be too. The reason I’m not completely shocked, is because I’ve heard a few accomplished shooters talk about how accurate a reticle was compared to mechanical adjustments. In fact, the latest issue of SNIPER Magazine had an article written by Todd Hodnett, one of the most well respected trainers in long-range shooting, and here is what he said on this exact subject:
“Another potential problem is not knowing whether your scope tracks correctly. Holding is always more accurate than dialing. A friend with a doctorate in optics agrees with me on this. Quality reticles are CNC laser etched. In testing, the turret has been proven not to track perfectly all the time. If you have a scope that does track, it will continue to track, but the key is knowing whether your scope tracks in the first place. I have seen too many that do not track.” – Todd Hodnett, SNIPER Magazine 2014
These independent tests seem to confirm exactly what Todd is saying here. We saw in the last post that even these top-shelf tactical scopes have a non-trivial amount of error in the turret adjustments. But, one option to that depressing news is avoiding turrets all together by using a hold-off reticle. These Christmas-tree style reticles allow you to hold for both elevation and wind corrections. Horus Vision is the leader in this space and has made inroads into the long-range community over the years, and there is definitely a trend among the top precision shooters towards these reticles, although it is still far from the majority. Among the top 50 shooters in the Precision Rifle Series, 1 out of 3 use a hold-off reticle (see the data).
At the very least, after reading the results from this field test, you can see the truth in Todd’s words. “In testing, the turret has been proven not to track perfectly all the time.” Yep. I’m not trying to convince anyone they should convert to a hold-off reticle, but this is an alternative solution to the problem of scopes not tracking. It just seemed relevant to mention it here.
Max Elevation Travel
If you’ve ever maxed out the elevation on your scope and had to hold off into space for an extreme-range target, you know how frustrating that can be. As if it weren’t hard enough to get hits on a long-range target, this can take it to a whole new level. One of my close friends is really trying to push the limits of small arms, and he has a rifle with a Surgeon action with 20 MOA of cant built into their integral rail, plus a scope mount with additional cant, and then topped it off with a Schmidt & Bender PMII 5-25×56 that provides a ton of adjustment, but he also went with the Horus H37 extreme range reticle which allows him to hold a little more when needed. Wow! While that may be extreme (or borderline psychotic), as long-range shooters we all want as much elevation travel as we can possibly get. So I actually measured the total elevation adjustment on every scope to see how they compare.
Although manufacturers advertise what this is for their scopes, I wanted to measure it for myself since it is such an important feature for long-range shooters. One important note is that I didn’t just count clicks. There were a couple scopes with turrets that would continue to turn and click even if it wasn’t actually moving the erector tube. That just meant the knob still had travel, but the Point of Aim (POA) wasn’t being adjusted. I kept a sharp eye out for that, and only counted the clicks where the erector tube was actually being adjusted.
The results are shown in the diagram below. Most of the test scopes were in mil/mrad units, but a few were in MOA, and the Zeiss was in Shooter’s MOA (which is slightly different). I’ve displayed them all in mils here to help with direct comparison.
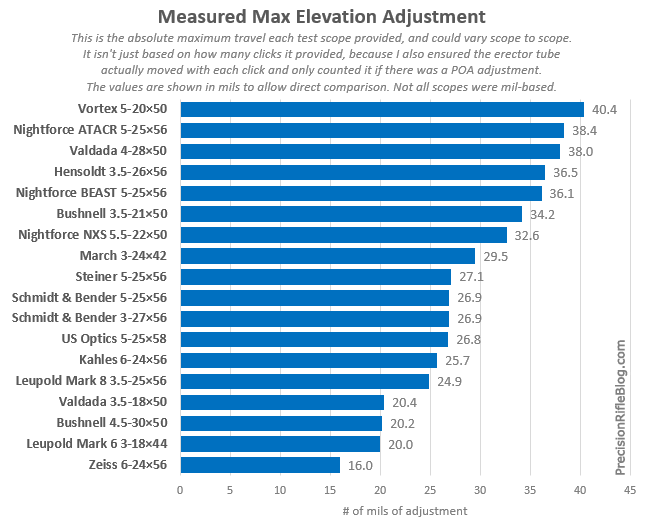
You can see there is a lot of variance in the amount of adjustment each scope allows. The most adjustment in the scopes I tested was found in the Vortex Razor HD scope, with a massive 40.4 mils of elevation. The Nightforce ATACR 5-25×56 and Valdada IOR 4-28×50 were close behind it with 38 mils of adjustment, followed by the Hensoldt 3.5-26×56 and Nightforce BEAST 5-25×56 with 36 mils.
On the other side, the Zeiss Victory 6-24×56 scope provides significantly less elevation adjustment than most in this class. The Zeiss Victory scope has 20% less travel than any other scope in this test. This could be a major concern for long-range shooters.
I want to add an important disclaimer that you likely won’t realize the max elevation adjustment shown here in the field. You will probably only realize 50-90% of the max elevation adjustment. Bryan Litz just published a great new book that has a concise explanation of why this is:
Here’s the problem: if you mount a scope on a flat rail, it will zero near the center of its range of adjustment, and you’ll only have about 1/2 of the scopes available travel to go up. So if your scope has 60 MOA of available travel and you zero it in the center, then you’re limited to 30 MOA of vertical travel. If you need 31 MOA, you’re screwed. The most common fix to this problem is to make use of an angled or tapered scope rail. A tapered scope rail is taller in the back than in the front, so that when you mount your scope, the muzzle is slightly elevated in relation to the line of sight. This causes the scope to zero closer to the bottom of its range of elevation, which means you have more capacity to go up, meaning you can adjust for more drop at longer ranges. – Bryan Litz
Here is a diagram I created to help illustrate what we’re talking about here:
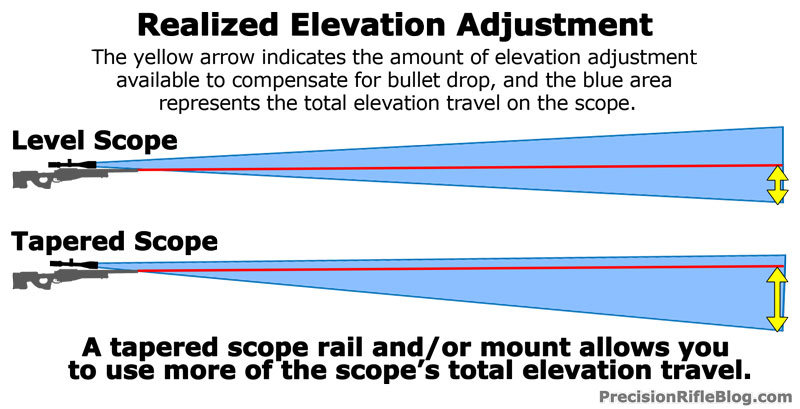
You can see in the diagram that a level scope only takes advantage of about 50% of a scope’s total elevation travel. The usable elevation adjustment is indicated by the yellow arrows, and the total adjustment is indicated by the blue area. On the level scope, the other half of the travel is in the opposite direction of gravity, and won’t ever be of use. What a waste! But, when you use a tapered rail and/or mount, you are simply tilting the scope so that more of its internal adjustment range is usable. This moves your zero from the middle of the travel closer to the edge of it, and there is less wasted adjustment. This can allow you to employ 70-95% of the max elevation range the scope offers, depending on how well you match the taper of the rail and/or mount to your scope.
The US Optics ER-25 scope actually has a unique solution to this problem integrated into the turret. In the US Optics manual for the ER-25 scope, it says “The Erector Repositioning Elevation Knob (EREK) incorporates a center screw for rough zeroing. This allows the knob to be zeroed near the bottom of its travel so that all movement of the knob is upward.” George from US Optics described that feature as a way to “allow the shooter to maximize gross elevation travel adjustment independent of the elevation knob. In short, there is more usable travel for shots taken at farther distances.” This is a very cool feature, and I’m not sure any other scope manufacturer offers this capability. This should allow you to address the issue of “wasted elevation travel” without having to resort to specialize rails or mounts. To learn more about this feature, check out a nice video from CS Tactical that walks you through the whole process.
Elevation Travel Per Revolution
In Part 1 of the ergonomics results, I compared the number of clicks per revolution and the “click density” of the elevation turret. If the adjustments were really packed together, it can be more difficult to ensure you’re on the adjustment you mean to be. It can be hard to differentiate between lines so close together. You also need good fine motor skills to be able to flip directly to the adjustment you’re intending, without overshooting it accidentally. The photo below shows how much this can vary between scopes.

The ergonomics post focused on how these factors impacted the feel and experience behind the scope. But now I’d like to focus on the mechanical performance aspect, and specifically how much elevation travel scopes provided with each turn of the knob. These are closely related, competing design characteristics, so I wanted to look at them separately.
Once again, most of the scopes were mil-based, but some were MOA and the Zeiss was Shooter’s MOA. But to have direct comparison, I’m displaying this as inches travel per revolution. If you want to know what a number is in mils, just divide it by 3.6. I didn’t think it was fair to just look at the travel per revolution for the model I happened to get in my hands for testing, so I also looked at similar models and options within the same line of scopes. The dark blue represents the scope I tested, while the light blue is another model that is available for purchase with more travel per revolution.

If you’ve had any experience with the Nightforce BEAST 5-25×56, you know it has a huge amount of travel per revolution. The MOA-based BEAST has 60 MOA in a single rotation, and the mil-based version provides 20 mils per rotation. Nightforce accomplish this by having 1/2 MOA or 0.2 mil clicks respectively (instead of the more typical 1/4 MOA or 0.1 mil clicks), and then introduced a switch that provides a 1/2 click of adjustment when flipped. For more on this, see the ergonomics post on the Nightforce BEAST.
But I was surprised to see how close the Hensoldt ZF 3.5-26×56 was to the BEAST. The Hensoldt provides the more standard 0.1 mil clicks, and still offers 18 mils of adjustment per revolution! Of course, it does this by packing them in there, and that was obvious when I compared the click density of each scope. The Hensoldt scope had a click density that was almost 50% higher than 90% of the scopes in this test. You can see how tightly packed they are in the photo above. But as I mentioned in the other post, it has a very positive click that allows you to still feel in control more than you might think with them that close together.
The Steiner 5-25×56 scope, Kahles 6-24×56 scope, and Schmidt and Bender PMII scopes also offered a lot of elevation adjustment per revolution. The Steiner Military 5-25×56 provides 15 mils per revolution, and the Kahles and Schmidt and Bender scopes all provide 14 mils per revolution.
One interesting note is that all the scopes I’ve mentioned (the top 6 on the chart) are double turn turret designs, which just means there are only two revolutions. This makes keeping track of what revolution you’re on much easier. This is a relatively new design technique, but it is quickly gaining popularity. The Leupold Mark 6 and Leupold Mark 8 scopes are also available with double turn turret designs.
Windage Adjustment
I debated on even including this, because most long-range shooters hold for wind instead of dialing (at least in variable speed wind). Most factors that effect the flight of a bullet are deterministic, meaning they can be measured or calculated before you get behind the rifle (like muzzle velocity, atmospheric conditions, range, sight height, etc.). But wind deflection is a non-deterministic element, because it is fluid and constantly changing. A wind call that resulted in a dead center hit 60 seconds ago, might not land you on target for a follow-up shot. So if you’re behind the rifle about to send a round, and you feel that 12 mph wind suddenly ease to 7 mph or change from a 3 o’clock wind to a 1 o’clock wind … its easier to adjust a hold in the moment than adjust the knob. I’ve only witnessed one serious shooter ever dial for wind in the field. He did get hits on a 1 mile target, so I’m not proposing dialing for wind is wrong … it just isn’t as common. But, I’ve included it for the sake of completeness and for the few who use that approach.
Unlike elevation, I’m not going to quantify the total windage travel available. Once you are zeroed, you realistically would only use the labeled portion of the windage knob. While the elevation knob might have two rows of numbers (like the one shown below), the windage knob is usually only used for adjustments in one direction or the other. If you need more than 1/2 a turn in either direction, it can get confusing because of how these are labeled. They’re really designed to just be used for 1/2 a revolution in either direction to compensate for wind, and that is plenty for most conditions and ranges.
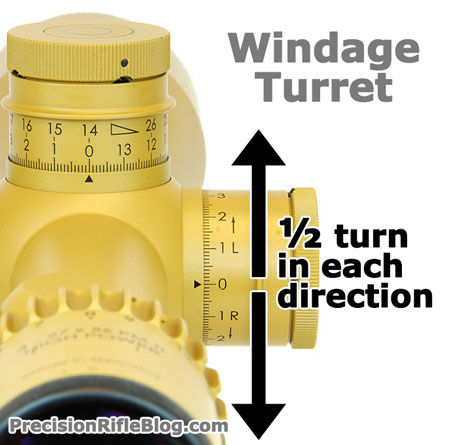
So the chart below shows the amount of wind that is marked on each turret. This essentially represents what 1/2 revolution is on each scope, unless the turret isn’t labeled all the way around. It is just what it is labeled for in one direction. So these values can be thought of in terms of plus or minus, for example: ±5 mils.
Once again, most of the scopes were in mils, there were a few in MOA, and the Zeiss was Shooter’s MOA. But here I’ve displayed them all in mils for direct comparison.

The Hensoldt ZF 3.5-26×56 has been an extremist throughout the entire field test, and it shows that again here. It provides ±9 mils of windage adjustment (at least that’s what is labeled). But that may be overkill. Honestly, the ±2.5 mils of windage provided by the Vortex and Bushnell scopes could be adequate for most shooters and scenarios.
Let’s look at the ballistics for a few different cartridges, and this can help put wind drift adjustments in perspective. The table displays the adjustments in mils needed to compensate for a 10 mph crosswind at various ranges. I’ve listed adjustments out to just beyond the supersonic range of each cartridge (I know your cousin has a friend that shoots a 308 out to 3 miles, but he’s probably a superhero).

So I guess you’d need the ±9 mils of adjustment the Hensoldt provides if you’re shooting a 338 Lapua out to 2,500 yards in a 20 mph wind. Good luck! I shoot in windy West Texas, and it’s rare that I need more than 4 mils of hold for wind, and very rare for me to hold more than 5 mils. I hope this offers some perspective for what you might realistically need to dial for wind adjustment.
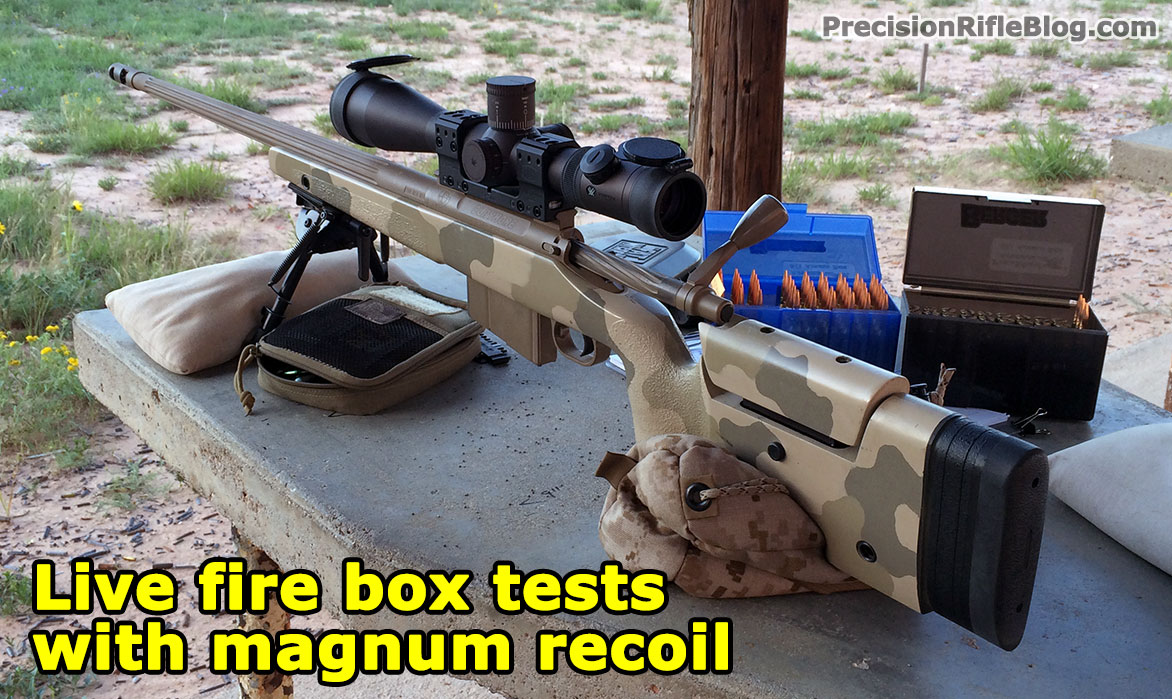
Magnum Recoil Box Tests
In addition to the detailed mechanical calibration tests I covered in my last post, I also mounted each scope to a magnum rifle and performed a huge box test. For this test, I used another target from the Horus Calibration and Training System (CATS) line of targets, the 0303E MIL Series target. These targets are extremely versatile and can be used for a variety of reasons. But one of the reasons they were designed was to “validate the accuracy and repeatability of the numerical values and ‘click’ adjustment of both the elevation and windage adjustment knobs in your riflescope.” Perfect. Like all of the Horus CATS line of targets, these are printed by a drafting company, so they are ridiculously accurate.
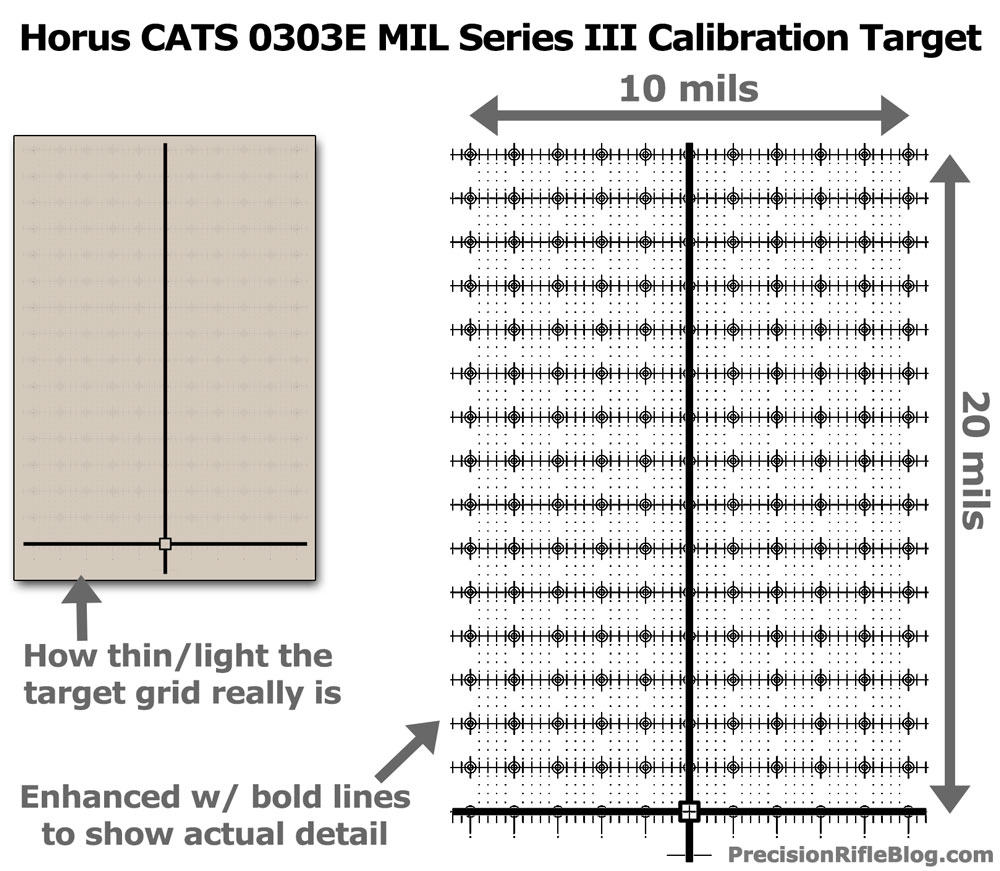
This particular target has very thin lines that are virtually impossible to see through the scope. You can only see them when you’re standing right in front of the target. This is actually by design, and helps in testing like this to ensure you aren’t trying to game the system by modifying your aim to compensate for a POI shift. The tester should just be aiming at the intersection of the bold lines and turning knobs. Then after you finish, you can go check the results … you just don’t have any feedback until the test is over and you walk downrange.
For this test, I used a custom 7mm Remington Magnum rifle that I personally own. With OCD-prepped handloads, this particular rifle is capable of 5 shot groups with an extreme spread ranging from 0.4 to 0.7 MOA. The ammo I used was Berger 168gr Match VLD’s over 69.4gr of Hodgdon Retumbo with Norma brass and Federal 210M primers. This was my first custom rifle, so I’ve shot it a lot and I’m very comfortable behind it. I recently had it rebarreled, and it only had 100 rounds down the fresh chamber before I started these tests. The rifle currently weighs in at 11 pounds bare, and 14 pounds fully loaded (optics, bipod, loaded mag, etc). So it isn’t a featherweight (who wants to shoot a 7 pound magnum), but it isn’t a fat target/benchrest rifle either.
This test was the main motivation for me to use Spuhr mounts for all of the mechanical tests. I believe they’re the most rock-solid mounts money can buy. I’ve used them on my personal rifles for a couple years, and they’ve proven themselves in the field. Although Spuhr mounts are expensive (typically around $400), I wanted to go to extreme lengths to know with certainty that any point of aim shift recorded was NOT due to movement within the mount. Spuhr mounts provide that confidence.
Spuhr mounts have a couple features that were especially helpful for these tests. First, they’re a one-piece mount that are precisely machined from a single billet of aluminum, which means there is no need to lap the rings. The rings are perfectly aligned, which ensures more surface contact with the scope tube and also prevents stress on the scope tube, which can dent the tube, distort the reticle, and cause adjustment problems. Spuhr mounts also feature a bubble level built into the rear of the mount, which I used to ensure the mount was completely level during the tests.
I followed the same steps I outlined in the last post in regards to confirming the exact distance to the target using a Leica Disto E7400x Laser Distance Meter, which is accurate to ± 0.1 mm. I also ensured the target frame was at a 90° angle with the rifle, and the target was perfectly plumb vertically.
The Horus calibration target made this test straight-forward. After mounting a scope in a Spuhr mount according to manufacturer torque specs, I’d get a good zero at 100 yards and then reset the turret on the scope so it was pointing to 0 for both elevation and windage.
Then I aligned with the aiming point with the center of the upside down cross on the target. There is an aiming square where the two bold lines intersect, and that target design actually makes it very, very easy to ensure your scope is perfectly aligned before you start to squeeze the trigger. In fact, after using these style targets for this field test I’ve designed some smaller versions that I use for firing groups while I’m out at the range. I’m convinced the bold lines that cross can help shrink your group, or at the very least, I’ve learned I prefer it over standard targets or aiming dots.
I fired 7 shots, aiming at that same point for each shot and simply adjusting the knobs between each shot.
- Start with a 100 yard zero (Elevation: 0 mils, Wind: 0 mils)
- Dial up 20 mils (Elevation: 20 mils, Wind: 0 mils)
- Dial right 5 mils (Elevation: 20 mils, Wind: 5 mils right)
- Dial down 20 mils (Elevation: 0 mils, Wind: 5 mils right)
- Dial left 10 mils (Elevation: 0 mils, Wind: 5 mils left)
- Dial up 20 mils (Elevation: 20 mils, Wind: 5 mils left)
- Dial down 20 mils & right 5 mils (Elevation: 0 mils, Wind: 0 mils)
The photo below shows an example of the shooting sequence. It is actually the results for the Schmidt and Bender PMII 5-25×56 scope.

The results from this test were another surprise for me. Although there was some slight variation, the results closely resembled the results from the mechanical calibration test. If one of the scopes hit high at 20 mils, I’d record that … only to notice later where I was reviewing the data in the spreadsheet that the scope performed exactly that way on the mechanical calibration test as well. I know that may sound obvious, but it was frustrating for me because of the amount of setup time that went into this test. I was hoping to walk away with a new insight, but I didn’t find anything. The few times I thought I’d found a discrepancy, it turned out to either be within the margin of error of the rifle’s grouping capability or when I reran the test it wouldn’t appear again … leading me to believe it was more likely an error with the ammo (maybe a primer was slightly hotter or one of the 100 other possible causes), or maybe I simply pulled it. I’m going to blame the ammo … or the rifle. It couldn’t be me!
Honestly, I expected there to be some type of scope error identified on this test like a failure to retain zero under recoil. After analyzing the results, I’ve concluded this test might could yield insight if you fired significantly more rounds with each scope. Unfortunately, that exceeds my budget. I’ve already spent hundreds of dollars on this test out of pocket. If I fired 50 rounds using each scope, the ammo components alone would easily add another $1,000 … not to mention the time commitment to load and fire all those rounds, and the barrel wear that would come with it. So I came to terms with accepting the results I had.
If anything, I believe this should be a vote of confidence for the Spuhr mounts. Those mounts could be one reason I didn’t see more movement on these scopes. When I hear a shooter complain about their rifle no longer grouping or starting to shoot erratically, I’ve learned to immediately check the scope mount. In my experience, that is the culprit more times than not. So my piece of advice, is please invest in good scope mounts. I’ve seen so many guys spend thousands on a rifle, another couple thousand on a scope, and then buy whatever mounts they find in stock at the local gun shop. They aren’t all the same! Even if you don’t want to drop $400 on a Spuhr mount, there are lots of other quality brands of rings and scope mounts: American Rifle Company, LaRue, Badger Ordnance, American Defense, and others. Every precision shooter knows the rifle is important, and the scope is important … don’t cut corners on the bridge between the two.
Since the results of this test matched the fixed mount mechanical calibration tests so closely, I’m just going to refer to those results instead of posting results that involved a much higher margin of error. The scope was essentially in a vise for those tests, and didn’t have near as many moving parts as this one (rifle, ammo, shooter). Since the results were so similar, I’m sure the more clinical test is the better representation of the truth. You can check out the results I’m referring to in Part 1 of the mechanical performance results.
Other Post in this Series
This is just one of a whole series of posts related to this high-end tactical scope field test. Here are links to the others:
- Field Test Overview & Rifle Scope Line-Up Overview of how I came up with the tests, what scopes were included, and where each scope came from.
- Optical Performance Results
- Summary & Part 1: Provides summary and overall score for optical performance. Explain optical clarity was measured (i.e. image quality), and provides detailed results for those tests.
- Part 2: Covers detailed results for measured field of view, max magnification, and zoom ratio.
- Ergonomics & Experience Behind the Scope
- Part 1: Side-by-side comparisons on topics like weight, size, eye relief, and how easy turrets are to use and read
- Part 2 & Part 3: Goes through each scope highlighting the unique features, provides a demo video from the shooter’s perspective, and includes a photo gallery with shots from every angle.
- Summary: Provides overall scores related to ergonomics and explains what those are based on.
- Advanced Features
- Reticles: See every tactical reticle offered on each scope.
- Misc Features: Covers features like illumination, focal plane, zero stop, locking turrets, MTC, mil-spec anodozing, one-piece tubes
- Warranty & Where They’re Made: Shows where each scope is made, and covers the details of the warranty terms and where the work is performed.
- Summary: Overall scores related to advanced features and how those were calculated.
- Mechanical Performance
- Summary & Overall Scores: Provides summary and overall score for entire field test.


This is the best rifle scopes test …
2014 High-End Rifle Scope
Shows how precisely calibrated the clicks are on each riflescope
congratulation
Thanks again Cal for bringing this all together. I think the box test and the grid reinforces the previous conversation that there is no agreed industry standard for MIL adjustments. I note there has been some comment in the forums about “it has to be xxx” but my feeling is that outside the US, NATO standard systems have influenced some manufacturers and this needs to be taken into account.
What I hope this review of yours will do is cause a rethink of what a MIL standard actually is and manufacturers will start to publish that.
Looking forward to the final two Blogs.
Excellent scope test and information. Shouldn’t the EREK knob advantages be covered in this section?. It is one of the big advantages the USO has that counters its size/weight. Surprised that wasn’t highlights in the mounting and usable elevation section.
Great suggestion! You’re absolutely right. I had mentioned the cool feature you’re referring to that is built into the EREK knob in the “Misc. Advanced Features” post (where I was talking about Zero Stop), but it is definitely worth repeating in this post as well. I added a paragraph about it under the “Max Elevation Travel” section that highlights the unique solution US Optics has integrated into their turret. Thanks for the input!
You can publish a book with the content of this test. Title: How do you test and select the best scope?
A properly edited set of YouTube videos would show the reality of all these man hours yet give visual “proof-house” evidence that you did accomplish this magnificent feat. U refer to West Texas so living south and west of Fort Worth I realize the heat and cold extremes you must have had to deal with. You must be part German.
Man, I wish you would’ve told me that during the peer-review period! You’re absolutely right. If there is one thing I regret about this whole 7 month scope field test project … it’s that I didn’t video more of the testing. Honestly, if I would’ve done that … it would have helped people see how reliable these tests really were. I went to extreme lengths (even beyond what is mentioned in the posts), and a little video clip would’ve been able to illustrate all that stuff. It would’ve definitely silenced a lot of the critics. I really, really wish I would’ve thought of that before this point … but I didn’t.
What I can’t understand is why did the Bushnell XRS you tested only had 20mils of total elevation ??? I own both the 3.5-21 dmr and the 4.5-30 XRS and the dmr has 34mils of total elevation and the xrs has 33mils. it is somewhat involving to set the zerostop and even more so to re-set it, and maybe this was the problem ?
Great question, Zero. Someone else made that comment on another post. I don’t know if I had an older model, or if they’ve changed the spec … or if the one I had was just bad. All I know is the unit I tested allowed 20.2 mils of total elevation adjustment, which is still more than what Bushnell advertises for that scope. On their website, Bushnell clearly says the “Adj Range” for the XRS 4.5-30×50 scope is 50 inches at 100 yards. 1 mil = 3.6 inches at 100 yards. So 50 inches / 3.6 inches per mil = 13.9 mils. So they’re advertising 13.9 mils of adjustment range for that scope, but I measured it (in a very detailed, but straight-forward way) to be 20.2 mils. Here is the product page on their website for that scope:
http://www.bushnell.com/tactical/rifle-scopes/elite-tactical/xrs-4-5-30x-50mm
I’d say if you already bought it, and know your scope has 33 mils … good for you! Elevation adjustment range only played into 15% of the overall mechanical score, so even if you assumed it should have received the same amount of points for that as the Bushnell 3.5-21 … that would have boosted it’s mechanical score 7 points, but that wasn’t enough to even make it move one place. It was originally at a score of 70, and the one above it was a 79. Unfortunately, the XRS I tested had almost 1% of error in it’s elevation adjustment … which isn’t insignificant. That’s the biggest reason the Bushnell XRS ended up towards the bottom of the pack in terms of mechanics.
Sorry for taking so long to reply, but I just wanted to ensure I had looked into this thoroughly before I responded.
Thanks,
Cal