By understanding how rangefinders work, you’ll be able to employ them more skillfully in the field. This article should equip you with the fundamental principles.
Laser rangefinders (LRF) all work using the same basic concept. The rangefinder emits laser beams at the push of a button. Those beams bounce off distant objects and the rangefinder’s high-speed clock measures the total time it took from when the beams left the unit until they returned. Since we know how fast the beam was traveling (speed of light) the unit can simply use that time measurement to calculate the distance it traveled, and then it displays the distance to the user.

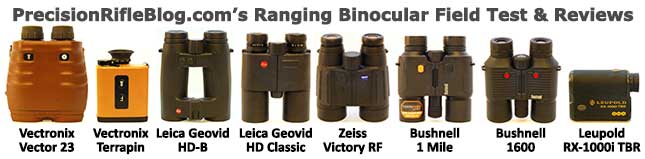
Although laser rangefinders all work along those same lines, there is a lot of room for innovation around the implementation details. I recently reviewed 8 of the top laser rangefinders used for hunting and long-range shooting, and was shocked by how much variance there was in their performance.
Ranging performance depends on many factors, but here are the biggest differentiators between rangefinders when using them for long range shooting or hunting. I’ll touch on most of these in more detail throughout the article. Special thanks to Mike at Vectronix for talking through this with me and putting so much thought into this list.
- Ability to spot the target – This means good quality optics with proper magnification. You can’t range the target if you can’t find it. Most shooters opt for an 8x or 10x magnification. While doing field tests on rangefinders we searched a field for targets using 5x magnification, and we thought we’d found all the targets. However, after searching again with 10x magnification we immediately saw one more target that we’d completely missed with the 5x unit. But like I’ve mentioned in other posts, really good glass can sometimes make up for magnification. I can see more detail on a 2000 yard target using a 45x Leica spotting scope than a 60x Bushnell spotting scope. The point is quality glass and appropriate magnification both matter, and you can’t totally ignore one or the other.
- Ability to get laser energy on the target – This has a lot to do with beam divergence, which is a description of how “focused” the beam is. There are a few trade-offs between a very tight or larger beam divergence, which we’ll talk about later in this article. There can also be a difference in the quality of the laser pulses transmitted, in terms of the type, wavelength, and sharpness … although those things can be very difficult to quantify.
- Receiver aperture size – This is the size of the opening on the receiver optic that captures the return readings and sends it to the actual sensor. A larger aperture can have a huge impact in how much return data the unit is able to collect, which can allow the unit to perform at greater distances and can help the resolution/accuracy of measurements at a shorter distance as well.
- How the unit analyzes results – There are a lot of differences between how rangefinders interpret the readings once they receive them, and some are much smarter than others. Older models simply displayed the first reading that returned to the unit, but many modern rangefinders use “multi-pulse technology.” This approach emits a burst of hundreds or even thousands of small laser pulses over an extremely short period of time. It then collects a large sample size of readings, then analyzes those results to identify/ignore outliers (like brush, fog, rain) and determine the reading you are intending to range with more certainty. More beams emitted can also help the odds that you’ll get a reading off a small and/or non-reflective target. The logic and algorithms used to determine what to display to the user can have a major impact on how well a rangefinder performs.
Beam Divergence – The Ability to Get Laser Energy on Target
Beam divergence, also referred to as beam dispersion, is an angular measurement (typically in mils) of how “focused” the laser beam is. Smaller beam divergence provides greater ranging precision and greater max distance in most situations. With rangefinders of similar quality, beam divergence can be a major indicator of ranging performance. If you can focus 100% of the laser energy on the intended target, you have a much better chance of getting multiple readings off of it. However, if a rangefinder is smart in how it analyzes the readings, it can make up for less than ideal beam divergence … so contrary to popular belief, beam divergence is not the only factor to consider.
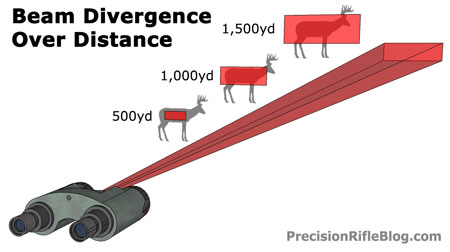
To understand beam divergence, think of shooting two rifles at a target 1000 yards away. One of those rifles averages 2.5” groups at 100 yards, and the other averages ½” groups. Which of those would give you the better chance of hitting your intended target at 1000 yards? Now if you are trying to hit a 12” target at 300 yards, either rifle should work. But as you stretch out the distance (or shrink the target size), the smaller divergence becomes critical. This is the same for beam divergence on laser rangefinders. If you are ranging relatively large (deer size) targets at ranges under 500 yards … there is probably no need to worry about beam divergence. But as the targets get further or smaller, beam divergence quickly becomes critical to accurate ranging.
I’ve heard of beam divergence as large as 4 x 2 mils, and one military-grade model I’ve tested was under 0.3 mils … so there is a lot of variance out there. Here is a diagram that illustrates how big of a difference beam divergence can be at 1000 yards.

One scenario where a very tight beam divergence may be a drawback is if you are trying to range a distant target offhand (i.e. not supported by a tripod). In that case, the motion caused by the unsupported position may make it difficult to hit the target precisely with a tightly focused beam. On the other hand, if you had a beam with more divergence you could more easily hit the target even with some wobble and then rely on the rangefinder’s “smarts” to determine what you were intending to range within that larger window.

I was talking to a representative from Vectronix, and we both agree that a beam divergence around 1.5 x 0.5 mils is probably ideal for targets in the range of 500 to 2000 yards, although that isn’t a hard and fast rule.
Factors Affecting Measurement Range
There are a number of factors that influence how well a rangefinder is able to perform, including target properties, atmospheric conditions and rangefinder support, and those all play into the maximum effective range of the unit in a given scenario. Here is a very helpful diagram provided by Vectronix that illustrates what those are:
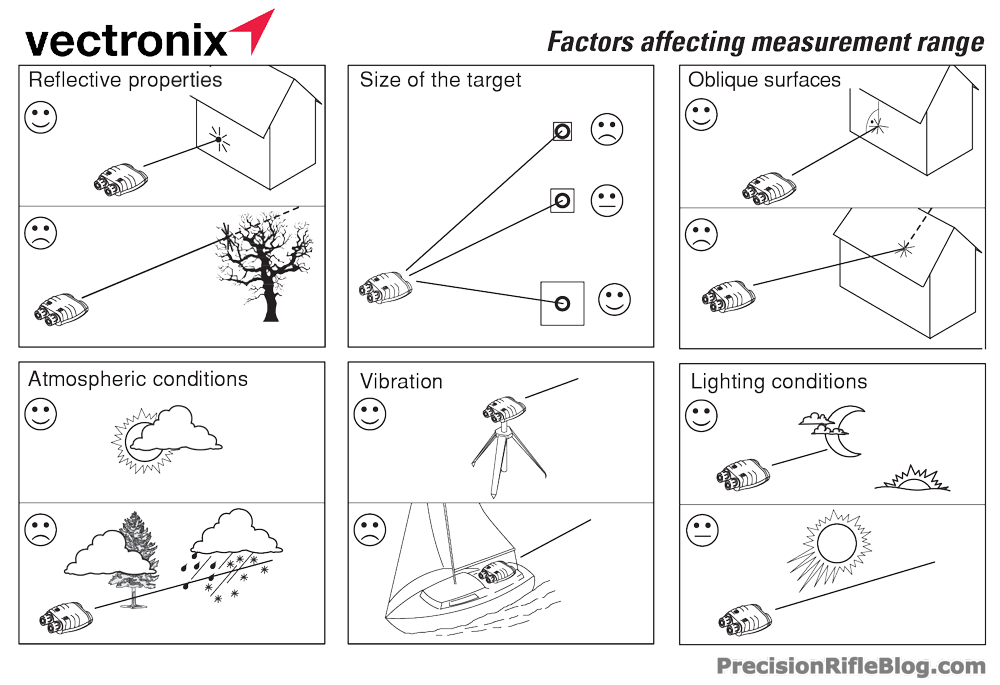
When manufacturers advertise a rangefinder to have a max range of 1000 yards or 1 mile, you can usually translate that to meaning there is a chance you might get a reading at that distance, but only under absolutely ideal conditions (e.g. low light, off a tripod, on a very large, reflective target). In my experience, you will usually only be able to get readings out to 70-80% of that advertised max distance under most daytime conditions (bright light) on a 2 MOA reflective targets.
Understanding What the Rangefinder “Sees”
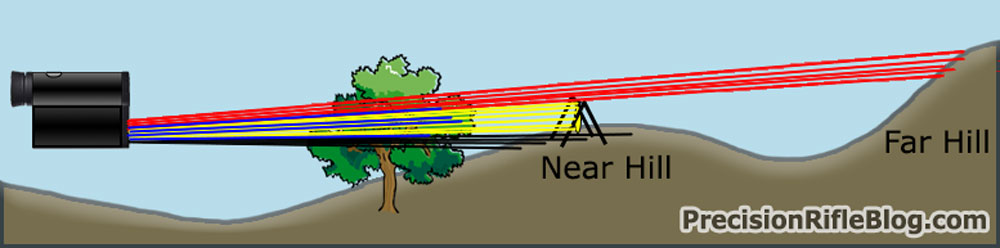
The easiest way to understand how rangefinders work is through a quick example. The diagram below shows a couple tough ranging situations, with each of the yellow targets highlighted by a red box meant to indicate the related beam divergence when trying to range that target. You can see in each situation there will likely be readings returned for the tree, the target, the near hill, and the far hill.

The next few illustrations show what the rangefinder might “see” when it tries to range one of our tough scenarios. The first diagram has a grid of just under 200 boxes. You can think of that as all of the beams emitted by the rangefinder. The blue boxes indicate beams that were reflected back to the rangefinder that it was able to record as readings. Boxes that aren’t marked blue mean the rangefinder didn’t get a reading back from that beam, which may be due to things like poor reflectivity (e.g. the tree doesn’t reflect as well as a metal target) and angled objects (e.g. the hills are at a shallow angle away from the user, instead of directly perpendicular like the target). Note: This is example is only meant to illustrate the theory and concept behind how rangefinders work. It is easy to get lost in the technical details, so this is a simplified example.

Here is a side-view of the same target that shows the readings the rangefinder received, and what those beams hit (click on the image to zoom in).
In less than half a second, the rangefinder will have received all of the readings, and it creates a graph of those readings similar to the one shown below. This essentially represents what the rangefinder “sees,” or what data it has on hand with which to make a decision about what distance to display to the user.

How a Rangefinder Analyzes Results & Decides What to Display
This is where it gets interesting. There are a number of approaches rangefinders could be programmed to use to determine which of the readings it should display. Here are a few of the most common.
- 1st reading – This is how older rangefinders worked, and there are still a few that use this simple approach. When the unit receives the first beam reflected back to it (the closest object), it calculates and displays the corresponding distance. In our example, this approach would display 225 yards.
- Closest spike – This is similar to #1, but it looks for the closest peak instead of the closest single reading. This approach can help filter out “false” readings from things like rain or fog, which are more scattered in pattern and don’t really result in a peak. There may be a “threshold” hard-coded that says something like “look for the first spike that has at least two readings for the same distance.” In our example, this approach would display 230 yards.
- Highest spike – This looks through the entire set of readings, and finds the largest peak of readings for the same distance and assumes that is what you are intending to range. This is a good approach in general, but especially helpful when ranging reflective targets that are perpendicular to the user. In our example, this approach would display 350 yards (our intended target).
- Largest cluster – This approach would also analyze the entire set of readings, and look for the biggest group of readings. In our example, you can look at 350 yards and see there is a group of 7 readings next to each other (these hit the target, the target stand, and the ground near it). But, if you look at 650 yards there is a group of 8 readings next to each other (these hit the far hill). So the approach would display 650 yards.
- Furthest spike – This is similar to #2, but it looks for the peak that is the furthest out. This approach is helpful when trying to range a target that is partially obscured by brush. In our example, this approach would display 660 yards.
Isn’t it crazy how many ways a rangefinder can interpret the results? The fact is, none of the approaches are perfect in every situation. I intentionally picked a tough example that illustrates the weaknesses of each approach, and even though approach #3 happened to give us the range to our intended target, I could think of other scenarios where the highest spike approach wouldn’t yield the correct result (like if the target wasn’t highly reflective or completely perpendicular to the user).
Most rangefinders are hard-coded to always use a single approach (usually either #1 or #2), but there are a few models that are becoming much smarter in how they analyze readings.
Allow the User to Specify the Best Approach
The Bushnell Fusion binoculars provide three different modes the user can select from:
- Normal – This is similar to either approach #3 or #4, and is their best all-around approach.
- BullsEye – This is similar to approach #2. The Bushnell manual says “this advanced mode allows easy acquisition of small targets and game without inadvertently getting distances to background targets that have stronger signal strength. When more than one object has been acquired, distance of the closer object will be displayed.”
- Brush – This is similar to approach #5. The Bushnell manual says “this advanced mode allows objects such as brush and tree branches to be ignored so that only distances to background objects are displayed. When more than one object has been acquired, distance of the further object will be displayed.”
In my view, these “advanced modes” are an innovative feature, and something the other optics manufacturers should take notice of. Essentially this allows the user to “hint” at what approach will give them the best chance of getting the reading on their intended target. Ultimately, the user knows more about the particular situation they are trying to range, for example if there is brush partially obscuring the target or they are trying to range a very small target. These modes simply provide a way for them to convey that info to the rangefinder so it can better interpret the results.
I recently did some comprehensive field tests on several rangefinder binoculars, and tried to range the target in the picture below. The target is a huge 30” square turned like a diamond, and it was only 360 yards away. The few branches that were partially obscuring the target were 103 yards away. I tried rangefinders made by Leica, Zeiss, Vectronix, Bushnell and Leupold and almost all of them would only give me a reading of 103 yards. The new Bushnell Fusion 1 Mile pair in brush mode gave me a reading of 360 yards most of the time. And although the Vectronix Terrapin model would only give a primary reading of 103 yards, the Vectronix Vector 23 binoculars gave a range of 360 yards every time. (Note: The Vectronix Terrapins do have a “3 DIS” feature I’ll touch on later that would’ve allowed me to see the 360 yard reading.)

Allow the User to Explore the Readings
Vectronix has a feature on all of their rangefinders called “Multiple Object Measurement” (also known as “3 DIS”) that you could enable to make it show the top 3 readings from a single measurement. It will automatically highlight the distance it thought you were intending to range, but also shows you the second and third strongest readings received as well. For example, if you were ranging a tree at 250 yards, and 100 yards behind it was a jeep, and 1000 yards behind that was a building … it would display 250, 350, and 1350 (and probably highlight the 350 yard reading).

The point is to ensure the real range information is available to the user somehow, instead of hiding it from them. The unit obviously has this information already, so it would really just be creating a way for the user to view and scroll through those readings (preferably in order from strongest to weakest). This would only need to be the top few readings. This feature isn’t something that you’d want to use on every measurement, but in tough ranging scenarios (which aren’t uncommon) having a quick and intuitive way to see the full set of possible readings could make the difference between knowing the range or not. At the very least, it would give the user additional confidence that the reading displayed was the intended target.
Just Make Them Smarter
The Vectronix Vector 23 model illustrates that you don’t have to have the “advanced modes” to be smarter about deciding what reading to display. In fact, I couldn’t come up with a single tough ranging scenario where the Vector 23 would give me a reading for anything other than my intended target. I never once had to enable the “3 DIS” feature in my testing for the Vector 23, because the range it displayed was always the one I was trying to get.
Now the Vectronix Vector 23 model costs around $24,000, and I know that puts it in a different class than most other rangefinders. But it does prove there can be a huge performance difference in rangefinders just by how smart they are about analyzing results and deciding the correct distance to display. I’ve personally developed software professionally for over a decade and I know this is possible on the software side. Subtle improvements in the algorithms used by the unit to determine the distance can make huge leaps in ranging performance … and cost almost nothing compared to the parts and labor that go into a high-end rangefinder.
I’m sure as time goes by and technology advances, this type of performance and innovation will trickle down into the more consumer-priced rangefinders. Hopefully this post will educate more consumers, and help motivate manufacturers to integrate these innovative features sooner rather than later.
Other Posts in this Series
This is just one of a whole series of posts related to this rangefinder field test. Here are links to the others:
- How Do Rangefinders Work? From Basics To Advanced Features
- The Models & Specs
- Optical Performance Test Results
- Ranging Performance Test Results
- Overall Results Summary
While performing the field tests I used each model to range 500 times on average … so I used them a lot. I also asked two of my close friends to use them, and I took notes on what we did or didn’t like about each of them. I transformed those notes and the test results for each model into comprehensive reviews for each model. I also took a bunch of high-res pictures of each model and have a photo gallery of each posted along with the review. Check them out:
- Vectronix Vector 23 Review
- Vectronix Terrapin Review
- Leica Geovid HD-B Review
- Zeiss Victory RF Review
- Bushnell Fusion 1 Mile Review


What I am getting from reading these posts is:
1- a person has to be rich to shoot any firearm if they want to be competitive
a-cost of rifle $5,000.00
b-cost of rifle scope $4,000.00
c-cost of rangefinder $23,000.00
d-cost of spotter scope $3,000.00?
e-cost of precision ammo $1,000.00 per month?
f-cost in time $$$$$$$
g-other cost I haven’t investigated yet?
2- a person has to have access to a place to shoot Long Range Shooting
a-cost of driving to the range
b-cost of wear and tear on your vehicle
c-cost in man hours for transportation
d-cost of the use of the range
Only a rich man can afford to be competitive in precision Long Range Shooting
Charley, I think you may be exaggerating a bit. This can become an expensive hobby, but it’s cheaper than a bass boat! 😉 I don’t have all that equipment, and you definitely don’t need it to get started. I think you should get a rifle capable of 1 MOA, a decent scope (I have suggested a few around $500 or less, and handload if you’re worried about cost starting with a $170 Parnter Press Kit. If you get into it, upgrade as you see fit.
In every field test I point out the biggest value … you just quoted all the most expensive stuff. I don’t appreciate the attitude. I try to be gracious and a nice guy, but I do all this for free in my spare time. Go somewhere else if you don’t appreciate what I’m writing about.
Thanks,
Cal
I for one appreciate all your articles, I would say the hardest part is finding a place to shoot. I can only shoot about 350 yards unless i want to drive 3 hours to a range. Most factory rifles shoot great out of the box nowadays so no need to have a custom 5k rifle. I have a remington 700 243 varmit, and i can shoot bullets into the same hole all day long with it. thanks for all your work on this sit e cal. sorry for any mistakes or typos, its hard to type long replies on my phone.
Thanks for the encouragement, Seth.
I hear you on how hard it is to find place to shoot long. That’s true for most places in the world, but not in West Texas! We got plenty of open land, and plenty of wind too!
And I agree, factory rifles are getting better every year. Machining tolerances are tightening for everyone. It’s a world of difference from just 10-20 years ago! A factory rifle is a good option for most shooters … You don’t “need” a custom build to get into this. It’s like a Schmidt & Bender scope, nobody “needs” one … but they’re pretty sweet at the same time!
Thanks,
Cal
Every sport has its entry level threshold. Cowboy, or other start at 5000$ and go up from basics. You can add to basics or start out full Bore. play with the big boys…have a fat wallet. Be wise in what you buy.
Cal, I think you are doing one heck of a job. I think your site is one of the better ones out there that I have come across. Don’t let people like Charley get to you. Those of us who actually get out and shoot appreciate what you are doing. I was wondering if you have had any experience with the gunwerks BR2 rangefinder? It seems to have some nice features to it, but it’s not that much less than some of the other models that have good scores based on your test results. Thanks in advance! Keep up the good work!
Thanks, Brent. I appreciate the encouragement. Anytime you do something significant, you can expect some criticism, but I do appreciate the kind words.
I haven’t tried the Gunwerks BR2 rangefinder, but lots of guys have asked me about it. It looks legit. And I don’t watch many long-range shooting shows on TV, because most are painful for me watch. But I do watch Gunwerk’s … and those guys know what they’re doing! I like to think if I started a rifle company, I’d have done a lot of the same things they did. They really have a very well-rounded and well-informed approach. While I don’t know any of those guys over there, they’ve honestly been one of the impressive firearms companies to me (at least watching from a distance). I’d be shocked if they put their name on something that wasn’t a great product. But unfortunately, I don’t have personal experience with it. If I ever test another batch of rangefinders, that will definitely be one of them. I’ve got more questions about it than all the rest of the rangefinders combined. Lots of long-range shooters seem to be considering it.
Thanks,
Cal
Cal, can I borrow those Vector 23’s for a week or two?
Ha! I wish I still had them. They were definitely loaners that I had to send back to Vectronix. I can’t afford those things. But they are magical!
Thanks,
Cal